About 71% of earth is covered with water, but sadly only 2.5% of it is drinking water. With rise in population, pollution and climate change, it is expected that by as soon as 2025 we will experience perennial water shortages. At one hand there are already minor disputes among nations and states for sharing river water on the other hand we as humans waste a lot of drinking water due to our negligence.
It might not appear big at the first time, but if your tap dripped a drop of water once every second it would take only about five hours for you to waste one gallon of water, that is enough water for an average human to survive for two days. So what can be done to stop this? As always the answer, for this, lies with improvement in technology. If we replace all the manual taps with a smart one that opens and closes on its own automatically not only we can save water but also have a healthier lifestyle since we don’t have to operate the tap with our dirty hands. So in this project we will build a Automatic Water Dispenser using Arduino and a Solenoid valve that can automatically give you water when a glass is placed near it. Sounds cool right! So let’s build one...
Materials Required
- Solenoid Valve
- Arduino Uno (any version)
- HCSR04 – Ultrasonic Sensor
- IRF540 MOSFET
- 1k and 10k Resistor
- Breadboard
- Connecting Wires
Working Concept
The Concept behind the Automatic Water Dispenser is very simple. We will use a HCSR04 Ultrasonic Sensor to check if any object such that the glass is placed before the dispenser. A solenoid valve will be used to control the flow of water, which is when energised the water will flow out and when de-energised the water will be stopped. So we will write an Arduino program which always checks if any object is placed near the tap, if yes then the solenoid will be turned on and wait till the object is removed, once the object is removed the solenoid will turn off automatically thus closing the supply of water. Learn more about using Ultrasonic sensor with Arduino here.
Circuit Diagram
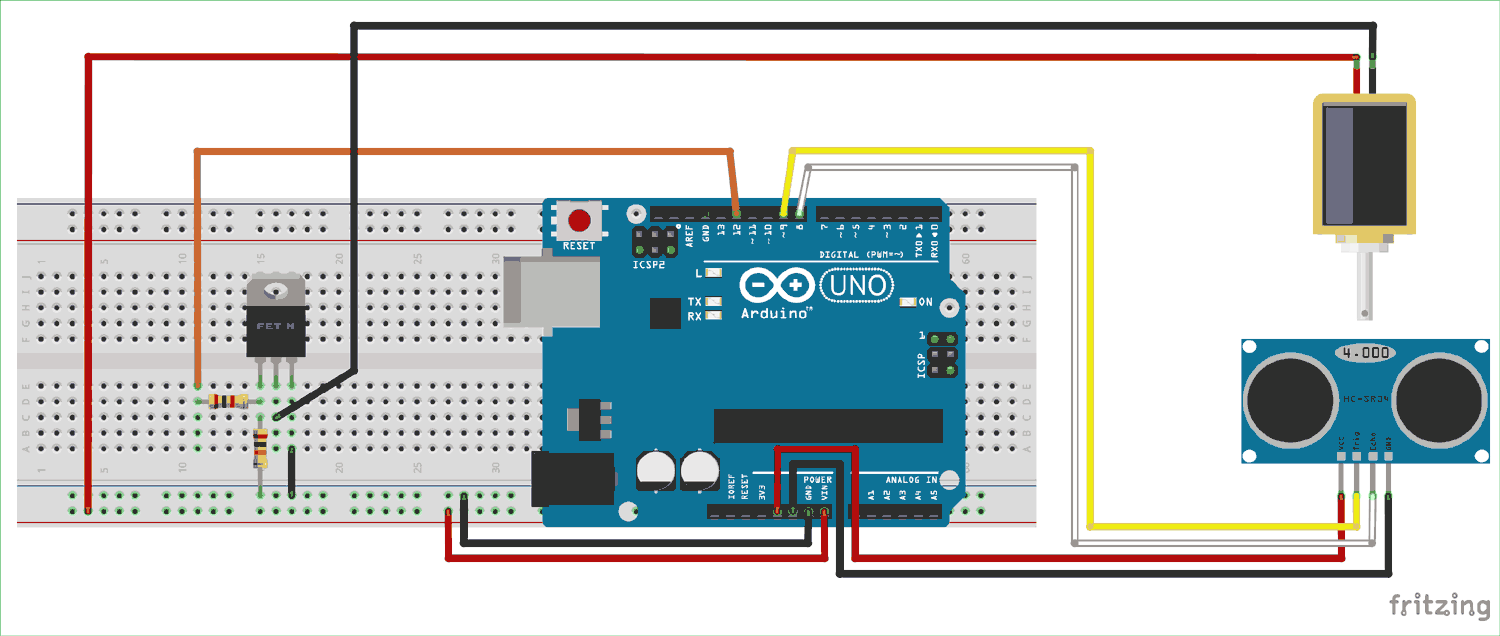
The complete circuit diagram for Arduino based water Dispenser is shown below
The solenoid valve used in this project is a 12V valve with a maximum current rating of 1.2A and a continuous current rating of 700mA. That is when the Valve is turned on it will consume about 700mA to keep the valve turned on. As we know an Arduino is a Development board which operates with 5V and hence we need a switching driver circuit for the Solenoid to turn it on and off.
The switching device used in this project is the IRF540N N-Channel MOSFET. It has the 3 pins Gate, Source and Drain from pin 1 respectively. As shown in the circuit diagram the positive terminal of the solenoid is powered with the Vin pin of the Arduino. Because we will use a 12V adapter to power the Arduino and thus the Vin pin will output 12V which can be used to control the Solenoid. The negative terminal of the solenoid is connected to the ground through the MOSFET’s Source and Drain pins. So the solenoid will be powered only if the MOSFET is turned on.
The gate pin of the MOSFET is used to turn it on or off. It will remain off if the gate pin is grounded and will turn on if a gate voltage is applied. To keep the MOSFET turned off when no voltage is applied to gate pin, the gate pin is pulled to ground though a 10k resistor. The Arduino pin 12 is used to turn on or off the MOSFET, so the D12 pin is connected to the gate pin through a 1K resistor. This 1K resistor is used for current limiting purpose.
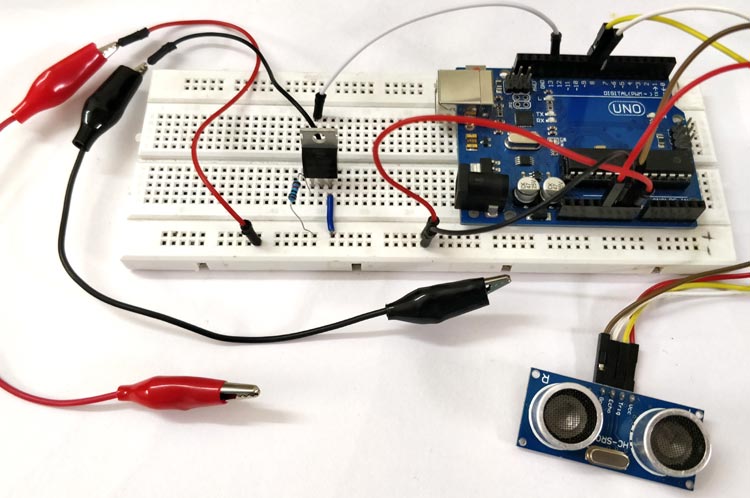
The Ultrasonic Sensor is powered by the +5V and ground pins of the Arduino. The Echo and Trigger pin is connected to the pin 8 and pin 9 respectively. We can then program the Arduino to use the Ultrasonic sensor to measure the distance and turn on the MOSFET when an object is detect. The whole circuit is simple and hence can be easily build on top of a breadboard. Mine looked something like this below after making the connections.

Programming the Arduino Board
For this project we have to write a program which uses the HCSR-04 Ultrasonic sensor to measure the distance of the object in front of it. When the distance is less than 10cm we have to turn on the MOSFET and else we have to turn off the MOSFET. We will also use the on board LED connected to pin 13 and toggle it along with the MOSFET so that we can ensure if the MOSFET is in turned on or off state. The complete program to do the same is given at the end of this page. Just below I have explained the program by breaking it into small meaningful snippets.
The program starts with macros definition. We have the trigger and echo pin for the Ultrasonic sensor and the MOSFET gate pin and LED as the I/O for our Arduino. So we have defined to which pin these will be connected to. In our hardware we have connected the Echo and Trigger pin to 8 and 9th digital pin respectively. Then the MOSFET pin is connected to pin 12 and the onboard LED by default is connected to pin 13. We define the same using the following lines
#define trigger 9
#define echo 8
#define LED 13
#define MOSFET 12
Inside the setup function we declare which pins are input and which are output. In our hardware only the Echo pin of Ultrasonic(US) sensor is the input pin and rest all are output pins. So we use the pinMode function of Arduino to specify the same as shown below
pinMode(trigger,OUTPUT);
 pinMode(echo,INPUT);
 pinMode(LED,OUTPUT);
 pinMode(MOSFET,OUTPUT);
Inside the main loop function we call for the function called measure_distance(). This function uses the US sensor to measure the distance of the object in front of it and updates the value to the variable ‘distance’. To measure distance using US sensor the trigger pin must first be held low for two micro seconds and then held high for ten microseconds and again held low for two micro seconds. This will send a sonic blast of Ultrasonic signals into the air which will get reflected by the object in front of it and the echo pin will pick up the signals reflected by it. Then we use the time taken value to calculate distance of the object ahead of the sensor. If you want to know more on how to interface HC-SR04 Ultrasonic sensor with Arduino, read though the link. The program to calculate the distance is give below
digitalWrite(trigger,LOW);
 delayMicroseconds(2);
 digitalWrite(trigger,HIGH);
 delayMicroseconds(10);
 digitalWrite(trigger,LOW);
 delayMicroseconds(2);
 time=pulseIn(echo,HIGH);
 distance=time*340/20000;
Once the distance is calculated, we have to compare the value of distance using a simple if statement and if the value is less than 10cm we make the MOSFET and LED to go high, in the following else statement we make the MOSFET and LED to go low. The program to do the same is shown below.
if(distance<10)
 {
   digitalWrite(LED,HIGH);digitalWrite(MOSFET,HIGH);
 }
 else
 {
   digitalWrite(LED,LOW);digitalWrite(MOSFET,LOW);
 }
Working of Automatic Water Dispenser
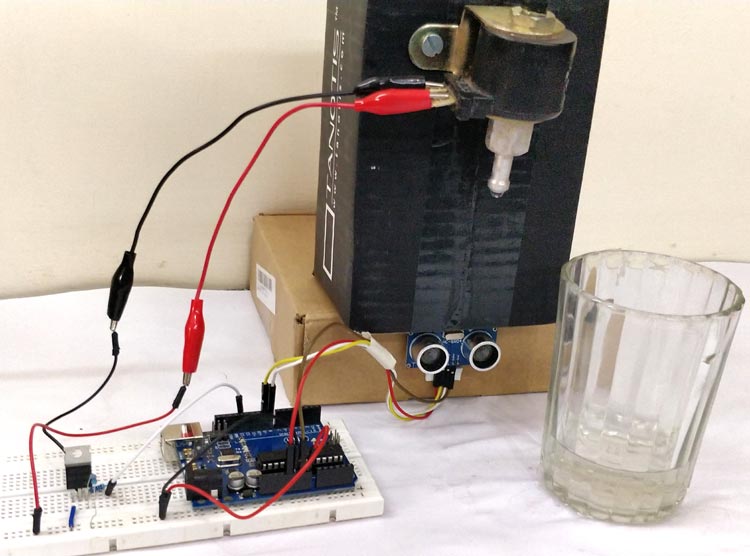
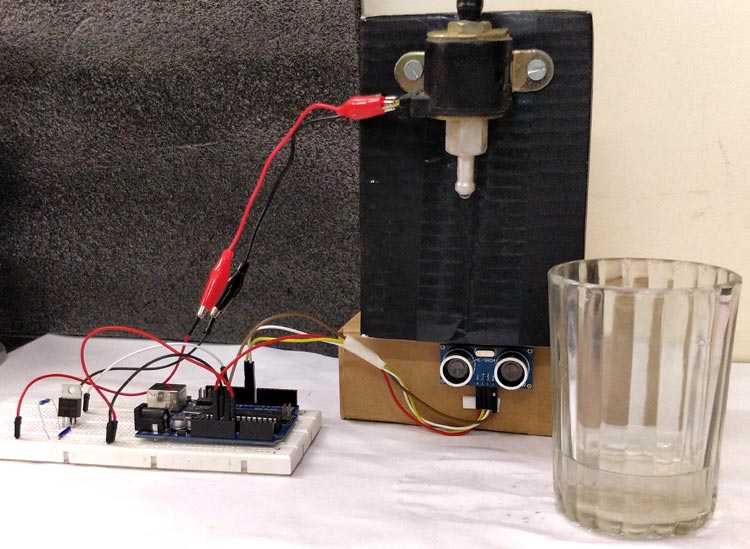
Make the connections as shown in the circuit and upload the below given program into your Arduino board. Make some simple arrangement to connect the solenoid valve to the water inlet and power up the circuit using the 12V adapter to the DC jack of Arduino board. Make sure the on board LED is turned off, this ensures that the Solenoid is also off. The set-up that I have made to demonstrate the project is shown below

As you can see I have placed the Ultrasonic sensor directly below the solenoid valve such that when the glass/tumbler is placed below the solenoid it gets directly opposite to the ultrasonic sensor. This object will be sensed by the ultrasonic sensor and the MOSFET along with the LED will turn ON thus making the solenoid to open and the water flows down.
Similarly when the glass is removed the ultrasonic sensor tells to the Arduino there is no glass in front of it and thus the Arduino closes the valve. The complete working of the project can be found in the video below. If you have any doubt in getting this to work, post it in the comment section or use the forum for technical help.
Warning: Different Solenoid vales have different operating voltage and current rating, make sure your solenoid operates on 12V and consumes not more than 1.5A maximum.
Complete Project Code
#define trigger 9
#define echo 8
#define LED 13
#define MOSFET 12
float time=0,distance=0;
void setup()
{
Serial.begin(9600);
 pinMode(trigger,OUTPUT);
 pinMode(echo,INPUT);
 pinMode(LED,OUTPUT);
 pinMode(MOSFET,OUTPUT);
 delay(2000);
}
void loop()
{
 measure_distance();
 if(distance<10)
 {
   digitalWrite(LED,HIGH);digitalWrite(MOSFET,HIGH);
 }
 else
 {
   digitalWrite(LED,LOW);digitalWrite(MOSFET,LOW);
 }
 delay(500);
}
void measure_distance()
{
 digitalWrite(trigger,LOW);
 delayMicroseconds(2);
 digitalWrite(trigger,HIGH);
 delayMicroseconds(10);
 digitalWrite(trigger,LOW);
 delayMicroseconds(2);
 time=pulseIn(echo,HIGH);
 distance=time*340/20000;
}
Comments
water loss
a bit, but if this is over a sink or drain, not much is lost. I like this for hand washing. combine it with temperature mixing so you get a preset temperature.
This is very nice project. I
This is very nice project. I see your project code but i didn't found code for automatic turn off. How its happened (automatic turn off)???
auto turn off
if the glass is removed the turn off is triggered:
if(distance<10)
{
digitalWrite(LED,HIGH);digitalWrite(MOSFET,HIGH);
}
else
{
digitalWrite(LED,LOW);digitalWrite(MOSFET,LOW);
}
what action is perform when
what action is perform when the object occur in front where it is rewritten in the code??????
about this project
is it possible for the arms to be used instead of a glass?
lets say i am from the toilet and dont wish to dirt my hands again, so i just put my hands to wash and after i just leave.
how much expense of this project
how much expense of this project
where we can buy this component
Total expense should be less
Total expense should be less than 25$. You can get the components in your local hardware store
i badly want to know the kind
i badly want to know the kind of solenoid valve you used, its name, brand, and place of purchase, i am confused to what solenoid valve I'm gonna use. please help. is this valve applicable when the water has pressure? i really need the answer ASAP pleeeeeeaaaaasssse
You can use any common 12V
You can use any common 12V solenoid. Yes these bigger solenoid should with stand the normal household pressure
how to get rid off delay
Hi! I am trying to make this project. Is there any way to get rid off the delay and if there is can u give me the code
Can you name a sensor which
Can you name a sensor which can detect the glass, so that the water stop automatically
They said water pump is more
They said water pump is more convinient on just using solenoid ?
Code Error
Thanks for this guide! I followed all the steps so far, but when I tried to program the Arduino, the code gave me an error of "exit status 1, expected constructor, destructor, or type conversion before '(' token". How can I fix this?
Actually, it looks like there
Actually, it looks like there are more errors than that. Any chance someone could send me a working .txt file of the code?
Project Circuit Diagram
Please send me Circuit diagram for this Project, in hand drawing. Thank you
why is that distance is
why is that distance is divided by 20000? ...usually we divide by 2
related program of the project
what are the software requirements of this project
the code is not working please help
Please help me am working on the same project and it is not working even the ultrasonic sensors are not detecting please help
Troubleshooting
My class is currently working this project, but for some reason, our arduinos are getting burnt out when we connect power, does anyone no why this could be happening? and if so, how to fix it
Hallo james, I'm doing this
Hallo james, I'm doing this for my final year project.. would you mind sharing with me the full code you guys are using.. thanks
want to make this project.i
want to make this project.i bought solenoid valve with 12V & 0.5 AMP .will it work ? if yes please mention suitable dc adaptor for powering solenoid ?
what pump should i use insted
what pump should i use insted of solenoid for ling lasting?
How to actually make product?
Pls. guide how to burn these codes to Atmega8A-PU controller & also use this Chip actually in PCB. Will we need to use Crystal & tact switch with Atmega8A in PCB?


It's a wonderful, clever project. But I was thinking that when we remove the glass, it'll take some time for this signal to close the solenoid valve. Thereby, throwing out some water when glass is removed. Wouldn't it?