In this project, we are going to build an audio bug using Arduino and NRF24L01. This audio spy bug is highly customizable and can be easily integrated with other devices and systems. The NRF24L01 module allows transmission over specific channel, ensuring that our transmissions remain private up to a level. This device is perfect for monitoring a baby room, keeping an eye on a pet, or even for professional surveillance. With its small size and easy portability, this audio spy bug is a must-have for anyone in need of discreet and reliable audio recording. The transmitter circuit is battery powered and has the battery protection built in. The small size of the project makes it very versatile and useful. Regardless of the small size it provides reasonable sound quality as well as transmission range. In this circuit, Arduino RF transmitter has the microphone to take the audio input, and at the other part it has Arduino RF Receiver which will receive the audio from transmitter and output it using Speaker.
How Does the Arduino Audio Spy Bug Work?
The working of the Arduino Audio Spy Bug is fairly simple. We have used a condenser microphone to pick up the sounds. The picked-up sounds then amplified using a preamplifier built around an operational amplifier. This amplified signal is then samples using the built in ADC of the Arduino. Once the data is samples and converted to digital format, that data is then transmitted using the NRF24L01 module in real time. On the receiver side the received data is then processed and a corresponding PWM signal is generated at the Arduino GPIOs. This PWM signals are then fed to a speaker to reproduce the audio. We have previously explained PWM in detail and built basic Arduino PWM project.
Components Required to Build the Arduino Audio Spy Bug
All the parts you will require to build the Arduino Audio RF Transmitter and Receiver are listed below.
- Arduino Nano – 1
- Arduino Pro mini – 1
- NRF24L01 module – 2
- TP4056 module with protection – 1
- Small Speaker - 1
- LM358 – 1
- Common PCB
- Resistors, capacitors
- Other components
- Wires
- Connectors and pin headers
- Other necessary tools
Arduino Audio Spy Bug Circuit Diagram
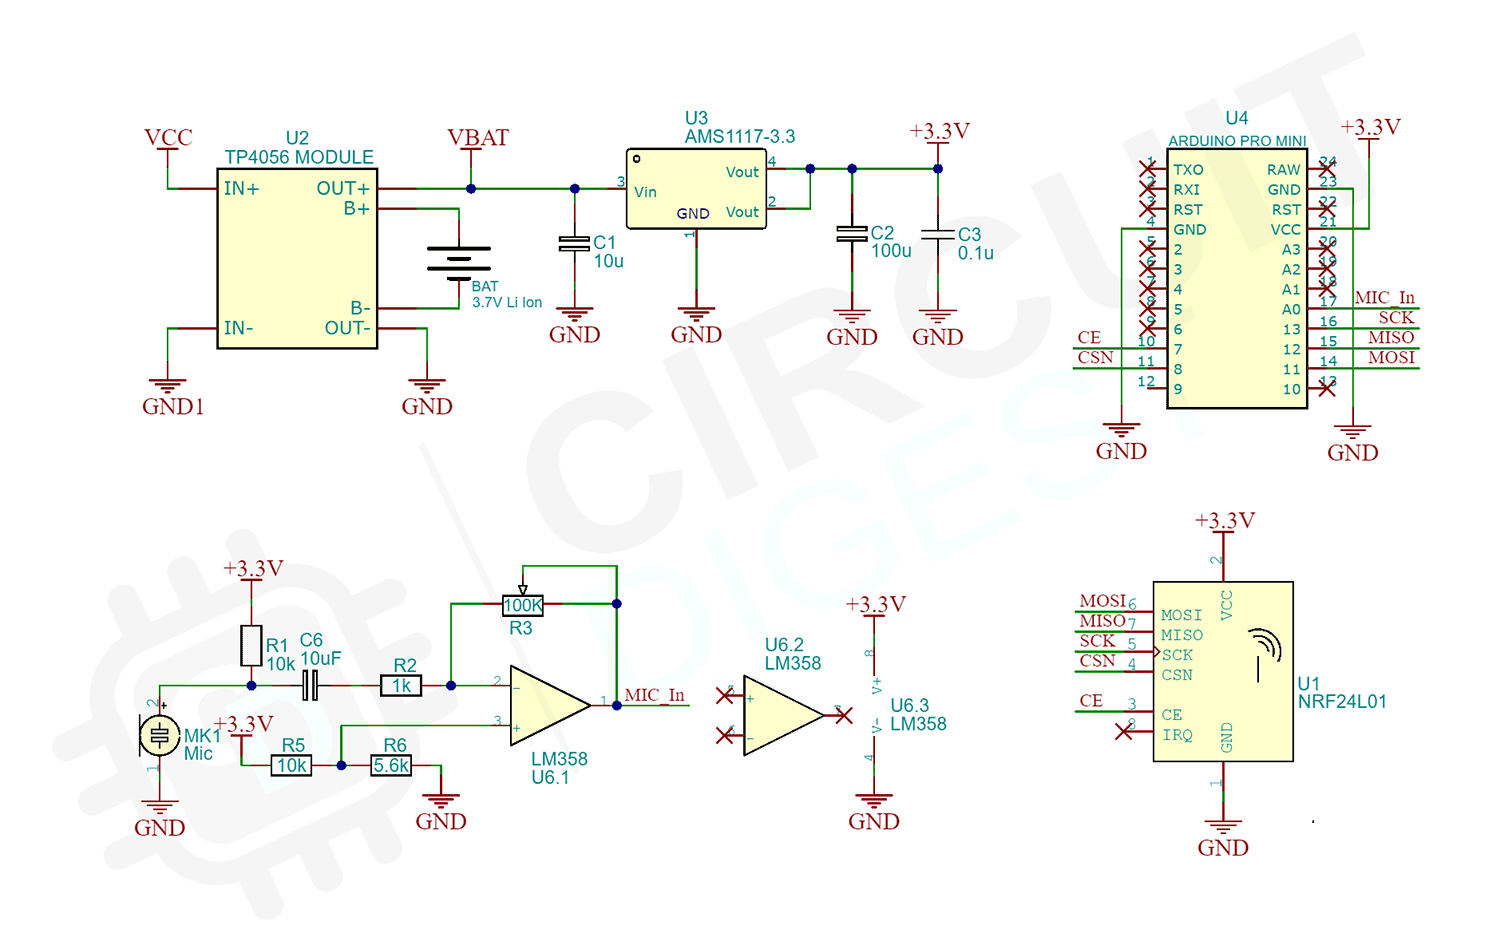
The complete circuit diagram for the Arduino Audio Spy Bug transmitter is shown below.
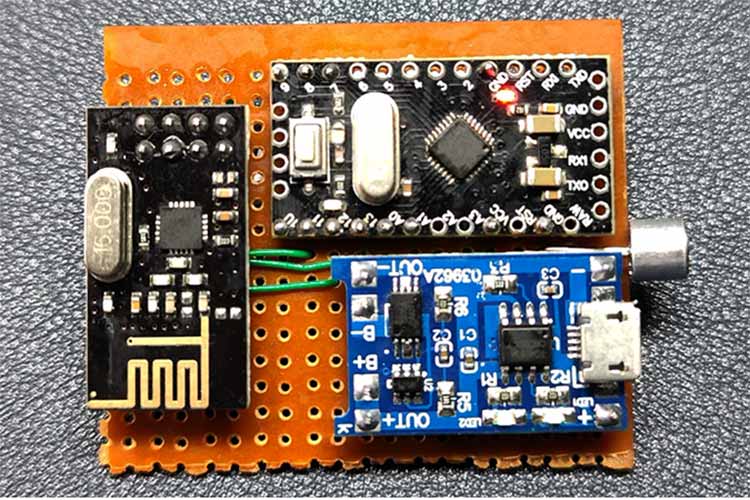
The circuit is built around an Arduino pro mini. I choose this because of its small size. You may also use other Arduino boards like Arduino Nano. The battery is connected to the TP4056 module, This module is responsible for charging and protecting the Li ion cell. The output of the module is then connected to a 3.3V voltage regulator. The entire circuit is powered by the 3.3V output from this regulator. The microphone is connected to the input of the preamplifier built around LM358 op amp. The preamplifier will amplify the weak signal from the microphone to an appropriate level. The output of the preamplifier is connected to the ADC0 pin of the Arduino. The NRF24L01 module is connected to the SPI pins of the Arduino. THE CE and CSN pins are connected to the digital pins D7 and D8 of Arduino.
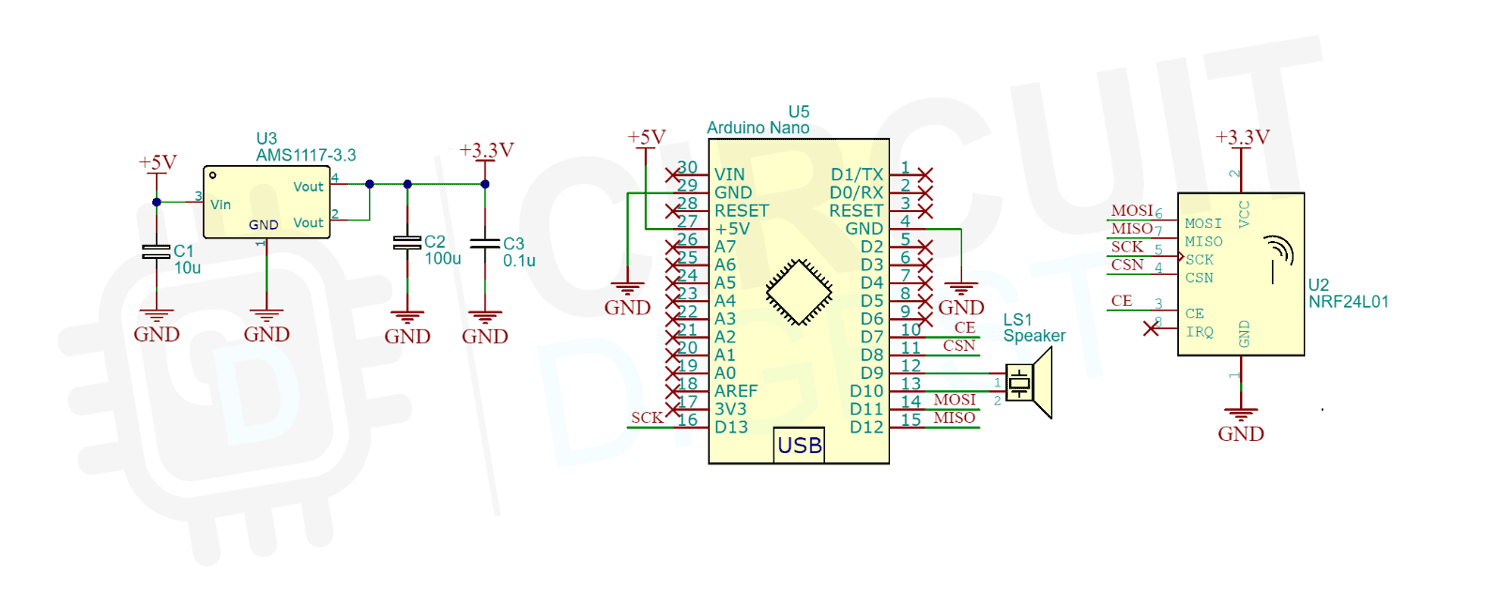
The below image shows the circuit diagram for the Arduino audio transmitter using nRF24L01.
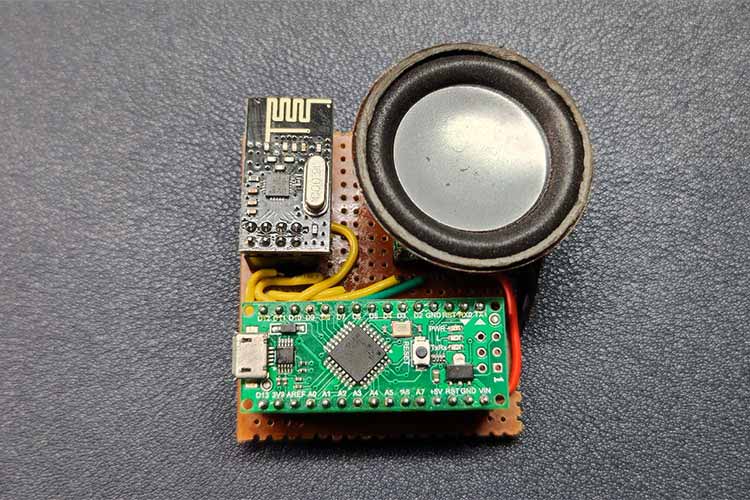
Here I have used an Arduino Nano, since it is much easier to use and the small size difference doesn’t matter. The Arduino is powered by the onboard USB port. The 5V pi of the Arduino Nano is connected to the voltage regulator. The 3.3V output form the AMS1117-3.3 is used to power the NRF24L01. The connections to the NRF module are same as the transmitter. The speaker is then connected to the digital pins D9 and D10.
We previously interfaced nRF24L01 with Arduino and setup communication between Arduino and Raspberry Pi using nRF24L01.
Arduino Code for the Audio Spy Bug Transmitter
As a first step make sure to install the RF24 and RF24Audio libraries from the library manager. Or you can install it manually by downloading from the GitHub link at the bottom of this article.
#include <SPI.h>
#include <RF24Audio.h>
#include <RF24.h>
#include "printf.h"
RF24 radio(7,8);
RF24Audio rfAudio(radio,0);
void setup() {
  radio.begin();
  radio.setPALevel(RF24_PA_MAX);
  radio.setChannel(10);
  radio.setDataRate(RF24_250KBPS);
  rfAudio.begin();
  rfAudio.transmit();
}
void loop() {}
The code uses the RF24Audio library. First, we have included all the necessary header file using #include. After that we have created two instances for RF24 and RF24Audio libraries. In the setup function we have initialized the RF24 library using the radio.beign function. setPALevel function is used to set the maximum transmit power of the NRF24L01 module. The setChannel function is used for setting the private channel and the setDataRate function is used to set the transmission data rate. After that we have initialized the RF24Aduio library. Latter we enabled the audio stream by calling the function rfAudio.transmit.
Arduino Code for the Audio Spy Bug Receiver
As a first step make sure to install the RF24 and RF24Audio libraries from the library manager. Or you can install it manually by downloading from the GitHub link at the bottom of this article.
#include <SPI.h>
#include <RF24Audio.h>
#include <RF24.h>
#include "printf.h"
RF24 radio(7,8);
RF24Audio rfAudio(radio,0);
void setup() {
  radio.begin();
  radio.setChannel(10);
  radio.setDataRate(RF24_250KBPS);
  rfAudio.begin();
  rfAudio.setVolume(7);
  rfAudio. receive();
}
void loop() {}
The code uses the RF24Audio library. First, we have included all the necessary header file using #include. After that we have created two instances for RF24 and RF24Audio libraries. In the setup function we have initialized the RF24 library using the radio.beign function. The setChannel function is used for setting the private channel and the setDataRate function is used to set the transmission data rate. After that we have initialized the RF24Aduio library. The setVolume function is used to set the output volume level. It supports from 1-7. Latter we enabled the audio stream by calling the function rfAudio.receive.
How to improve coverage and audio quality?
You can increase the coverage either by reducing the data rate or by using the NRF module with PA and LNA. Keep in mind that reducing data rate will affect the audio quality. To get better sound quality you must increase the data rate.
You can download all the necessary files from the Circuit Digest GitHub repo, from the following link.
Complete Project Code
// Transmitter
#include <SPI.h>
#include <RF24Audio.h>
#include <RF24.h>
#include "printf.h"
RF24 radio(7,8);
RF24Audio rfAudio(radio,0);
void setup() {
  radio.begin();
  radio.setPALevel(RF24_PA_MAX);
  radio.setChannel(10);
  radio.setDataRate(RF24_250KBPS);
  rfAudio.begin();
  rfAudio.transmit();
}
void loop() {}
// Receiver
#include <SPI.h>
#include <RF24Audio.h>
#include <RF24.h>
#include "printf.h"
RF24 radio(7,8);
RF24Audio rfAudio(radio,0);
void setup() {
  radio.begin();
  radio.setChannel(10);
  radio.setDataRate(RF24_250KBPS);
  rfAudio.begin();
  rfAudio.setVolume(7);
  rfAudio. receive();
}
void loop() {}
