Focused on versatility and modularity, the LiteWing drone can be programmed and controlled using different platforms. When you purchase a LiteWing drone, it gets shipped with a default firmware that supports crazyflie. Meaning out of the box, your drone is ready to fly using the ESP-Drone mobile application and it also supports cfclient and cflib packages from crazyfile. If you have no idea what cfclient is, it is basically a software that allows you to visualize and fly your LiteWing drone from your computer. You can check our article on cfclient with LiteWing to understand more.
In this article we will focus only on Cflib, which is a python SDK from crazyflie that allows you to write your own python code to control your LiteWing drone. If you are not a fan of python programming you can also program your LiteWing using Arduino and directly reflash your ESP32, but that is for a different tutorial. For now, let’s focus how to control your LiteWing drone using a python.
Pre-requisites
Before we get started it is highly recommend that you check out our LiteWing WiKi Documentation and have learnt the basics. Make sure you are using the right battery with your LiteWing Drone and you are able to fly it using the ESP-Drone mobile application without any problem.
Crazyflie cflib Python SDK for Litewing
The crazyflie cflib is an open source API written in python and developed by crazyflie, this library allows out to communicate with LitWing Drone using UDP protocol, meaning we can connect to the drone from our laptop using Wifi and then send commands from our code to control the drone. While there a lot of things you can program your LiteWing to do, this tutorial will cover the basics like how to install this package and write a simple code that will connect to LiteWing drone spin up the motors and then land back. We have also tested this cflib to support height hold and position control using joystick but we will post them as separate tutorials later.
Installing Cflib Python package for LiteWing
Let’s start by installing cflib in your computer, we are using pycharm as our development IDE and would recommend the same. But you can use any IDE of your choice. Open a new project on PyCharm and get into the terminal to follow the below steps and install cflib
Step 1: Use the code below to clone into the repository.
git clone https://github.com/jobitjoseph/crazyflie-clients-python.git
cd crazyflie-clients-python
Step 2: Install dependencies, cfclient and cflib using the below line
pip3 install -e .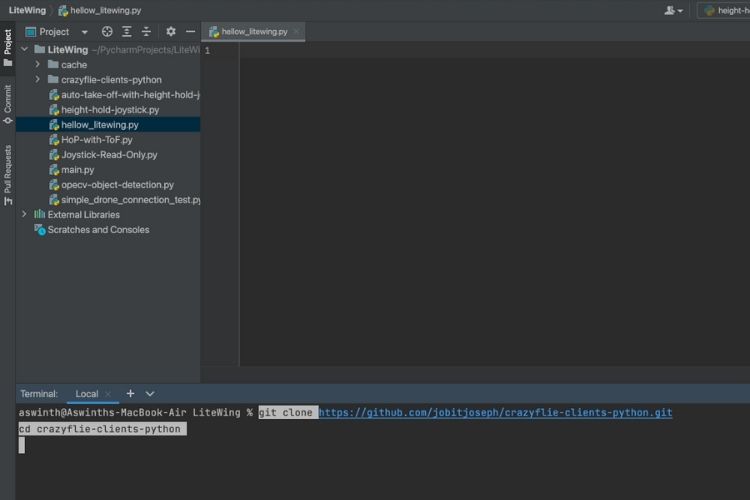
Hello LiteWing Python Code
Now that we have the cflib installed and ready let's write a simple python code that will help us connect to the drone and spin all four motors for 1 second at a very minimum speed. This simple code will help us understand the basics, we will build on top of this in upcoming tutorials. The complete hello LiteWing code can be found at the bottom of this page, but here in this section I will explain the different lines in code so that you can get better understanding.
We start by including the required libraries for our code as you can see below. The time library is used to provide delay and the crtp and crazyflie libraries are used to communicate with out drone as we will see more.
import time
import cflib.crtp
from cflib.crazyflie import Crazyflie
In the next line we have provided the URI code for our drone. URI stands for Uniform Resource Identifier, this code lets us identify the drone and the communication protocoal used to communicate with the drone. In our case it is “udp://192.168.43.42: where UDP is the communication protocol and 192.168.43.42 is the ID, this ID is hardcoded inside litewing firmware and will remain the same for all drones. It can be changed when working with swarm drones.
# URI for your LiteWing drone
DRONE_URI = "udp://192.168.43.42"
Note that cfclient also supports protocols other than UDP, you can also try UART, USB and BLE however we have not tested those yet.
Moving on we will initialize the drivers for CRTP using “cflib.crtp.init_drivers()” and create an instance for the Crazyflie object. Here CRTP stands for Crazy Real Time Protocol and it was developed by Crazyflie, we will be using this protocol to communicate with our drone using UDP
# Initialize CRTP drivers
cflib.crtp.init_drivers()
# Create Crazyflie instance
cf = Crazyflie()
Next we connect to the drone using our Drone URI, when we are establishing connection to the drone you will also be able to see the LINK led (blue) on the drone blinking.
# Connect to the drone
print("Connecting to drone...")
cf.open_link(DRONE_URI)
To control the drone we are going to use the send_setpoint option, you can read about it here in cflib documentation. Basically “send_setpoint(roll, pitch, yawrate, thrust)” can be used to set the position of the drone by giving it the value of roll, pitch yawrate and thrust. If you are not sure what roll, pitch and yawrate is please check out the documentation on basics of drone.
Before we start anything, we have to arm the drone to start controlling it, this is a safety feature programmed in the firmware so the motors do not spin by accident during development. To arm the drone we can use the send_setpoint command and send all the values as zero as shown below
# First send zero setpoint to unlock safety and arm drone
print("Sending zero setpoint to unlock safety...")
cf.commander.send_setpoint(0, 0, 0, 0)
time.sleep(0.1)
After the drone is armed, we are going to spin all four propellers for one seconds, again using the same send_setpoint command but giving a thrust value. The minimum thrust value for your drone is 10000 and the maximum is 60000, we are going to use 10000 so that the drone does not lift off.
# Flight parameters
roll = 0.0
pitch = 0.0
yaw = 0
thrust = 10000  # Thrust value is 10000 minimum and 60000 maximum
# Start motors
print("Starting motors at minimum speed...")
cf.commander.send_setpoint(roll, pitch, yaw, thrust)
time.sleep(1)
The roll pitch and yaw values are kept at zero, if you are feeling ambitious you can connect a joystick and change the value of roll and pitch to fly the drone. We will also be covering a separate tutorial for that.
# Stop the motors
print("Stopping motors...")
cf.commander.send_setpoint(0, 0, 0, 0)
time.sleep(0.1)
# Close the connection
cf.close_link()
After the motors have spin, we will stop the motors by sending zero again using the same send_setpoint command and also finally close the cf clink with our drone.
Testing Hello LiteWing Python Code
Before we test the code make sure you have connected to the wifi SSID of litewing from your laptop. Power on your LiteWing drone and search for a wifi network named something like "LightWing_F09E9E29511D", the password will be “12345678”

Now, hit on run button and you should be able to see the blades on your drone spin for 1 second before they turn off again. You can also notice the blue LED on the drone blinking as it receives UDP packets from your python code. The print statement should look like something below
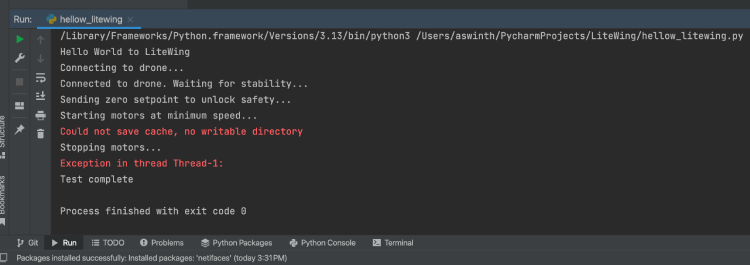
You can ignore the warnings on cache and Thread for now, you can also check out the video below which show how the code executes and how the drone responds.
What’s Next?
Now that you have learnt how to control your LiteWing drone using cflib and python code you can go ahead and explore the documentation of cflib to understand more commands and what more you can do. We have already test height hold and gesture control using cflib for LiteWing documentation for the same will be available soon. You can follow our LiteWing Python Tutorials where we will post more projects and tutorials.