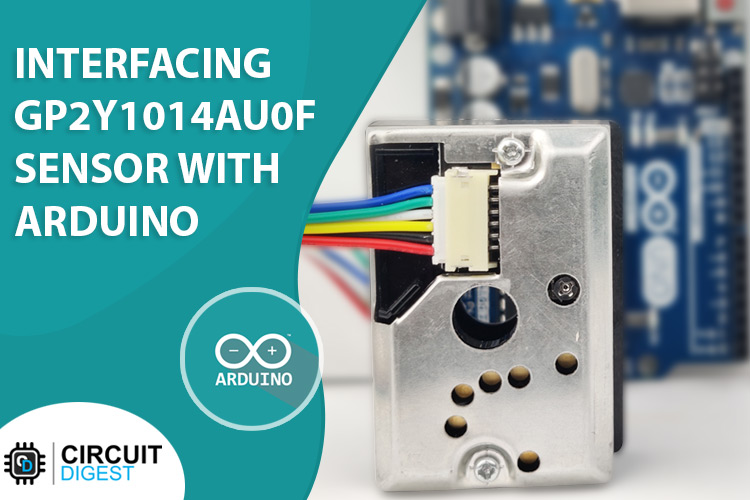
When we are talking about air pollution, dust and smoke are one of the many reasons for air pollution. Not only that, in recent years due to climate change, wildfires have become more frequent. A recent report from National Interagency Fire Center (NIFC) reported a total of 58,733 wildfires across the US that had burned more than 7.13 million acres in 2021 alone. That is why in this article we are going to Interface the GP2Y1014AU0F Dust Sensor with Arduino to add basic particle sensing to our project. But let's be real, this sensor is not as good as the nova SDS110 Sensor that can measure PM2.5 and PM10 in the air. However, for the price of only 5$ or approx 400Rs, it can't be beaten.
GP2Y1014AU0F Dust Sensor Pinout
The GP2Y1014AU0F Dust Sensor module has 6 pins; those are V-LED, LED-GND, LED, S-GND, VOUT, and VCC. The output of this sensor is analog and we need to connect this pin to the ADC of a microcontroller to measure the PM in the air. The Pinout of the GP2Y1014AU0F Dust Sensor is shown below:
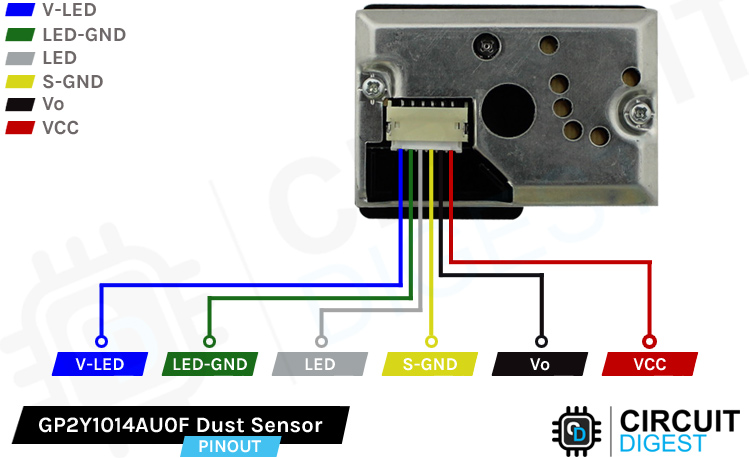
V-LED This is the VCC pin of the LED. Connect this pin to the 5V pin of the Arduino with a 150Ω Current Limiting Resistor.
LED-GND This is the Ground Pin of the LED. Connect this pin to the Ground pin of the Arduino.
LED This Pin can be used to Toggle the LED On/Off. Connect it to any digital pin of Arduino.
S-GND is the ground pin of the pulse Dust Sensor module and it should be connected to the ground pin of the Arduino.
Vout This is the output of the Dust Sensor Module, you can connect it to any analog pins of the Arduino.
VCC Power Pin of the Dust Sensor Module connects to 5V or 3.3V pin of the Arduino.
How Does a GP2Y1014AU0F Dust Sensor Module Work?
The working of the GP2Y1014AU0F Dust sensor is simple and easy to understand. Inside the sensor, there are three major parts, they are the light-emitting diode(light source), the photodiode(detector), and a pair of lenses. The LED and the Photodiode inside the sensor are so placed that the two optical axis cross the detection area in the sensor. When dust or smoke enters the detection area of the sensor, the light inside the sensor gets reflected from the dust or smoke, as a result, the current generated by the photodiode varies in accordance with the amount of the detected light. And by converting and amplifying the current value to voltage value with proper circuitry we get the desired output from our sensor.
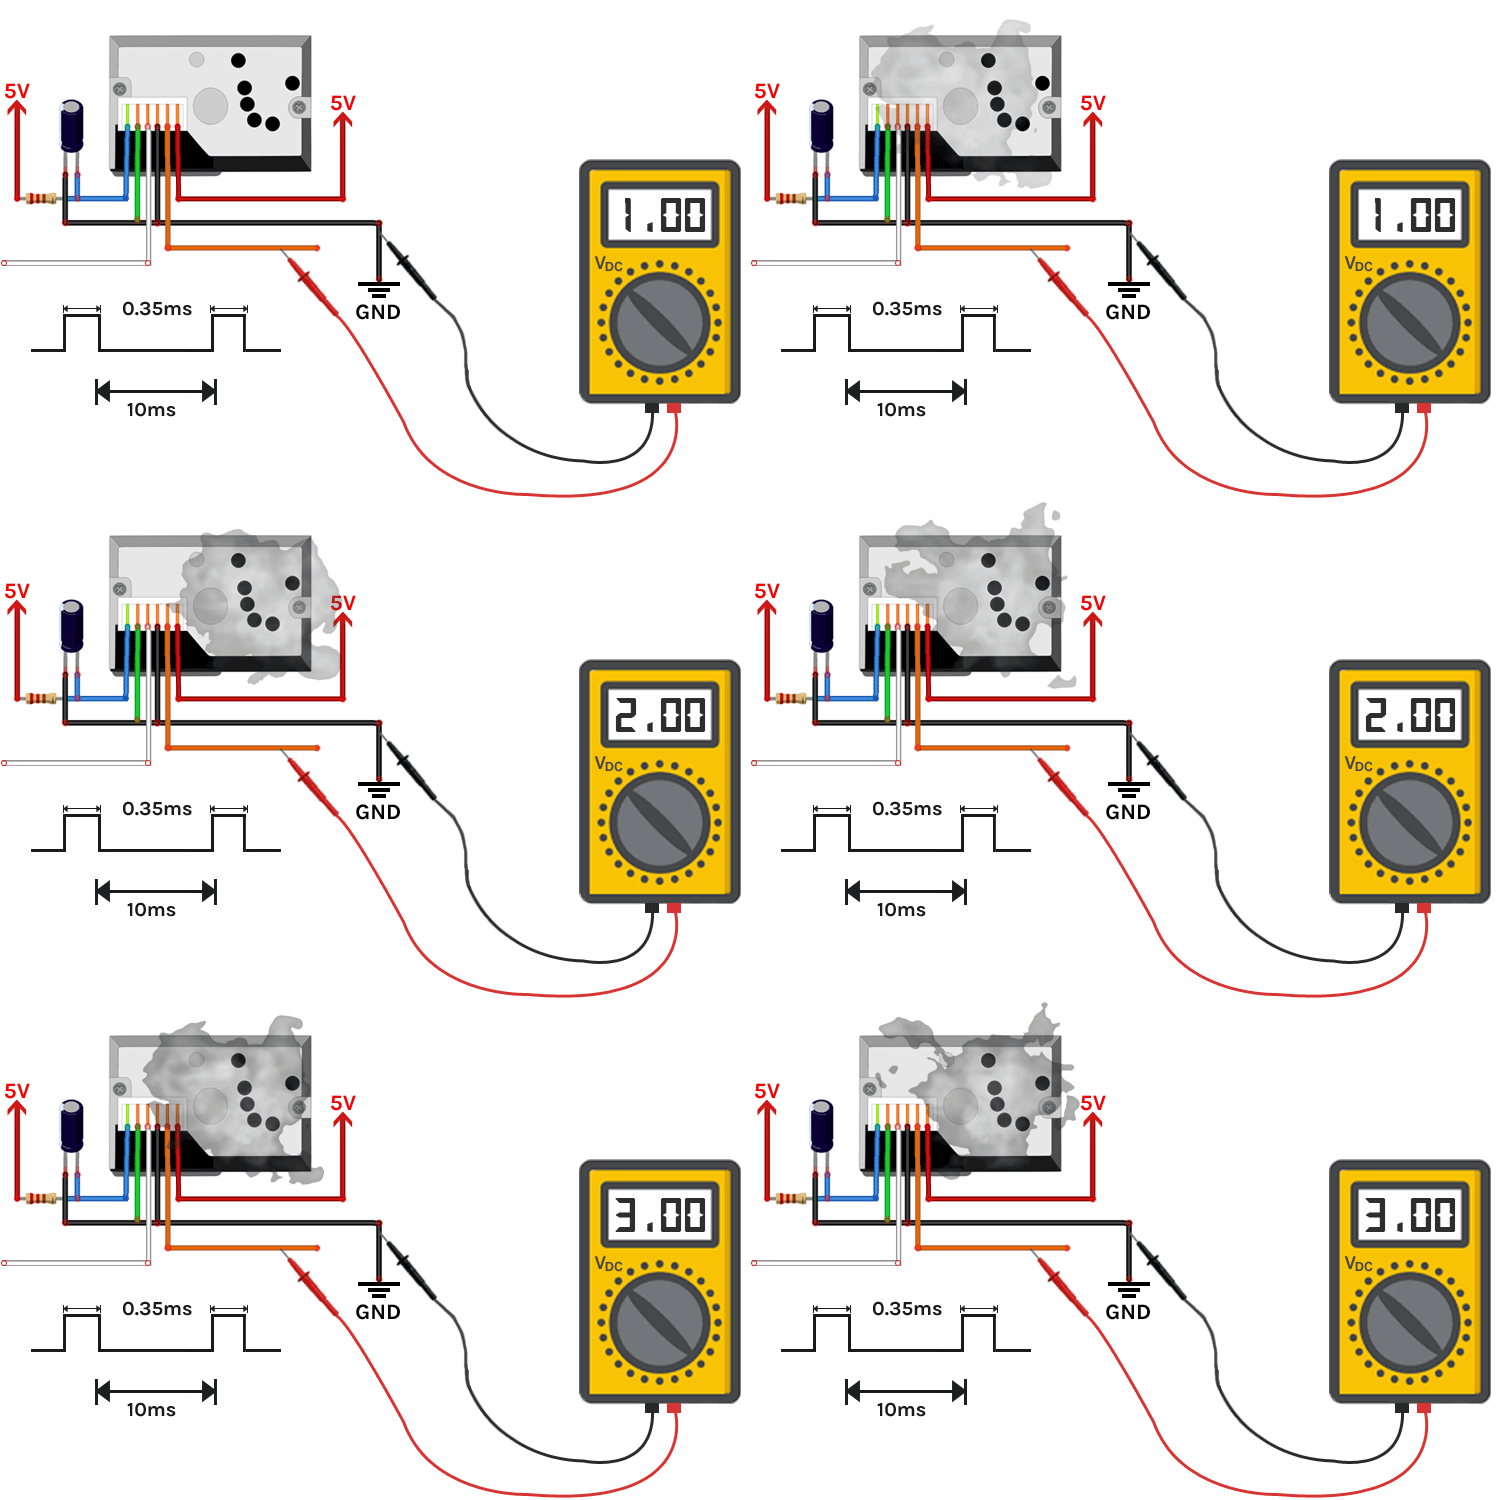
To work with the sensor you need only two pins out of all six pins. The first one triggers the LED and the second one puts out the analog signal from the sensor. Resistor, R1=150Ω, and capacitor, C1=220uF mentioned above are required for the pulse drive of the LED. Without the resistor and the capacitor, the module does not work. To get the desired data out of the sensor, you need to trigger the LED with a 10ms pulse in which the pulse width should be not more than 0.32ms. And as recommended by the datasheet, we should sample the signal after 0.28ms, after the trigger pulse is provided to the LED.
GP2Y1014AU0F Dust Sensor Module – Parts
The construction of the sensor makes it difficult to mark all the major components of the sensor in one image and that is why we have divided the parts marking of the GP2Y1014AU0F sensor into two.
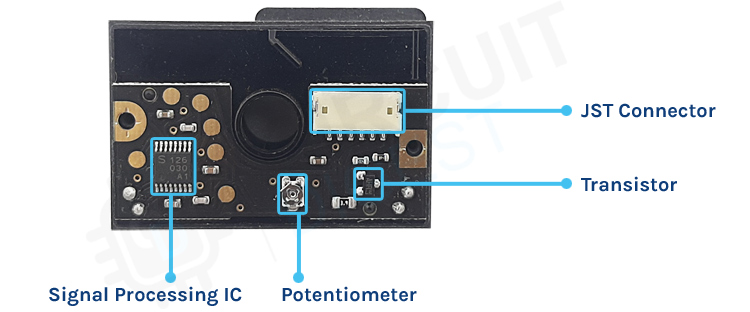
In the above image, you can see the PCB inside the sensor module when the front cover is open. The PCB has the main processor IC to process the data out of the photodiode, a potentiometer, and a transistor that drives the LED. Other than that, we have a JST connector for VCC, ground, and output data.
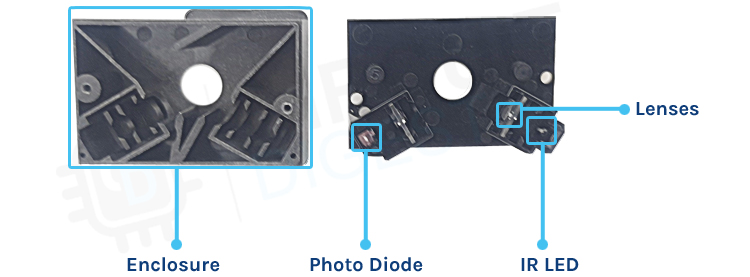
The above image shows how the sensor looks when you tear it down. On the left-hand side, we have the enclosure of the sensor module and on the right-hand side, we have the backside of the PCB. On the PCB you can see the LED and the photodiode attached and in front of both the LED and photodiode you can see the lenses that focus the light beam.
Commonly Asked Questions about Dust Sensor Module
What is the difference between a dust sensor and a PM2.5 sensor?
PM2.5 refers to particles that are 2.5 microns or smaller in diameter. This sensor uses laser scattering to radiate suspending particles in the air, then collects scattering light to obtain the curve of scattering light change with time. The dust sensor uses a photodiode to detect the dust.
What is the difference between an optical dust sensor and a laser dust sensor?
A laser dust sensor is a kind of sensor that uses laser technology to measure dust concentration. It consists of a fan, laser diode, receiver, and measuring circuit. But in an optical dust sensor, an infrared emitting diode and a phototransistor are diagonally arranged to allow it to detect the reflected light of dust in the air.
How do you test a dust sensor?
To test a dust sensor, you need to add in proper pulse driver circuitry that is recommended by the datasheet of the particular device that you are using and then you need to sample and calculate output data with your microprocessor or microcontroller.
Arduino GP2Y1014AU0F Dust Sensor Circuit Connection Diagram
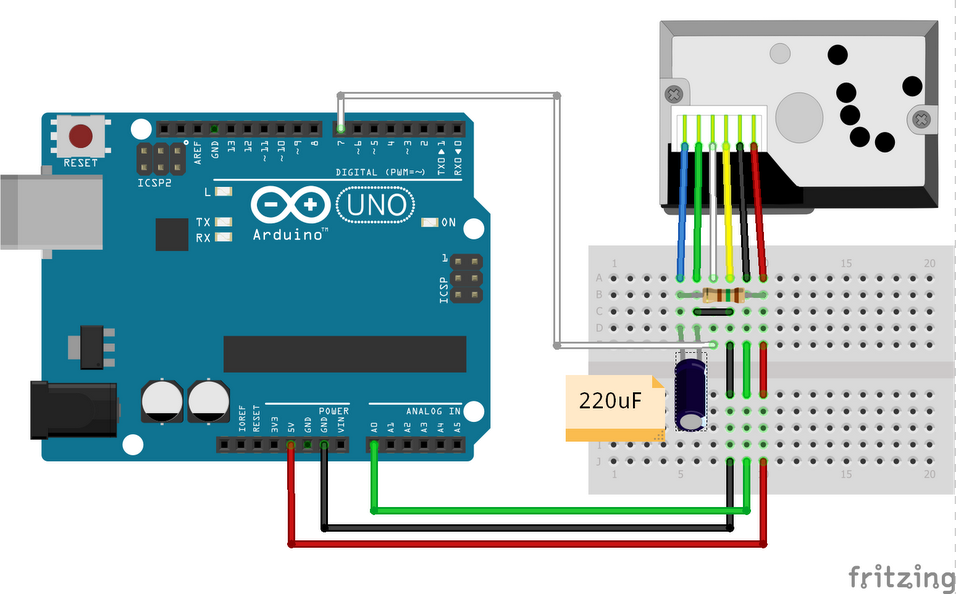
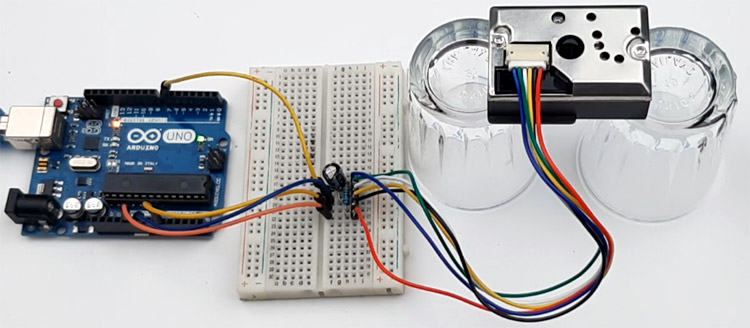
Now that we have a complete understanding of how a GP2Y1014AU0F Dust Sensor works, we can connect all the required wires to Arduino and then write our code to get the data out of the sensor module. The Connection Diagram of the GP2Y1014AU0F Dust Sensor with Arduino is given below.
Connecting the GP2Y1014AU0F Dust Sensor with Arduino is really simple and easy. As we know from the above discussion, this sensor gives out data by the varying voltage at the output pin. So we need to use the ADC of the Arduino to convert and compute the data to recognizable value. We also need to connect the LED enable pin of the sensor to one of the GPIO pins of the Arduino, it's the white wire that is connected to the D7 of the Arduino. Finally, we need a 150R resistor and a 220uF capacitor. The resistor and the capacitor make an RC timer circuit, in our case a pulse driver circuit that is absolutely mandatory for the stable operation of the device, and the values are recommended by the datasheet.
Arduino Code for Interfacing GP2Y1014AU0F Dust Sensor Module with Arduino
The Arduino code to process data from GP2Y1014AU0F Sensor is very simple and easy to understand. We just need to convert the analog voltage given by the sensor and convert it to digital data to get our result.
We start our code by defining the analog input pin of the device and we also define a digital pin that will be used to control the LED. Next, we have defined three variables that will hold the necessary timing values required to calculate the dust measured by the sensor. Next, we have three float variables that will hold the result generated by the sensor.
#define measurePin = 0; //Connect dust sensor to Arduino A0 pin
#define ledPower = 7;   //Connect 3 led driver pins of dust sensor to Arduino D2
int samplingTime = 280; // time required to sample signal coming out of the sensor
int deltaTime = 40; //
int sleepTime = 9680;
float voMeasured = 0;
float calcVoltage = 0;
float dustDensity = 0;
Next, we have our setup function. In the setup function, we enable the serial for debugging and we make the ledpin as output.
void setup(){
  Serial.begin(9600);
  pinMode(ledPower,OUTPUT);
}
Next, we have our loop function; in the loop function, we start the measurement process that is recommended by the datasheet. The total measurement process takes around 10ms but the sampling period is .28ms. First, we make the ledpin low that turns on the led and we use the delayMicroseconds() function to generate a 280 uS or 0.28mS delay that is recommended by the datasheet. Then we take our sample and add another delay of 40uS, this will ensure the pulse width remains at .32ms or 320us and we sleep for the rest of the 9680uS.
  digitalWrite(ledPower,LOW); // power on the LED
   (samplingTime);
  voMeasured = analogRead(measurePin); // read the dust value
  delayMicroseconds(deltaTime);
  digitalWrite(ledPower,HIGH); // turn the LED off
  delayMicroseconds(sleepTime);
Next, we calculate the voltage value from the ADC value. Please make sure that your Arduino is powered with a proper +5V supply and not powered with USB if so, you will get errors in your result.
calcVoltage = voMeasured * (5.0 / 1024.0);
Finally, we calculate the amount of suspended dust particles by using the linear equation provided by Chris Nafis; the unit is in ug/m3, and print the result in the serial monitor window.
dustDensity = 170 * calcVoltage - 0.1;
Serial.println(dustDensity);
delay(1000);
This is the end of our code section. We can move to the next section of this article.
Working of the GP2Y1014AU0F Dust Sensor Module
The gif below shows the hardware circuitry of the GP2Y1014AU0F Dust sensor with Arduino in action. On the left-hand side, we have placed the Arduino with the GP2Y1014AU0F sensor connected to the ADC pin of the Arduino and on the right-hand side we have the serial monitor window, and as you can see, when we place an incense close to the sensor, it detects the smoke and the values of the sensor goes up gradually.
Troubleshooting GP2Y1014AU0F Dust Sensor
- The sensor output is quite sensitive to the accurate timing of the ledPower pulse, and it needs a few cycles to settle. The Arduino code ignores the time that analogread() takes to run and includes serial print in the loop so it will be nowhere near what the spec sheet says it should be. That is why for highly sensitive applications a Flash ADC is recommended.
- First, check the power supply pin of the sensor, this sensor only works in the +5V range more or less than this voltage will render this device unusable.
- Check if the 150R resistor and the 220uF capacitor are connected properly with the sensor as per the datasheet of the device this sensor will not work without this capacitor and resistor.
- If you are having trouble reading the datasheet of the GP2Y1014AU0F Dust Sensor you can check out the application note of the device for a better understanding.
Projects using Arduino and GP2Y1014AU0F Dust Sensor Module
If you are searching through the internet for interesting IoT based projects, this project can be for you because in this project we have interfaced a Nova SDS011 PM Sensor and some gas sensors to build yourself a IoT enabled Air quality monitoring system.
In one of our previous projects, we have interfaced this GP2Y1014AU0F dust sensor with Arduino to build a simple air quality analyzer. If you are searching for a quick and easy tutorial on the GP2Y1014AU0F sensor this project is for you.
In this project of ours, we have interfaced the popular SDS0011 sensor with an Arduino to build a simple air quality monitoring system and we displayed the result on a 128X64 OLED Display.
Supporting Files
Complete Project Code
/*
 Interfacing Sharp Optical Dust Sensor GP2Y1014AU0F with Arduino
*/
#define measurePin = 0; //Connect dust sensor to Arduino A0 pin
#define ledPower = 7;   //Connect 3 led driver pins of dust sensor to Arduino D2
int samplingTime = 280; // time required to sample signal coming out   of the sensor
int deltaTime = 40; //
int sleepTime = 9680;
float voMeasured = 0;
float calcVoltage = 0;
float dustDensity = 0;
void setup(){
  Serial.begin(9600);
  pinMode(ledPower,OUTPUT);
}
void loop(){
  digitalWrite(ledPower,LOW); // power on the LED
  delayMicroseconds(samplingTime);
  voMeasured = analogRead(measurePin); // read the dust value
  delayMicroseconds(deltaTime);
  digitalWrite(ledPower,HIGH); // turn the LED off
  delayMicroseconds(sleepTime);
  // 0 - 5V mapped to 0 - 1023 integer values
  // recover voltage
  calcVoltage = voMeasured * (5.0 / 1024.0);
  // linear eqaution taken from http://www.howmuchsnow.com/arduino/airquality/
  // Chris Nafis (c) 2012
  dustDensity = 170 * calcVoltage - 0.1;
  Serial.println(dustDensity); // unit: ug/m3
  delay(1000);
}

