Raspberry Pi is known for its computational power and its vast application in the field of IoT, Home Automation etc. However for any electronic system to interact with the real world and get information about it, the system has to use sensors. There are many types of sensors used for this process and the required sensor is selected based on the parameter to be measured and its application. In this tutorial we learn to interface a temperature sensor DS18B20 with the Raspberry Pi.
The DS18B20 is widely used temperature sensor, mainly at places where harsh operating environments are involved like chemical industries, mine plants etc. This article will tell about the sensor and how it outstands other temperature sensor and finally interface it with Raspberry Pi and view the temperature value on the 16x2 LCD.
Materials Required
- DS18B20 Temperature Sensor
- Raspberry Pi
- 16*2 LCD display
- 10k trim pot
- 10k Pull up resistor
- Breadboard
- Connecting wires
Introduction to DS18B20 Temperature Sensor
The DS18B20 is a three terminal temperature sensor available in the TO-92 (transistor type) package. It is very easy to use and requires only one external component to start working. Also it requires only one GPIO pin from the MCU/MPU to communicate with it. A typical DS18B20 temperature sensor with its pin name is shown below.
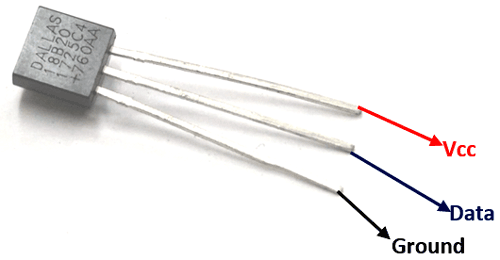
This sensor is also available as a waterproof version in which the sensor is covered by a cylindrical metal tube. In this tutorial we will be using the normal transistor type sensor that is shown above. The DS18B20 is a 1-wire programmable temperature sensor meaning it requires only the data pin to send the information to the microcontroller or microprocessor boards like the Raspberry Pi. Each sensor has a unique address of 64-bit for it so it is also possible to have multiple sensors connected to the same MCU/MPU since each sensor can be addressed individually on the same data bus. The specification of the sensor is show below.
- Operating voltage: 3-5V
- Measuring Range: -55°C to +125°C
- Accuracy: ±0.5°C
- Resolution: 9-bit to 12-bit
Now that we know enough of the sensor, let us stat interfacing it with Raspberry Pi.
Pre-Requisites
It is assumed that your Raspberry Pi is already flashed with an operating system and is able to connect to the internet. If not, follow the Getting started with Raspberry Pi tutorial before proceeding. Here we are using Rasbian Jessie installed Raspberry Pi 3.
It is also assumed that you have access to your pi either through terminal windows or through other application through which you can write and execute python programs and use the terminal window.
Circuit Diagram
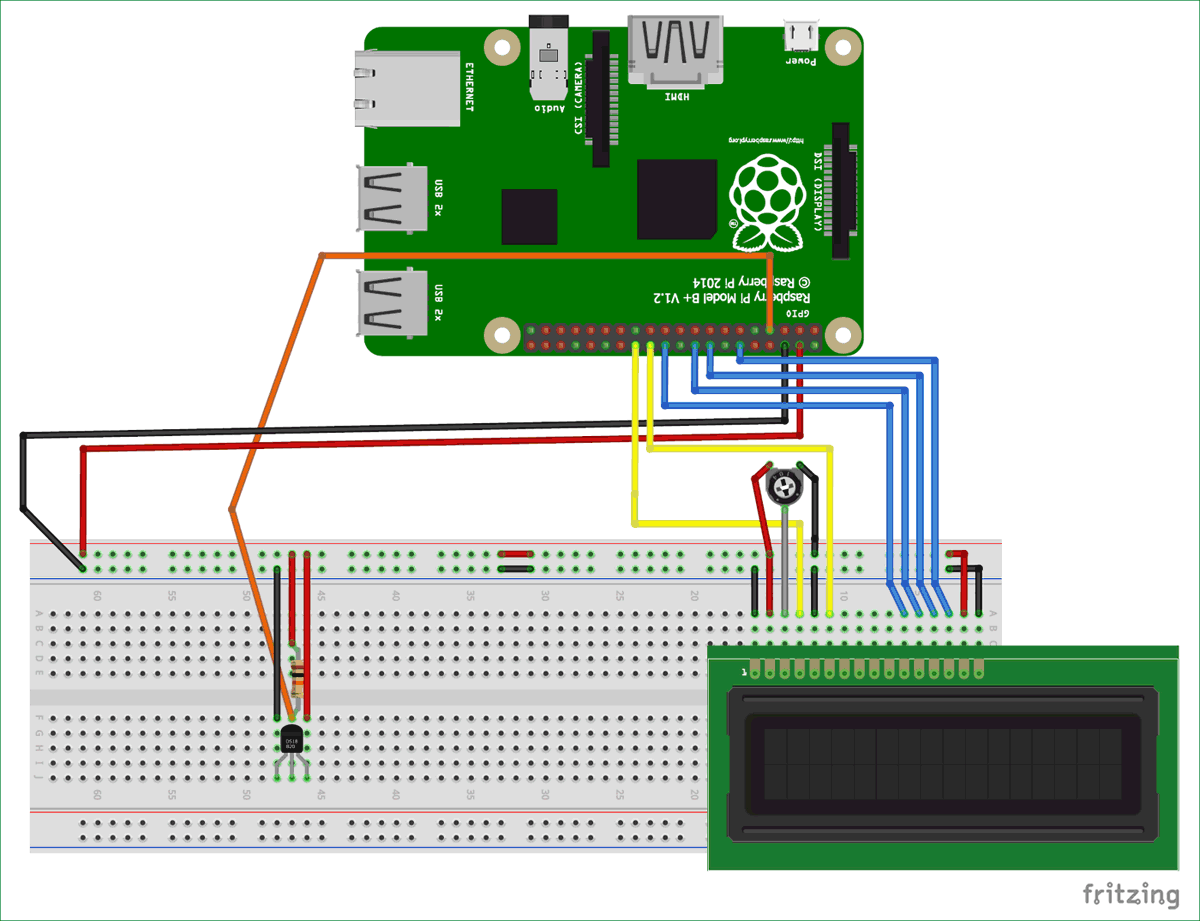
As we told earlier in this tutorial we will interface the DS18B20 sensor with Pi and display the value of temperature on a 16*2 LCD screen. So the sensor and the LCD should be connected with Raspberry Pi as show below.
Follow the circuit diagram and make the connection accordingly. Both the LCD and the DS18B20 sensor works with the help of +5V which is provided by the 5V pin on the Raspberry pi. The LCD is made to work in 4-bit mode with Raspberry pi, the GPIO pins 18,23,24 and 25 is used for the data line and the GPIO pins 7 and 8 is used for the control lines. A potentiometer is also used to control the contrast level of the LCD. The DS18B20’s data line is connected to GPIO pin 4. Also note that a 10K resistor must be used pull the data like high as show in the circuit diagram.
You can either follow the circuit diagram above and make the connections or use the pin table to follow up with the GPIO pin numbers.

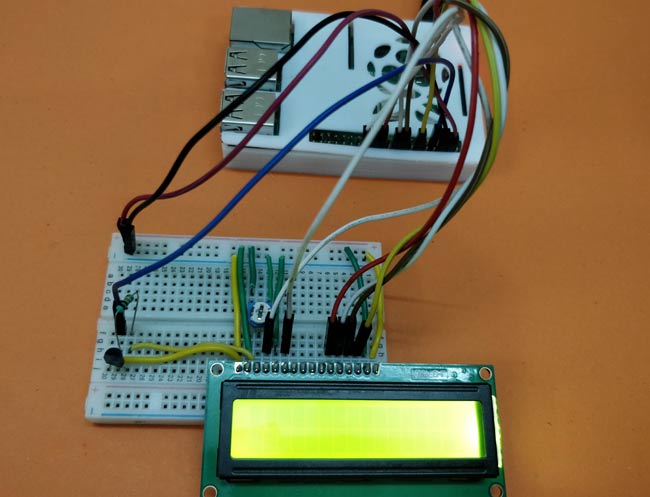
I have built the circuit on a breadboard using the single strand wires and male to female wires to make the connections. As you can see the sensor requires only one wire to interface and hence occupies less space and pins. My hardware looks like this below when all the connections are made. Now it time to power up the pi and start programming.
Installing the Adafruit LCD library on Raspberry P
The value of the temperature will be displayed on a 16*2 LCD display. Adafruit provides us a library to easily operate this LCD in 4-bit mode, so let us add it to our Raspberry Pi by opening the terminal window Pi and following the below steps.
Step 1: Install git on your Raspberry Pi by using the below line. Git allows you to clone any project files on Github and use it on your Raspberry pi. Our library is on Github so we have to install git to download that library into pi.
apt-get install git
Step 2: The following line links to the GitHub page where the library is present just execute the line to clone the project file on Pi home directory
git clone git://github.com/adafruit/Adafruit_Python_CharLCD
Step 3: Use the below command to change directory line, to get into the project file that we just downloaded. The command line is given below
cd Adafruit_Python_CharLCD
Step 4: Inside the directory there will be a file called setup.py, we have to install it, to install the library. Use the following code to install the library
sudo python setup.py install
That is it the library should have been installed successfully. Now similarly let’s proceed with installing the DHT library which is also from Adafruit.
Enabling One-Wire Interface in Pi
Since the DS18B20 sensor communicates through One-Wire method, we have to enable the one wire communication on Pi by following the below steps.
Step 1:- Open the Commands prompt and use the below command to open the config file
sudo nano /boot/config.txt
Step 2:- Inside the config file add the line “dtoverlay=w1-gpio” (encircled in below image) and save the file as shown below
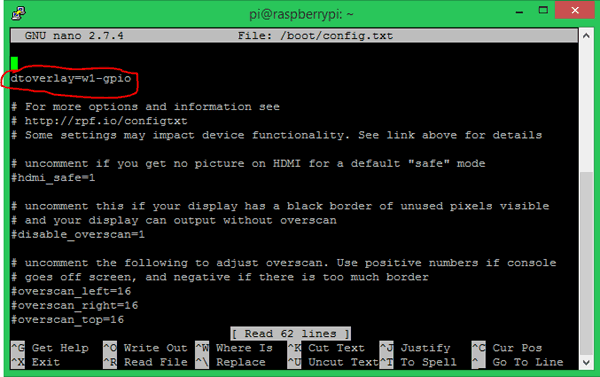
Step 3:- Use Ctrl+X to exit the file and save it by pressing “Y” and then Enter key. Finally restart the Pi by using the command
sudo reboot
Step 4:- Once rebooted, open the terminal again and enter the following commands.
sudo modprobe w1–gpio
sudo modprobe w1-therm.
cd /sys/bus/w1/devices
ls
Your terminal windows will display something like this
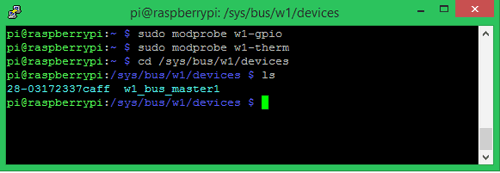
Step 5:- At the end of step 4 when you enter ls, your pi will display a unique number this number will be different for each user, based on the sensor, but will always start with 28-. In my case the number is 28-03172337caff.
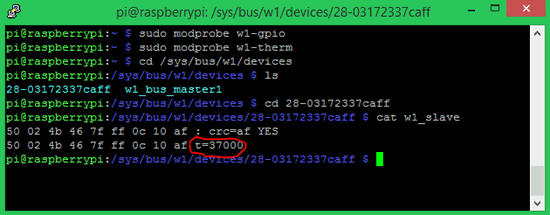
Step 6:- Now we can check if the sensor is working by entering the following commands
cd 28-XXXXXXXXXXXX [use the name of your directory or use Tab key for auto complete)
cat w1_slave
These two commands will read the data from the sensor and display it on the terminal as show below. The value of temperature is encircled with red in the below picture. In my case the value of temperature is 37*C.
Programming your Raspberry Pi for DS18B20 Sensor
Now we have our Pi ready to be programmed for LCD and to use One-wire protocol. So we can write our final program to read the value of temperature from the DS18B20 sensor and display it on the LCD screen. The complete python program to do the same is given at the end of this page. However below I have split the code into small meaningful snippets to explain them.
As always we begin the program, by importing the header files required by the program. Here we import time to deal with delay function, the LCD header to use LCD with Pi. The os header is used to handling files in the OS.
import time #import time for creating delay
import Adafruit_CharLCD as LCD #Import LCD library
import os #Import for file handling
import glob #Import for global
Next we have to mention the LCD pins which are connected to Raspberry Pi Pins. Use the GPIO pin chart provided above to know the pin numbers of the respective GPIO pins. Once we have declared, to which pins of PI the LCD is connected to, we can specify the number of rows and columns and finally initialize it by using the below lines of code.
lcd_rs        = 7  #RS of LCD is connected to GPIO 7 on PI
lcd_en        = 8  #EN of LCD is connected to GPIO 8 on PI
lcd_d4        = 25 #D4 of LCD is connected to GPIO 25 on PI
lcd_d5        = 24 #D5 of LCD is connected to GPIO 24 on PI
lcd_d6        = 23 #D6 of LCD is connected to GPIO 23 on PI
lcd_d7        = 18 #D7 of LCD is connected to GPIO 18 on PI
lcd_backlight =  0  #LED is not connected so we assign to 0

lcd_columns = 16 #for 16*2 LCD
lcd_rows    = 2 #for 16*2 LCD

lcd = LCD.Adafruit_CharLCD(lcd_rs, lcd_en, lcd_d4, lcd_d5, lcd_d6, lcd_d7,
     lcd_columns, lcd_rows, lcd_backlight)   #Send all the pin details to library
After initializing the LCD we print a sample text message on the LCD. The character ‘\n’ is used to mention new line. After displaying the intro we introduce a delay of 2 seconds for the user to read the intro message.
lcd.message('DS18B20 with Pi \n -CircuitDigest') #Give a intro message
time.sleep(2) #wait for 2 secs
Now, if you could recollect the step 4 of enabling one wire interface with Pi. We have to repeat the same line of code, so we use the os.system function to execute the same lines. Then we specify the file location from where the value of temperature has to be read. The device_folder variable points to the folder that starts with ‘28-‘ since we do not know the exact name of the folder we use the * symbol to open whatever that starts with 28. Finally inside that folder we use another variable called device_file which actually points to the file which has the value of temperature inside it.
Then we use function named get_temp inside which we define the procedure of reading the temperature from the file that we just linked in the above step. As we checked with the terminal earlier the file will have the value of temperature inside it but it will in the following format

From this we only need the value of 37000, which is the value of temperature. Here the actual value of temperature is 37.00*C. So from this format of text we have to trim all the useless data and get the integer value 37000 and finally divide it by 1000 to get the actual data. The function shown below does exactly the same
def get_temp(): #Fundtion to read the value of Temperature
    file = open(device_file, 'r') #opent the file
    lines = file.readlines() #read the lines in the file
    file.close() #close the file

    trimmed_data = lines[1].find('t=') #find the "t=" in the line

    if trimmed_data != -1:
        temp_string = lines[1][trimmed_data+2:] #trim the strig only to the temoerature value
        temp_c = float(temp_string) / 1000.0 #divide the value of 1000 to get actual value
        return temp_c #return the value to print on LCD
The variable lines is used to read the lines inside the file. Then these lines are compared searched for the letter “t=” and the value after that letter is saved in the variable temp_string. Finally to get the value of temperature we use the variable temp_c in which we divide the string value by 1000. In the end return the temp_c variable as a result of the function.
Inside the infinite while loop, we only have to call the above defined function to get the value of temperature and display it in the LCD screen. We also clear the LCD for every 1 sec to display the updated value.
while 1: #Infinite Loop
    lcd.clear() #Clear the LCD screen
    lcd.message ('Temp = %.1f C' % get_temp()) # Display the value of temperature
    time.sleep(1) #Wait for 1 sec then update the values
Output / Working
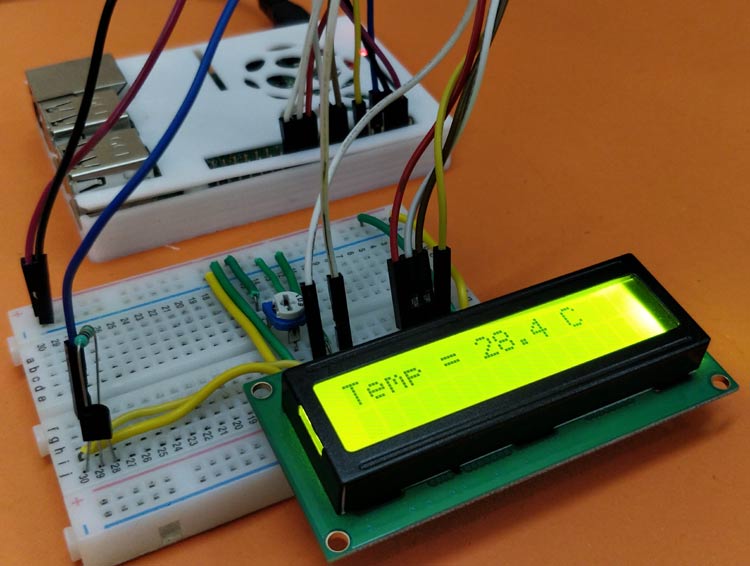
As always the complete python code is given at the end of the page, use the code and compile it on your Raspberry Pi. Make the connection as shown in the circuit diagram and before executing the program make sure you have followed the above steps to install LCD header files and enable one-wire communication on pi. Once that is done just execute the program, if everything is working as expected you should be able to notice the intro text. If not adjust the contrast potentiometer until you see something. The final result will look something like this below.
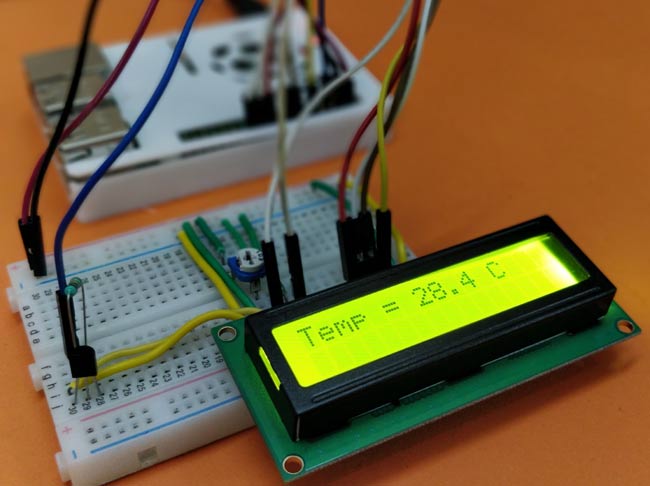
Hope you understood the project and had no problem building it. If otherwise state your problem in the comment section or use the forum for more technical help. This is just an interfacing project, but once this is done you can think ahead by working on a Raspberry Pi weather station, temperature E-mail notifier and much more.
The complete working of the project is also show in the video below where you can see the value of temperature being updated in real time.
Complete Project Code
#Program to read the values of Temp from the DS18B20 sensor and display them on the LCD

#Website: www.circuitdigest.com


import time #import time for creating delay
import Adafruit_CharLCD as LCD #Import LCD library
import os #Import for file handling
import glob #Import for global


lcd_rs        = 7  #RS of LCD is connected to GPIO 7 on PI
lcd_en        = 8  #EN of LCD is connected to GPIO 8 on PI
lcd_d4        = 25 #D4 of LCD is connected to GPIO 25 on PI
lcd_d5        = 24 #D5 of LCD is connected to GPIO 24 on PI
lcd_d6        = 23 #D6 of LCD is connected to GPIO 23 on PI
lcd_d7        = 18 #D7 of LCD is connected to GPIO 18 on PI
lcd_backlight =  0  #LED is not connected so we assign to 0

lcd_columns = 16 #for 16*2 LCD
lcd_rows    = 2 #for 16*2 LCD

lcd = LCD.Adafruit_CharLCD(lcd_rs, lcd_en, lcd_d4, lcd_d5, lcd_d6, lcd_d7,
                           lcd_columns, lcd_rows, lcd_backlight)   #Send all the pin details to library

lcd.message('DS18B20 with Pi \n -CircuitDigest') #Give a intro message

time.sleep(2) #wait for 2 secs


os.system('modprobe w1-gpio')
os.system('modprobe w1-therm')

base_dir = '/sys/bus/w1/devices/'
device_folder = glob.glob(base_dir + '28*')[0]
device_file = device_folder + '/w1_slave'


def get_temp(): #Fundtion to read the value of Temperature
    file = open(device_file, 'r') #opent the file
    lines = file.readlines() #read the lines in the file
    file.close() #close the file

    trimmed_data = lines[1].find('t=') #find the "t=" in the line

    if trimmed_data != -1:
        temp_string = lines[1][trimmed_data+2:] #trim the strig only to the temoerature value
        temp_c = float(temp_string) / 1000.0 #divide the value of 1000 to get actual value
        return temp_c #return the value to prnt on LCD


while 1: #Infinite Loop

    lcd.clear() #Clear the LCD screen
    lcd.message ('Temp = %.1f C' % get_temp()) # Display the value of temperature

    time.sleep(1) #Wait for 1 sec then update the values

