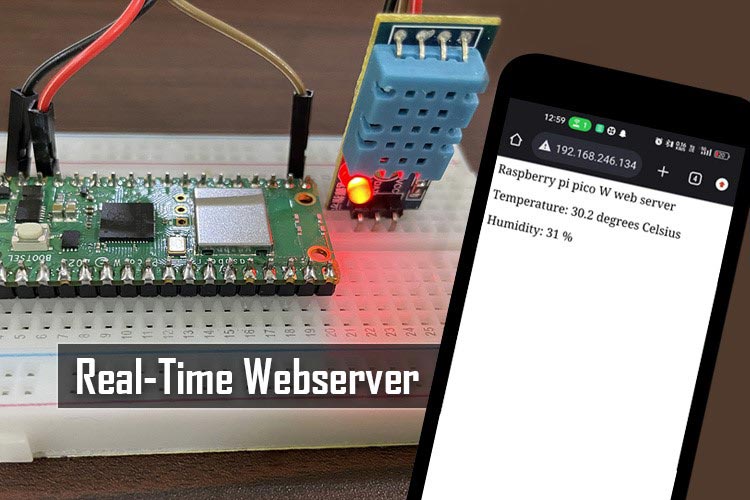
In this blog post, we will explore how to build a real-time webserver using a Raspberry Pi Pico W microcontroller and a DHT11 temperature and humidity sensor. By combining the power of Raspberry Pi Pico's microcontroller capabilities and the DHT11 sensor's ability to measure temperature and humidity, we can create a simple yet effective system for monitoring environmental conditions. We will walk through the process of setting up the hardware, writing the code, and creating a web server that displays the temperature and humidity data in real-time.
Let’s understand the components used in this project.
DHT11 Humidity and Temperature Sensor
The DHT11 sensor is a popular and inexpensive digital temperature and humidity sensor. It is commonly used in various projects and applications that require monitoring or controlling the temperature and humidity levels in an environment. The sensor provides reliable and accurate measurements, making it suitable for both hobbyist and professional projects.
DHT11 Module Pinout
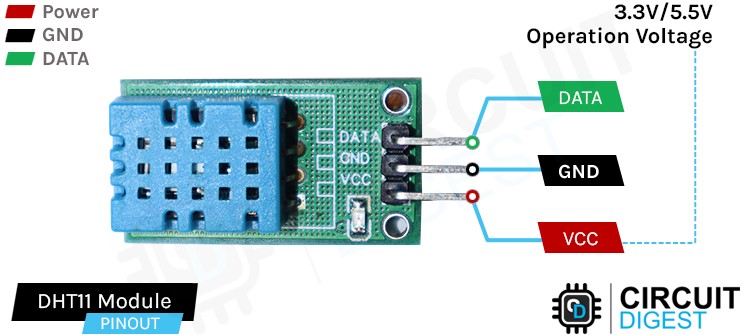
VCC This pin is used to supply power to the sensor. It is typically connected to a 5V power source.
Data The data pin is used for bidirectional communication between the sensor and the microcontroller. It uses a single-wire serial interface for data transmission.
GND The GND pin is connected to the ground or 0V reference of the power supply.
DHT11 Module Parts

There are very less parts in a DHT11 module and that includes DHT11, a pullup resistor which is not visible from this angle and a power LED.
We have previously built IoT based weather station using Raspberry Pi and IoT based webserver using NodeMCU.
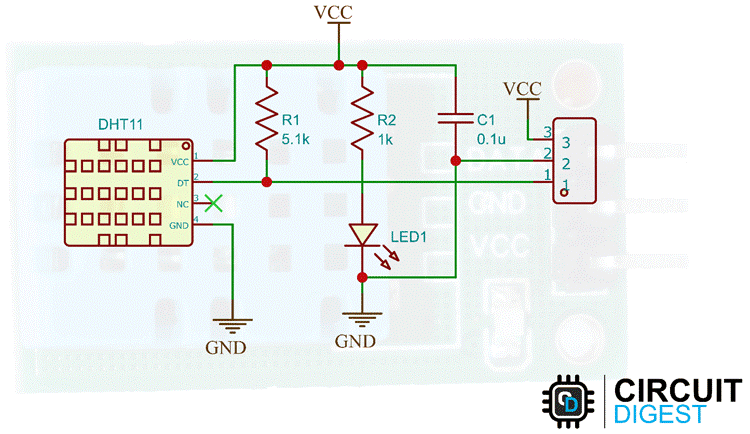
Circuit Diagram of DHT11 Module
The DHT11 consists of a pull-up resistor which is added to the data pin. A single led is used with a 1k current limiting resitor and capacitor is used to filter the signals from the dht11 sensor.
Working of DHT11 Humidity and Temperature Sensor
The DHT11 sensor operates by utilizing its capacitive humidity sensor and thermistor-based temperature sensor. The microcontroller initiates the measurement by sending a start signal to the sensor module. The module responds and transmits a 40-bit data stream to the microcontroller, containing the humidity and temperature readings. The microcontroller calculates the checksum to verify the data integrity, interprets the received data, and converts it into meaningful temperature and humidity values. The DHT11 sensor module simplifies the integration by providing a digital output, eliminating the need for analog-to-digital conversion, and abstracting the communication protocol complexity, making it easy to use for temperature and humidity sensing applications.
Hardware Setup for Temperature and Humidity Monitoring
The components you require for this interfacing are as follows:-
- Raspberry Pi Pico W
- Usb cable
- DHT11 humidity and temperature sensor
- Mini breadboard
- Jumper wires
Circuit Diagram of Pico W and DHT11 Interfacing
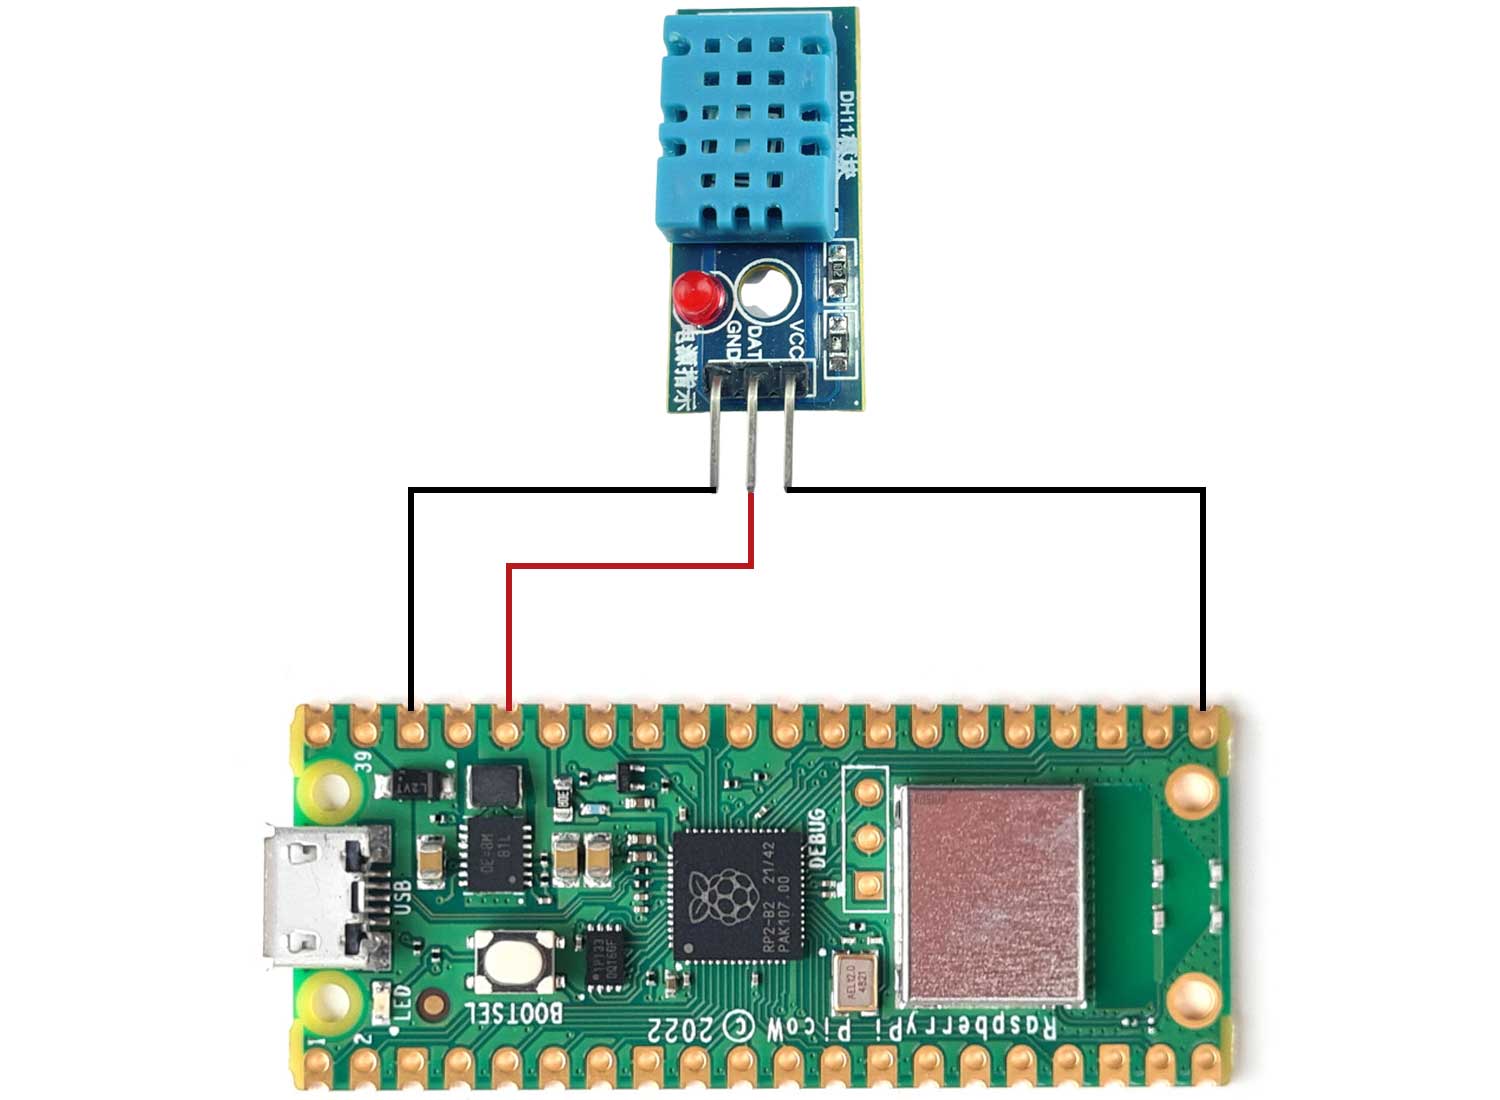
To connect the DHT11 sensor to the Raspberry Pi Pico, you will need to establish the necessary connections. Start by connecting the Vcc (power) pin of the DHT11 sensor to the 3V3 output pin of the Raspberry Pi Pico. This connection provides the sensor with the required power supply.
Next, connect the Gnd (ground) pin of the DHT11 sensor to the ground (GND) pin of the Raspberry Pi Pico. This connection establishes a common ground between the sensor and the microcontroller, ensuring proper signal referencing.
Finally, connect the data pin of the DHT11 sensor to pin 16 of the Raspberry Pi Pico. This pin will be used to communicate with the sensor and receive temperature and humidity data. It serves as the interface between the sensor and the microcontroller.
Commonly asked questions about DHT11
How should I handle errors or inconsistencies in readings from the DHT11 sensor?
The DHT11 sensor may occasionally provide incorrect or inconsistent readings. To improve accuracy, you can implement error checking and averaging techniques, such as taking multiple readings and calculating an average or comparing readings against predefined thresholds to identify anomalies.
How often can I read data from the DHT11 sensor?
The DHT11 sensor has a limited refresh rate, typically around 1 Hz. This means you can read data from the sensor once every second. Reading data more frequently may lead to inaccurate readings.
Can I use the DHT11 sensor outdoors?
The DHT11 sensor is not designed for outdoor use or exposure to harsh environments. It is recommended to use it in indoor applications where it can be protected from moisture and extreme temperatures.
Software Configuration for Pico W and DHT11 Interfacing
First, you need to download the dht.py file and open it in Thonny IDE
Now click on File>Save as
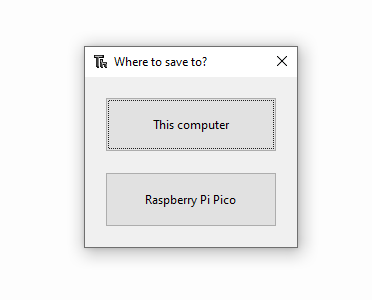
When this dialogue pops up, click on raspberry pi pico W and save the file with name “dht.py”
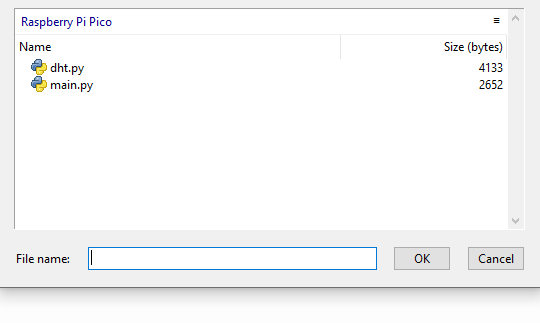
The file system should look like this. The main.py is the webserver file which you need to save in the same way. We will dive into its code explanation now.
Replacing the SSID and password
wlan.connect("SSID", "password")
The webserver needs to connect to your phone’s hotspot to display the dht11 values and for that you need to replace the SSID and password with your own.
Now let’s dive into the full code explanation
from machine import Pin
import socket
import math
import utime
import network
import time
import json
from dht import DHT11, InvalidChecksum
The code imports necessary modules and libraries required for the program.
wlan = network.WLAN(network.STA_IF)
wlan.active(True)
wlan.connect("SSID", "password")
This code sets up and connects to a Wi-Fi network with the SSID "Realme" and password "onetwoeight".
dhtPIN = 16
sensor = DHT11(Pin(dhtPIN, Pin.OUT, Pin.PULL_UP))
Here, pin 16 is assigned as the GPIO pin for connecting the DHT11 sensor. An instance of the DHT11 class is created, passing the pin as a parameter.
wait = 10
while wait > 0:
    if wlan.status() < 0 or wlan.status() >= 3:
        break
    wait -= 1
    print('waiting for connection...')
    time.sleep(1)
This loop waits for the Wi-Fi connection to be established. It checks the status of the Wi-Fi connection and waits for a maximum of 10 seconds.
if wlan.status() != 3:
    raise RuntimeError('WiFi connection failed')
else:
    print('Connected')
    ip = wlan.ifconfig()[0]
    print('IP:', ip)
If the Wi-Fi connection is successful, it retrieves the IP address and prints it.
def read_dht():
    sensor.measure()
    temperature = sensor.temperature
    humidity = sensor.humidity
    return temperature, humidity
This function reads the temperature and humidity values from the DHT11 sensor.
def webpage(temperature, humidity):
    html = f"""
        <!DOCTYPE html>
        <html>
        <body>
        <head>Raspberry pi pico W web server </head>
        <p>Temperature: <span id="temp">{temperature}</span> degrees Celsius</p>
        <p>Humidity: <span id="hum">{humidity}</span> %</p>
        <script>
            setInterval(function() {{
                fetch('/data')
                .then(response => response.json())
                .then(data => {{
                    document.getElementById('temp').innerHTML = data.temperature;
                    document.getElementById('hum').innerHTML = data.humidity;
                }});
            }}, 5000);
        </script>
        </body>
        </html>
    """
    return html
This function generates an HTML webpage containing placeholders for temperature and humidity values. It also includes JavaScript code to update the values dynamically every 5 seconds using a fetch request to the '/data' endpoint.
def serve(connection):
    while True:
        client = connection.accept()[0]
        request = client.recv(1024)
        request = str(request)
        try:
            request = request.split()[1]
        except IndexError:
            pass
        print(request)
        if request == '/data':
            temperature, humidity = read_dht()
            print("temp :"+str(temperature))
            print(" humidity :"+str(humidity))
            response = {'temperature': temperature, 'humidity': humidity}
            client.send(json.dumps(response))
        else:
            html = webpage(0, 0)  # Initial values for temperature and humidity
            client.send(html)
        client.close()
This function handles client connections and serves the appropriate response based on the received HTTP request. If the request is '/data', it reads the temperature and humidity
Accessing Raspberry Pi Web Server
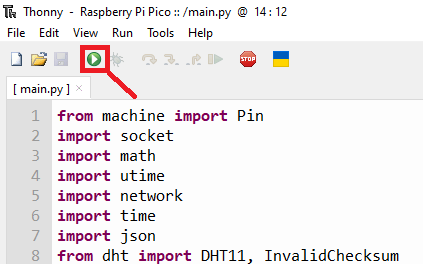
First, you need to run the code by opening the main.py in the Thonny IDE, then click on the run current script button on the top left side and start your phone’s hotspot. Remember to replace the “SSID” and hotspot in the code.
On the shell, you can see that Pico W is connected to your smartphone. It prints your ip address and then continuously sends data to the html webpage in real time.
Now open your smartphone and put your ip in the address bar (each ip is different so check yours through the shell first)
Your output screen should look like this and should update itself in real-time every 5 seconds.
By following this tutorial, you will be able to create a real-time temperature and humidity monitoring system using Raspberry Pi Pico W and the DHT11 sensor. This project demonstrates the power and versatility of the Raspberry Pi Pico W microcontroller in combination with a popular sensor, opening up possibilities for various IoT applications. With the real-time web server, you can easily keep track of environmental conditions and integrate this data into your projects or systems.
Projects using DHT11 Sensor
This blog explores an IoT-based Air Quality Index monitoring system using ESP32. It covers the measurement of PM2.5, PM10, and CO, vital air quality parameters affecting human health. The step-by-step instructions provided enable readers to replicate the system. Whether you're an IoT enthusiast, a DIYer, or concerned about the environment, this blog offers practical knowledge to monitor air quality and make informed decisions. Join the discussion and empower yourself to create a healthier environment.
Discover the world of smart irrigation systems with this blog focusing on an ESP8266-based setup. Learn how to effectively monitor humidity levels and water levels for optimized irrigation. The blog provides detailed instructions, allowing you to build your own system. Whether you're a gardening enthusiast, a technology lover, or simply interested in water conservation, this blog offers valuable insights to create an efficient and sustainable irrigation solution. Stay informed and enhance your gardening practices with the power of IoT and the ESP8266 microcontroller.
Explore the realm of IoT-powered gardening with this blog on a Garden X Soil Monitoring Device. Using ESP32, DHT11, and MQ135, this device enables real-time monitoring of soil conditions. The blog provides a comprehensive guide on how to set up and utilize this system effectively. Whether you're a gardening enthusiast or an IoT hobbyist, this blog equips you with the knowledge to create a smart garden and optimize plant growth. Gain insights into soil moisture, temperature, humidity, and air quality measurements for informed gardening decisions. Join the IoT revolution in gardening and cultivate a thriving garden with precision and ease.
Supporting Files
You can download all the necessary files from the Circuit Digest GitHub repo, from the following link
Complete Project Code
from machine import Pin
import socket
import math
import utime
import network
import time
import json
from dht import DHT11, InvalidChecksum
wlan = network.WLAN(network.STA_IF)
wlan.active(True)
wlan.connect("SSID", "password")
dhtPIN = 16
sensor = DHT11(Pin(dhtPIN, Pin.OUT, Pin.PULL_UP))
# Wait for connect or fail
wait = 10
while wait > 0:
    if wlan.status() < 0 or wlan.status() >= 3:
        break
    wait -= 1
    print('waiting for connection...')
    time.sleep(1)
# Handle connection error
if wlan.status() != 3:
    raise RuntimeError('WiFi connection failed')
else:
    print('Connected')
    ip = wlan.ifconfig()[0]
    print('IP:', ip)
def read_dht():
    sensor.measure()
    temperature = sensor.temperature
    humidity = sensor.humidity
    return temperature, humidity
def webpage(temperature, humidity):
    html = f"""
        <!DOCTYPE html>
        <html>
        <body>
        <head>Raspberry pi pico W web server </head>
        <p>Temperature: <span id="temp">{temperature}</span> degrees Celsius</p>
        <p>Humidity: <span id="hum">{humidity}</span> %</p>
        <script>
            setInterval(function() {{
                fetch('/data')
                .then(response => response.json())
                .then(data => {{
                    document.getElementById('temp').innerHTML = data.temperature;
                    document.getElementById('hum').innerHTML = data.humidity;
                }});
            }}, 5000);
        </script>
        </body>
        </html>
    """
    return html
def serve(connection):
    while True:
        client = connection.accept()[0]
        request = client.recv(1024)
        request = str(request)
        try:
            request = request.split()[1]
        except IndexError:
            pass
        print(request)
        if request == '/data':
            temperature, humidity = read_dht()
            print("temp :"+str(temperature))
            print(" humidity :"+str(humidity))
            response = {'temperature': temperature, 'humidity': humidity}
            client.send(json.dumps(response))
        else:
            html = webpage(0, 0)  # Initial values for temperature and humidity
            client.send(html)
        client.close()
def open_socket(ip):
    # Open a socket
    address = (ip, 80)
    connection = socket.socket()
    connection.bind(address)
    connection.listen(1)
    print(connection)
    return connection
try:
    if ip is not None:
        connection = open_socket(ip)
        serve(connection)
except KeyboardInterrupt:
    machine.reset()

