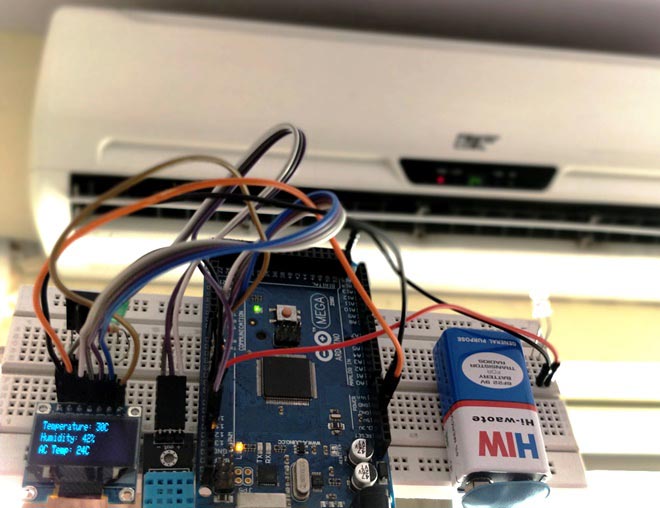
An AC (Air Conditioner) which was once considered to be a luxury item and was only to be found in big hotels, movie halls, restaurants etc... But, now almost everyone has a AC in our home to beat out the summer/winter and those who have it, worry about one common thing. That is their high electricity consumption and chargers due to it. In this project we are going to make a small Automatic Temperature Control Circuit that could minimize the electricity chargers by varying the AC temperature automatically based on the Rooms temperature. By varying the set temperature periodically we can avoid making the AC to work for lower temperature values for a long time and thus making it consume less power.
Most of us would have experienced a situation where we have to change the Air Conditioner’s set temperature to different values during different times of the day, so as to keep us comfy throughout. To automate this process this project uses a Temperature sensor (DHT11) which reads the present temperature of the room and based on that value it will send commands to the AC through an IR blaster similar to the AC’s Remote. The AC will react to these commands as if it is reacting to its Remote and thus adjust the temperature. As your room’s temperature changes, the Arduino will also adjust your AC’s set temperature to maintain your temperature in just the way you want it to be. Sounds cool right?... Let’s see how to build one.
Materials Required:
- Arduino Mega 2560
- TSOP1738 (HS0038)
- IR Led
- DHT11 Temperature/Humidity Sensor
- Any Colour LED and 1K Resistor(optional)
- Breadboard
- Connecting Wires
Working Methodology:
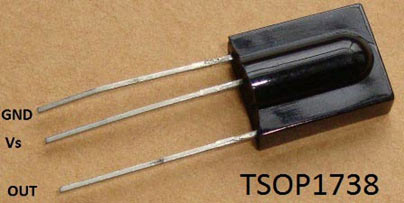
All the Remote Controls in our home that we use to control TV, Home Theatre, AC etc work with the help of IR Blasters. An IR blaster is nothing but an IR LED which could blaster a signal by repetitive pulsing; this signal will be read by the receiver in the electronics appliance. For each different button on the remote a unique signal will be blasted which after read by the receiver is used to perform a particular pre-defined task. If we are able to read this signal coming out from the Remote, we can then mimic the same signal using an IR LED when ever required to perform that particular task. We have previously made a IR Blaster circuit for Universal IR Remote.
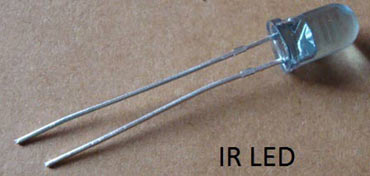
A TSOP is an IR Receiver that could be used to decode the signal coming from the Remotes. This Receiver will be interfaced with Arduino to signal for each button and then an IR Led will be used with Arduino to mimic the signal when ever required. This way we can gain control over our AC using Arduino.
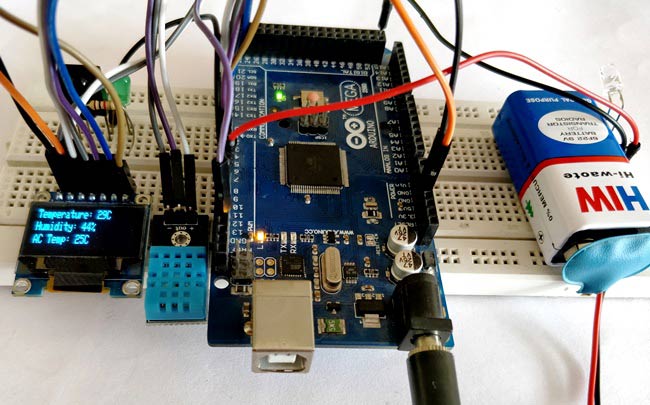
Now, all that is left is to read the Temperature value using DHT11 and instruct the AC accordingly using the IR signals. To make the project look more attractive and user friendly I have also added an OLED display that display the current Temperature, Humidity and AC set temperature. Learn more about using OLED with Arduino.
Pre-requisites:
This Automatic AC Temperature Controller project is slightly advanced for beginner’s level, however with help of few other tutorials anyone can build this with matter of time. So if you are a absolute newbie to OLED, DHT11 or TSOP then kindly fall back to these tutorials below where you can learn the basics and how to get started with these. The list might seem to be bit long, but trust me it’s easy and worth learning, also it will open doors to many new projects.
- Basic circuit using TSOP and IR LED to under their working
- Basic interfacing guide for DHT11 with Arduino
- Basic interfacing guide for OLED with Arduino
- Interfacing TSOP with Arduino to Read IR remote values
Make sure you have an Arduino Mega and any other version of Arduino, since the code size is heavy. Also check if you have already installed the following Arduino libraries if not install them form the link below
- IR Remote Library for TSOP and IR Blaster
- Adafruit Library for OLED
- GFX Graphics Library for OLED
- DHT11 Sensor Library for Temperature sensor
Working of an AC Remote:
Before we proceed into the project take some time and notice how your AC remote works. AC remotes work in a bit different way compared to TV, DVD IR remotes. There might be only 10-12 buttons on your Remote, but they will be able to send a lot of different types of signals. Meaning the Remote does not send the same code every time for the same button. For example, when you decrease the temperature using the down button to make it 24°C (degree Celsius) you will get a signal with a set of data, but when you press it again to set 25°C you will not get the same data since the temperature is now 25 and not 24. Similarly the code for 25 will also vary for different fan speed, sleep settings etc. So let’s not fiddle around with all options and just concentrate only the temperature values with a constant value for other settings.
Another problem is the amount of data that is being sent for each button press, normal remotes with send either 24 bits or 48 bits but an AC remote might sends up to 228 bits since each signal contains a lot of information like Temp, Fan Speed, Sleep timing, Swing style etc. This is the reason why we need an Arduino Mega for better storage options.
Circuit Diagram and Explanation:
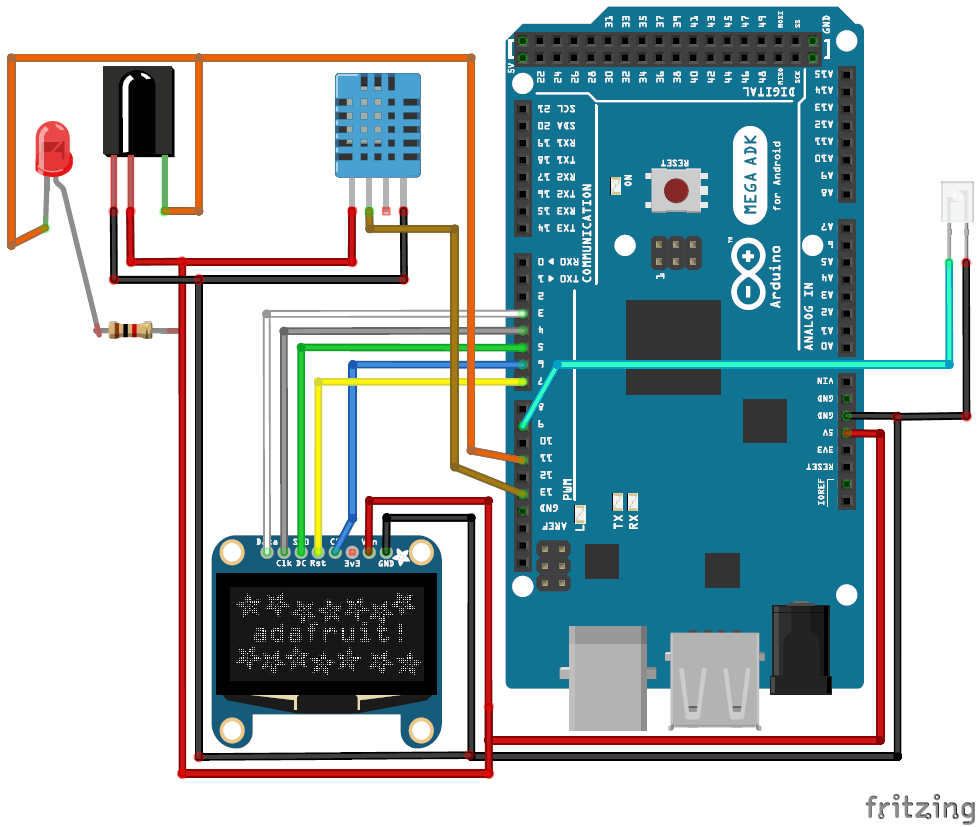
Luckily the hardware setup of this Automatic AC Temperature Control Project is very easy. You can simply use a breadboard and make the connections as shown below.
The following table can also be used to verify your connections.
|
S.No: |
Component Pin |
Arduino Pin |
|
1 |
OLED – Vcc |
5V |
|
2 |
OLED – Gnd |
Gnd |
|
3 |
OLED- SCK, D0,SCL,CLK |
4 |
|
4 |
OLED- SDA, D1,MOSI, Data |
3 |
|
5 |
OLED- RES, RST,RESET |
7 |
|
6 |
OLED- DC, A0 |
5 |
|
7 |
OLED- CS, Chip Select |
6 |
|
8 |
DHT11 – Vcc |
5V |
|
9 |
DHT11 – Gnd |
Gnd |
|
10 |
DHT11 – Signal |
13 |
|
11 |
TSOP – Vcc |
5V |
|
12 |
TSOP – Gnd |
Gnd |
|
13 |
IR Led – Anode |
9 |
|
14 |
IR Led – Cathode |
Gnd |
Once you connections are done it should look something like this shown below. I have used a Breadboard to tidy things, but you can also you Male to female wires directly to hook up all components
Decoding your AC Remote Signals:
The first step to control your AC is to use TSOP1738 to decode AC Remote Control IR Codes. Make all the connections as shown in the circuit diagram and make sure you have installed all the mentioned libraries. Now open the example program “IRrecvDumpV2” which can be found at File -> Examples -> IRremote -> IRrecvDumpV2. Upload the program to your Arduino Mega and open the Serial Monitor.
Point your Remote towards TSOP and press any button, for each button you press its respective Signal will be read by the TSOP1738, decoded by Arduino and displayed in the Serial Monitor. For every change in temperature on your Remote you will get a different Data. Save this Data for we will be using it in our main program. Your serial monitor will look something like this, I have also shown the Word file on which I have saved the copied data.
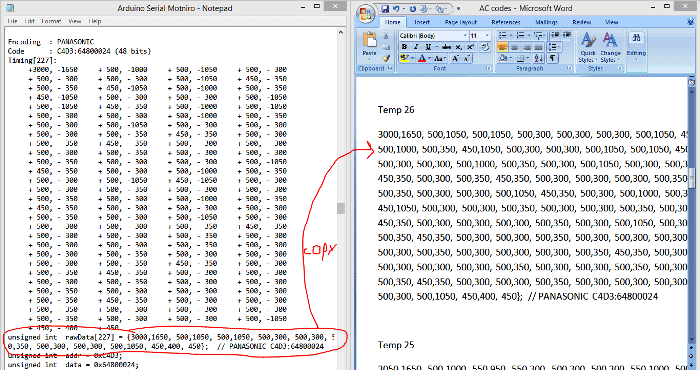
The Screenshot shows the code for setting the temperature at 26°C for my AC remote. Based on your Remote you will get a different set of codes. Similarly copy the codes for all different level of temperature. You can check all the Air Conditioner Remote control IR codes in the Arduino Code given at the end of this tutorial.
Main Arduino Program:
The complete main Arduino program can be found at the bottom of this page, but you cannot use the same program. You have to change the Signal code values that we just obtained from the Example sketch above. Open the main program on you Arduino IDE and scroll down to this area shown below where you have to replace the array values with the values that you obtained for your Remote.
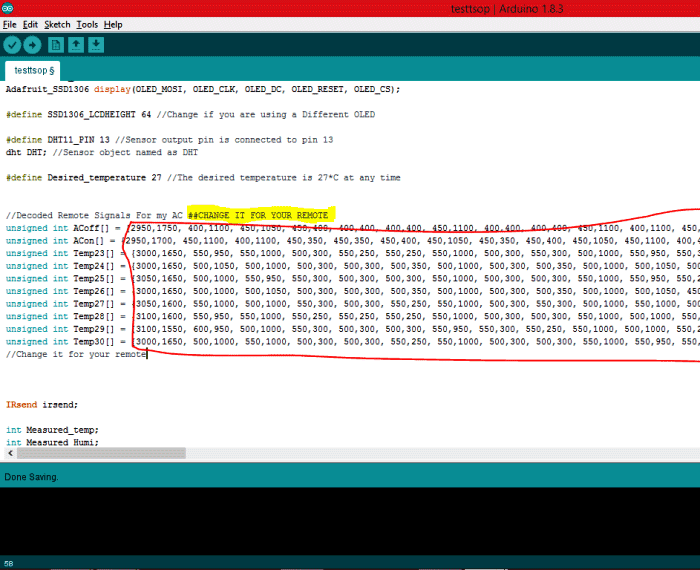
Note that I have used 10 Arrays out of which two used to Turn ON and turn OFF the AC while the rest 8 is used to set different temperature. For example Temp23 is used to set 23°C on your AC, so use the respective code in that Array. Once that is done, you just have to upload the code to your Arduino and Place it opposite of you AC and enjoy the Cool Breeze.
The Explanation of the code goes as follows, first we have to use the DHT1 temperature sensor to read the Temperature and Humidity and display it on the OLED. This is done by the following code.
DHT.read11(DHT11_PIN); //Read the Temp and Humidity
  Measured_temp = DHT.temperature + temp_error;
  Measured_Humi = DHT.humidity;

// text display tests
  display.setTextSize(1);
  display.setTextColor(WHITE);
  display.setCursor(0,0);
  display.print("Temperature: "); display.print(Measured_temp);display.println("C");
  display.setCursor(0,10);
  display.print("Humidity: "); display.print(Measured_Humi);display.println("%");
Once we know the Temperature of the room we just have to compare it with the desired value. This desired value is a constant value which is set as 27°C (Degree Celsius) in my program. So based on this comparison we will set a corresponding AC temperature as shown below
if (Measured_temp == Desired_temperature+3) //If AC is ON and measured temp is very high than desired
{
   irsend.sendRaw(Temp24, sizeof(Temp24) / sizeof(Temp24[0]), khz); delay(2000);//Send signal to set 24*C
  AC_Temp = 24;
}
Here the AC will be set to 24°C when the Measured temperature is 30°C (since desired temp is 27). Similarly we can create many If loops to set different level of temperatures based on the measured temperature as shown below.
if (Measured_temp == Desired_temperature-1) //If AC is ON and measured temp is low than desired value
{
  irsend.sendRaw(Temp28, sizeof(Temp28) / sizeof(Temp28[0]), khz); delay(2000);//Send signal to set 28*C
  AC_Temp = 28;
}

if (Measured_temp == Desired_temperature-2 ) //If AC is ON and measured temp is very low than desired value
{
  irsend.sendRaw(Temp29, sizeof(Temp29) / sizeof(Temp29[0]), khz); delay(2000);//Send signal to set 29*C
  AC_Temp = 29;
}

if (Measured_temp == Desired_temperature-3 ) //If AC is ON and measured temp is very very low desired value
{
  irsend.sendRaw(Temp30, sizeof(Temp30) / sizeof(Temp30[0]), khz); delay(2000);//Send signal to set 30*C
  AC_Temp = 30;
}
Working of Automatic AC Temperature Control System:
When your Code and hardware is ready, Upload the Code to your Board and you should notice the OLED displaying something similar to this.
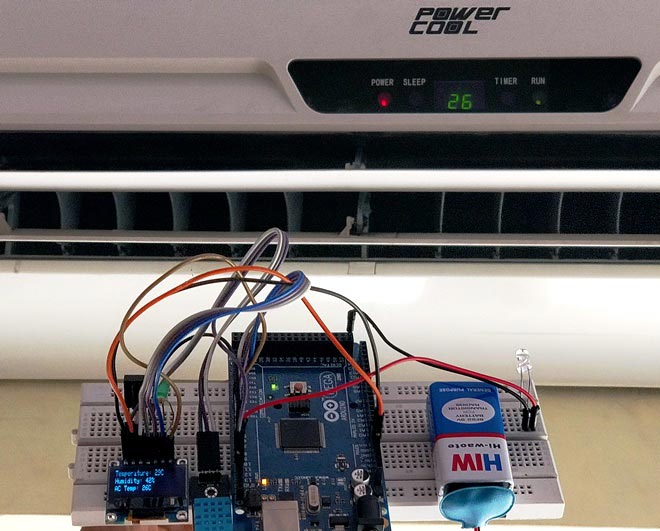
Now place the circuitry opposite to your Air Conditioner and you notice the AC’s temperature getting controlled based on the rooms temperature. You can try increasing the temperature near the DHT11 sensor to check if the AC’s temperature is controlled as shown in the Video below.
You can tweak the program to perform any desired action; all you need is the code that you obtained from the example sketch. Hope you understood this Automatic Temperature Controller project and enjoyed building something very similar. I know there are lot of places here to get stuck, but don’t worry then. Just use the forum or comment section to explain your problem and people here will surely help you to get it solved.
Complete Project Code
/*
 * Automatic AC Temperature control using Arduino and TSOP
 * Code by: Aswinth Raj B
 * Dated: 25-10-2017
 * Website: www.circuitdigest.com
 *
       S.No: Component Pin Arduino Pin
    1 OLED – Vcc  5V
    2 OLED – Gnd  Gnd
    3 OLED- SCK, D0,SCL,CLK 4
    4 OLED- SDA, D1,MOSI, Data  3
    5 OLED- RES, RST,RESET  7
    6 OLED- DC, A0  5
    7 OLED- CS, Chip Select 6
    8 DHT11 – Vcc 5V
    9 DHT11 – Gnd Gnd
    10  DHT11 – Signal  13
    11  TSOP – Vcc  5V
    12  TSOP – Gnd  Gnd
    13  IR Led – Anode  9
    14  IR Led – Cathode  Gnd
 */
 #include <IRremote.h> //Lib for IT Blaster and TSOP
 #include <SPI.h> // Inbuilt Lib
 #include <Wire.h> //Inbuilt Lib
 #include <Adafruit_GFX.h> //Lib for OLED
 #include <Adafruit_SSD1306.h> //Lib for OLED
 #include <dht.h> //Library for dht11 Temperature and Humidity sensor (Download from Link in article)
 // Assign pins for OLED (Software config.)
#define OLED_MOSI  3
#define OLED_CLK   4
#define OLED_DC    5
#define OLED_CS    6
#define OLED_RESET 7
Adafruit_SSD1306 display(OLED_MOSI, OLED_CLK, OLED_DC, OLED_RESET, OLED_CS);
#define SSD1306_LCDHEIGHT 64 //Change if you are using a Different OLED
#define DHT11_PIN 13 //Sensor output pin is connected to pin 13
dht DHT; //Sensor object named as DHT
#define Desired_temperature 27 //The desired temperature is 27*C at any time
//Decoded Remote Signals For my AC ##CHANGE IT FOR YOUR REMOTE
unsigned int ACoff[] = {2950,1750, 400,1100, 450,1050, 450,400, 400,400, 400,400, 450,1100, 400,400, 400,400, 450,1100, 400,1100, 450,350, 450,1100, 400,400, 400,400, 450,1100, 400,1100, 450,400, 400,1100, 400,1100, 450,400, 400,400, 400,1100, 450,350, 450,400, 400,1100, 450,400, 400,400, 400,400, 450,350, 450,350, 450,400, 400,400, 450,350, 450,400, 400,400, 400,400, 450,350, 450,400, 400,400, 400,400, 450,400, 400,400, 400,400, 450,350, 450,350, 450,1100, 400,400, 450,400, 400,1100, 450,1050, 450,400, 400,400, 400,400, 450,350, 450,400, 400,400, 450,350, 450,400, 400,400, 400,1100, 450,350, 450,400, 400,400, 400,400, 450,400, 400,1100, 450,350, 450,400, 400,400, 400,400, 400,1100, 450,400, 400,400, 450,350, 450,400, 400,400, 400,400, 450,350, 450,350, 450,400, 400,400, 450,350, 450,400, 400,400, 400,400, 450,350, 450,400, 400,400, 450,350, 450,400, 400,400, 400,400, 450,350, 450,350, 450,400, 450,350, 450,350, 450,400, 450,350, 450,350, 450,350, 450,400, 450,350, 450,350, 450,400, 400,1100, 450,350, 450,350, 450,400, 450,350, 450,350, 450,1100, 450};
unsigned int ACon[] = {2950,1700, 450,1100, 400,1100, 450,350, 450,350, 450,400, 450,1050, 450,350, 450,400, 450,1050, 450,1100, 400,400, 450,1050, 450,350, 450,400, 400,1100, 450,1100, 450,350, 450,1050, 450,1100, 450,350, 450,350, 450,1100, 450,350, 400,400, 450,1100, 450,350, 450,350, 450,400, 400,400, 450,350, 450,350, 450,400, 400,400, 450,350, 450,350, 450,400, 400,400, 450,350, 450,350, 450,400, 450,350, 450,350, 450,1100, 400,400, 450,350, 450,1100, 400,400, 450,350, 450,1100, 400,1100, 450,350, 450,400, 400,400, 450,350, 500,300, 450,400, 450,350, 400,400, 450,1100, 400,400, 450,350, 450,350, 450,400, 400,400, 450,350, 450,1100, 450,350, 400,400, 450,350, 450,400, 450,350, 400,400, 450,400, 450,350, 450,350, 450,350, 450,400, 400,400, 450,350, 450,400, 400,400, 400,400, 400,400, 450,350, 450,400, 450,350, 450,350, 450,400, 450,350, 450,350, 450,350, 450,400, 400,400, 400,400, 450,350, 450,400, 450,350, 400,400, 450,350, 450,400, 450,350, 450,350, 450,350, 450,400, 450,350, 450,1100, 400,400, 400,400, 450,350, 450,350, 450,1100, 400,400, 450};
unsigned int Temp23[] = {3000,1650, 550,950, 550,1000, 500,300, 550,250, 550,250, 550,1000, 500,300, 550,300, 500,1000, 550,950, 550,300, 550,950, 550,250, 550,300, 500,1000, 500,1050, 500,300, 500,1000, 550,1000, 500,300, 500,300, 550,1000, 450,350, 500,300, 500,1050, 450,350, 450,350, 450,350, 450,400, 450,350, 450,350, 450,400, 400,400, 450,350, 450,350, 450,350, 450,400, 400,400, 400,400, 450,400, 400,400, 400,400, 450,1100, 400,400, 400,400, 450,1050, 450,400, 400,400, 450,1100, 400,1100, 400,400, 450,350, 450,400, 400,400, 400,400, 450,400, 400,400, 400,400, 450,350, 450,1100, 400,400, 400,400, 450,350, 450,400, 400,400, 450,1100, 400,400, 400,1100, 450,1100, 400,1100, 450,350, 450,400, 400,400, 450,350, 450,350, 450,400, 400,400, 400,400, 450,350, 450,400, 400,400, 450,350, 450,400, 400,400, 400,400, 450,350, 450,400, 400,400, 450,350, 450,350, 450,400, 450,350, 400,400, 450,350, 450,400, 450,350, 450,350, 450,400, 450,350, 450,350, 450,350, 450,400, 400,400, 400,400, 450,350, 450,1100, 400,1100, 450,1100, 400,1100, 450,1100, 400,1100, 400,400, 450};
unsigned int Temp24[] = {3000,1650, 500,1050, 500,1000, 500,300, 500,300, 500,350, 500,1000, 500,300, 500,350, 500,1000, 500,1050, 500,300, 500,1000, 500,300, 500,350, 500,1000, 500,1050, 500,300, 500,1000, 500,1050, 500,300, 500,300, 500,1050, 500,300, 500,300, 500,1050, 500,300, 500,300, 500,350, 500,300, 500,300, 500,300, 500,350, 500,300, 500,300, 500,300, 500,350, 500,300, 500,300, 500,300, 500,350, 500,300, 500,300, 500,1050, 500,300, 500,300, 500,1050, 500,300, 500,300, 500,1050, 500,1000, 500,300, 500,350, 500,300, 500,300, 500,300, 500,350, 500,1000, 500,1050, 500,1000, 500,300, 500,350, 450,350, 500,300, 500,300, 500,350, 500,1000, 500,300, 500,1050, 500,1000, 500,1050, 500,300, 500,300, 500,350, 500,300, 500,300, 500,300, 500,300, 500,350, 500,300, 450,350, 500,350, 450,350, 450,350, 450,350, 450,400, 400,400, 400,400, 450,400, 400,400, 400,400, 400,400, 450,350, 450,400, 400,400, 450,350, 450,400, 450,350, 450,350, 450,350, 450,400, 450,350, 450,350, 450,350, 500,350, 450,1050, 500,300, 500,1050, 500,1000, 500,1050, 500,1000, 500,1000, 500,350, 550};
unsigned int Temp25[] = {3050,1650, 500,1000, 550,950, 550,300, 500,300, 500,300, 550,1000, 500,300, 500,300, 550,1000, 550,950, 550,250, 550,1000, 500,300, 550,250, 550,1000, 500,1000, 550,300, 550,950, 550,950, 550,300, 500,300, 500,1000, 550,250, 550,300, 550,950, 550,300, 500,300, 500,300, 550,250, 550,300, 500,300, 550,250, 550,250, 600,250, 500,300, 550,250, 550,250, 550,300, 550,250, 500,300, 550,300, 500,300, 500,1000, 550,250, 550,300, 500,1000, 550,250, 550,300, 500,1000, 550,1000, 500,300, 500,300, 550,250, 550,300, 500,300, 500,300, 550,300, 500,1000, 550,950, 550,300, 500,300, 500,300, 550,250, 550,300, 500,300, 550,950, 550,300, 500,1000, 550,1000, 500,1000, 500,300, 550,300, 500,300, 500,300, 550,250, 550,300, 500,300, 500,300, 550,250, 550,300, 500,300, 550,250, 550,250, 550,300, 500,300, 500,300, 550,250, 550,300, 500,300, 550,250, 550,300, 500,300, 500,300, 550,250, 550,250, 550,300, 550,250, 550,250, 550,300, 500,300, 500,300, 550,250, 550,300, 500,300, 500,300, 500,350, 500,1000, 500,1000, 500,1050, 500,1000, 500,1050, 500,300, 550};
unsigned int Temp26[] = {3000,1650, 500,1000, 500,1050, 500,300, 500,300, 500,350, 500,1000, 500,300, 500,350, 500,1000, 500,1050, 450,350, 500,1000, 500,300, 500,350, 500,1000, 500,1050, 500,300, 500,1000, 500,1050, 500,300, 500,300, 500,1050, 500,300, 500,300, 500,1050, 500,300, 500,300, 500,300, 500,350, 500,300, 500,300, 500,350, 500,300, 500,300, 500,300, 500,350, 500,300, 500,300, 500,300, 500,350, 500,300, 500,300, 500,1050, 500,300, 500,300, 500,1050, 450,350, 500,300, 500,1050, 500,1000, 500,300, 500,350, 500,300, 500,300, 500,300, 500,350, 500,1000, 500,300, 500,1050, 500,300, 500,300, 500,300, 500,350, 500,300, 500,300, 500,1050, 500,300, 500,1050, 450,1050, 500,1000, 500,350, 500,300, 500,300, 500,350, 450,350, 500,300, 500,300, 500,300, 500,350, 500,300, 500,300, 500,350, 500,300, 500,300, 500,300, 500,350, 450,350, 500,300, 500,350, 450,350, 500,300, 500,300, 500,300, 500,350, 500,300, 500,300, 500,350, 500,300, 500,300, 500,300, 500,350, 500,300, 500,300, 500,350, 450,1050, 500,1000, 500,350, 500,1000, 500,1000, 500,1050, 500,1000, 500,350, 500};
unsigned int Temp27[] = {3050,1600, 550,1000, 500,1000, 550,300, 500,300, 550,250, 550,1000, 500,300, 550,300, 500,1000, 550,1000, 500,300, 550,1000, 550,250, 500,300, 550,1000, 500,1050, 500,300, 500,1000, 550,1000, 500,300, 550,250, 550,1000, 550,250, 550,300, 500,1000, 550,300, 500,300, 550,250, 550,300, 500,300, 500,300, 550,300, 500,300, 550,250, 550,300, 500,300, 500,300, 550,300, 500,300, 500,300, 550,300, 500,300, 500,1000, 550,300, 500,300, 550,1000, 500,300, 500,300, 550,1000, 550,1000, 500,300, 500,300, 550,250, 550,300, 500,300, 550,300, 500,300, 500,300, 550,1000, 500,300, 550,250, 550,300, 500,300, 500,300, 500,350, 500,300, 550,250, 550,1000, 500,1000, 550,1000, 500,300, 550,300, 500,300, 550,250, 550,300, 500,300, 500,300, 550,300, 500,300, 500,300, 550,300, 500,300, 550,250, 550,300, 500,300, 500,300, 500,300, 550,300, 550,250, 550,300, 500,300, 500,300, 550,300, 500,300, 500,300, 550,300, 500,300, 500,300, 550,300, 500,300, 500,300, 500,300, 500,350, 500,300, 500,350, 500,300, 500,300, 500,1050, 500,1000, 500,1050, 500,1000, 500,350, 500};  // PANASONIC C4D3:64800024
unsigned int Temp28[] = {3100,1600, 550,950, 550,1000, 550,250, 550,250, 550,250, 550,1000, 500,300, 500,300, 550,1000, 500,1000, 550,250, 550,1000, 500,300, 550,250, 550,1000, 550,950, 550,300, 500,1000, 550,950, 550,300, 550,250, 500,1000, 550,300, 500,300, 550,950, 550,300, 500,300, 500,300, 550,250, 550,300, 550,250, 500,300, 550,300, 500,300, 500,300, 550,250, 550,250, 600,250, 500,300, 500,300, 550,300, 500,300, 500,1000, 550,300, 500,300, 500,1000, 550,250, 550,300, 500,1000, 550,1000, 550,250, 550,250, 550,250, 550,300, 500,300, 550,250, 550,1000, 500,1000, 550,250, 550,300, 500,300, 500,300, 550,250, 550,300, 500,300, 550,1000, 500,300, 500,1000, 550,1000, 500,1000, 550,250, 550,300, 500,300, 550,250, 550,250, 550,300, 500,300, 500,300, 550,250, 550,300, 500,300, 550,250, 550,300, 550,250, 500,300, 550,250, 550,250, 550,300, 550,250, 550,250, 550,300, 500,300, 500,300, 550,250, 550,300, 500,300, 550,250, 550,300, 500,300, 500,300, 550,250, 550,250, 550,300, 500,300, 550,1000, 500,300, 500,300, 550,950, 550,1000, 500,1000, 550,1000, 500,300, 550};
unsigned int Temp29[] = {3100,1550, 600,950, 500,1000, 550,300, 500,300, 500,300, 550,950, 550,300, 550,250, 550,1000, 500,1000, 550,250, 550,1000, 500,300, 550,250, 550,950, 600,950, 550,250, 550,1000, 500,1000, 550,250, 600,250, 550,950, 550,250, 550,300, 550,950, 550,250, 550,300, 550,250, 550,250, 550,250, 550,300, 550,250, 550,250, 550,300, 500,300, 550,250, 550,250, 550,300, 500,300, 550,250, 550,250, 600,250, 550,950, 550,250, 550,300, 500,1000, 550,250, 550,300, 550,950, 550,1000, 500,300, 500,300, 550,250, 550,250, 550,300, 500,300, 550,250, 550,1000, 500,300, 550,250, 550,300, 500,300, 550,250, 550,250, 550,300, 500,1000, 550,250, 550,1000, 500,1000, 550,1000, 500,300, 500,300, 550,300, 500,300, 500,300, 550,250, 550,250, 550,300, 500,300, 500,300, 550,300, 500,300, 500,300, 550,250, 550,300, 500,300, 500,300, 550,300, 500,300, 500,300, 550,250, 550,250, 550,300, 500,300, 500,300, 550,300, 500,300, 500,300, 550,250, 550,300, 500,300, 500,300, 550,250, 550,300, 500,300, 550,250, 550,250, 550,1000, 500,1000, 550,1000, 500,1000, 550,300, 500};
unsigned int Temp30[] = {3000,1650, 500,1000, 550,1000, 500,300, 500,300, 550,250, 550,1000, 500,300, 500,300, 550,1000, 550,950, 550,250, 550,1000, 550,250, 550,250, 550,1000, 550,950, 550,300, 500,1000, 550,950, 550,300, 500,300, 550,950, 550,300, 550,250, 550,1000, 500,300, 500,300, 550,250, 550,250, 550,300, 500,300, 550,250, 550,300, 500,300, 500,300, 550,250, 550,300, 500,300, 500,300, 550,300, 500,300, 500,300, 550,950, 550,300, 500,300, 500,1000, 550,250, 550,300, 550,950, 550,1000, 500,300, 550,250, 550,250, 600,250, 500,300, 550,250, 550,1000, 500,300, 550,250, 550,300, 500,300, 500,300, 550,250, 550,300, 500,300, 550,950, 550,300, 500,1000, 550,950, 550,1000, 500,300, 550,300, 500,300, 500,300, 550,250, 550,300, 500,300, 500,300, 550,250, 550,300, 500,300, 500,300, 550,250, 550,300, 500,300, 500,300, 550,250, 550,300, 500,300, 550,250, 550,300, 500,300, 500,300, 550,250, 550,250, 550,300, 500,300, 550,250, 550,300, 500,300, 500,300, 550,250, 550,300, 500,300, 550,950, 500,1050, 500,1000, 500,350, 500,1000, 500,1000, 500,1050, 500,300, 500};
//Change it for your remote
IRsend irsend;
int Measured_temp;
int Measured_Humi;
int AC_Temp;
char temp_error = 2;
int Pev_value;
boolean AC = false;
int khz = 38; // 38kHz carrier frequency for the NEC protocol
void setup()
{
Serial.begin(9600);
display.begin(SSD1306_SWITCHCAPVCC);
display.clearDisplay();
}
void loop() {
  DHT.read11(DHT11_PIN); //Read the Temp and Humidity
  Measured_temp = DHT.temperature + temp_error;
  Measured_Humi = DHT.humidity;
// text display tests
  display.setTextSize(1);
  display.setTextColor(WHITE);
  display.setCursor(0,0);
  display.print("Temperature: "); display.print(Measured_temp);display.println("C");
  display.setCursor(0,10);
  display.print("Humidity: "); display.print(Measured_Humi);display.println("%");
  display.setCursor(0,20);
  display.print("AC Temp: "); display.print(AC_Temp);display.println("C");
  display.display();
  delay(500);
  display.clearDisplay();
 if ((Measured_temp <= (Desired_temperature-3)) && AC == true) //If AC is turned on and temperature is less than 3 degree of Desired value #24 turn off
 {
  irsend.sendRaw(ACoff, sizeof(ACoff) / sizeof(ACoff[0]), khz);  delay(2000);//Send signal to Turn Off the AC
  AC_Temp = 0; AC=false;
 }
 if ((Measured_temp >= Desired_temperature+4) && AC == false) //If AC is off and measured Temp is greater than Desired Temp
 {
  irsend.sendRaw(ACon, sizeof(ACon) / sizeof(ACon[0]), khz); delay(2000); //Send Signal to Turn On the AC
  delay(2000);
  irsend.sendRaw(Temp27, sizeof(Temp27) / sizeof(Temp27[0]), khz); //Send signal to set 27*C
  AC_Temp = 27; AC=true;
 }
if ( Measured_temp != Pev_value) //Change the temperature only if the measured voltage value changes
{
if (Measured_temp == Desired_temperature+3) //If AC is ON and measured temp is very very high than desired
{
   irsend.sendRaw(Temp24, sizeof(Temp24) / sizeof(Temp24[0]), khz); delay(2000);//Send signal to set 24*C
  AC_Temp = 24;
}
if (Measured_temp == Desired_temperature+2) //If AC is ON and measured temp is very high than desired
{
   irsend.sendRaw(Temp25, sizeof(Temp25) / sizeof(Temp25[0]), khz); delay(2000);//Send signal to set 25*C
  AC_Temp = 25;
}
if (Measured_temp == Desired_temperature+1) //If AC is ON and measured temp is very high than desired
{
   irsend.sendRaw(Temp26, sizeof(Temp26) / sizeof(Temp26[0]), khz); delay(2000);//Send signal to set 26*C
  AC_Temp = 26;
}
if (Measured_temp == 27 ) //If AC is ON and measured temp is desired value
{
  irsend.sendRaw(Temp27, sizeof(Temp27) / sizeof(Temp27[0]), khz); //Send signal to set 27*C
  AC_Temp = 27;
}
if (Measured_temp == Desired_temperature-1) //If AC is ON and measured temp is low than desired value
{
  irsend.sendRaw(Temp28, sizeof(Temp28) / sizeof(Temp28[0]), khz); delay(2000);//Send signal to set 28*C
  AC_Temp = 28;
}
if (Measured_temp == Desired_temperature-2 ) //If AC is ON and measured temp is very low than desired value
{
  irsend.sendRaw(Temp29, sizeof(Temp29) / sizeof(Temp29[0]), khz); delay(2000);//Send signal to set 29*C
  AC_Temp = 29;
}
if (Measured_temp == Desired_temperature-3 ) //If AC is ON and measured temp is very very low desired value
{
  irsend.sendRaw(Temp30, sizeof(Temp30) / sizeof(Temp30[0]), khz); delay(2000);//Send signal to set 30*C
  AC_Temp = 30;
}
}
Pev_value = Measured_temp;
}
Comments
automatic controller with timer
Hi, there its a wonderful project infact very useful if we want to change temperature in midnight. i need one help from you. i want to change the temperature setting for every one hour say starting 9 p.m onwards every 1 hour temperature should be set to 26 deg for 1 hour and to be set to 27 deg for 1 hour and should be cyclic. can you please share the code for the same. thanks in advance
Error while downloading/ Uploading program
I tried many times to download the program. But, I found the error (dht. library is missing) even I installed it.
Can you help me to solve this error? Or send me the new program.
What Error? Always post your
What Error? Always post your error info if at all you are looking for any help
why i run this coding have
why i run this coding have error
Arduino:1.8.5 (Windows 10), 开发板:"Arduino/Genuino Uno"
C:\Users\18766\Documents\Arduino\__\__.ino:39:0: warning: "SSD1306_LCDHEIGHT" redefined
#define SSD1306_LCDHEIGHT 64 //Change if you are using a Different OLED
^
In file included from C:\Users\18766\Documents\Arduino\__\__.ino:28:0:
C:\Users\18766\Documents\Arduino\libraries\Adafruit_SSD1306-master/Adafruit_SSD1306.h:91:0: note: this is the location of the previous definition
#define SSD1306_LCDHEIGHT 32
^
__:42: error: 'DHt' does not name a type
DHt DHT; //Sensor object named as DHT
^
C:\Users\18766\Documents\Arduino\__\__.ino: In function 'void loop()':
__:79: error: expected unqualified-id before '.' token
DHT.read11(DHT11_PIN); //Read the Temp and Humidity
^
__:80: error: expected primary-expression before '.' token
Measured_temp = DHT.temperature + temp_error;
^
__:81: error: expected primary-expression before '.' token
Measured_Humi = DHT.humidity;
^
exit status 1
'DHt' does not name a type
Automatic AC temperature controller using arduino, DHT 111 an IR
Good evening.
Thank you for explaination about the this project topic Automatic AC temperature controller using arduino, DHT111 and IR blaster. Pls I need the programming code of this project, pls I need the code
An error
C:\Users\mshaf\AppData\Local\Temp\arduino_modified_sketch_444937\sketch_sep26a.ino:5:102: fatal error: dht.h: No such file or directory
#include <dht.h> //Library for dht11 Temperature and Humidity sensor (Download from Link in article)
^
compilation terminated.
Multiple libraries were found for "IRremote.h"
Used: C:\Users\mshaf\Documents\Arduino\libraries\IRremote-2.2.3
Not used: C:\Users\mshaf\Documents\Arduino\libraries\Arduino-IRremote-master
Not used: C:\Program Files (x86)\Arduino\libraries\RobotIRremote
exit status 1
Error compiling for board Arduino/Genuino Mega or Mega 2560.
irsend
Hi,
I followed all the instructions but im having a problem with the irsend, the ir can not opent the AC once reaches above 27C as per your program says:
if ((Measured_temp >= Desired_temperature+4) && AC == false) //If AC is off and measured Temp is greater than Desired Temp
{
irsend.sendRaw(ACon, sizeof(ACon) / sizeof(ACon[0]), khz); delay(2000); //Send Signal to Turn On the AC
delay(2000);
irsend.sendRaw(Temp27, sizeof(Temp27) / sizeof(Temp27[0]), khz); //Send signal to set 27*C
AC_Temp = 27; AC=true;
Can we add motion detector to
Can we add motion detector to this project room non occupied condition maintain the temperature what we give
I just made it
A very detail instruction, i just made in a day even with different component and also with improvement how to control AC with my own preference (off if bellow 27 and wait for stable temperature changes).
Made registration and comment here just apreciate your work. Big thanks !
Thanks for your words, glad
Thanks for your words, glad you liked it
decode for MITSUBISHI
Hi friends , my ac is mitsubishi and these raws dose not work with it to control my ac how can i decode it's remote ? Itest arduino example to decode it but it seems that codes are not correct the raw buffer is 100 . please help me , I'm new in arduino and don't know how to change buffer size to decode my remote codes correctly .thanks
Arduino UNO has low memeory
Arduino UNO has low memeory which cannot hold all the decoded values from your remote. May be one or two buttons can be remembered.
Yes the procedure will work all remotes even for mitsubishi
Hi, could you please send the
Hi, could you please send the updated codes since your code is not working with dht library. Thank you
another question
my arduino is uno is it able to decode and send the long raws ?
thanks
Thanks for your answer . But you don't say how can I save longe raws . When i press the botton , serial nuber write ; too long raw icrease raw buffer in ir remoteUnt.h I increase it to 255 but not solve and that warnin writed again . When I increase raw buffer more than 255 in serial monitor write raw buffer [35] why it decrease when I increase raw buffer to 400 or 600 or 500?
Edit IrRemoteInt.h
edited rawbuf to 1001 works for me
#define RAWBUF 1001 // Maximum length of raw duration buffer
Good Project
I did it succeed with arduino uno & Mega, My problem is, How do i make create unsigned int Temp0[] to unsigned int Temp16[] will be using for Cold Storage Control.
Let me know your solution, I don't have remote control from Temperature 0 degree Celsius. I wish to try for Mitsubushi AC or make to Arduino for Sender and Receiver.
Appreciated thanks
Error while downloading/ Uploading program
Can you send me the code for the same (arduino Mega)?
Error while downloading/ Uploading program
Hello,
I tried many times to download the program. But, I found the error (dht. library is missing) even I installed it.
Can you help me to solve this error? Or send me the new program.
i too found the error ie.dht.library is missing even after i ins
i too found the error ie.dht.library is missing even after i installed it.can u pls tell me new code for it
i too found the error ie.dht.library is missing even after i ins
i too found the error ie.dht.library is missing even after i installed it.can u pls tell me new code for it
Hi, Could you please explain
Hi, Could you please explain to me how do you get the AC temperature with your code since the code does not tell the way of getting AC temperature? And also it would be better if you post the latest code because your code is getting error in the dht library. Thank you.
My IR transmitter not sending
My IR transmitter not sending, how to fixed it?
can i ask you something, why
can i ask you something, why my OLED not function even though i already uncomment #define SSD1306_128_64 because im using OLED 128x64. please reply because when i upload ssd1306_128x64_spi, my OLED function but when i using your coding, OLED not function. Please reply, do i need setting something else.
nevermine my circuit can
nevermine my circuit can function but i still have the problem negatif temperature, humidity and AC temp cant read the AC.
Please can you reply to my
Please can you reply to my message, how to fix my problem OLED. my OLED display temperature -997C, humidity -999% and AC temp 0. Please, i think my problem is library. can you reply my message, Im using arduino mega 2560 and project same like you and the only problem is my OLED display wrong temperature and humidity. i think my library is problem.



As far as i know irsend does not work with arduino mega due .How did you make that happen ??