Fire Alarm Systems are very common in commercial building and factories, these devices usual contain a cluster of sensors that constantly monitors for any flame, gas or fire in the building and triggers an alarm if it detects any of these. One of the simplest way to detect fire is by using an IR Flame sensor, these sensors have an IR photodiode which is sensitive to IR light. Now, in the event of a fire, the fire will not only produce heat but will also emit IR rays, yes every burning flame will emit some level of IR light, this light is not visible to human eyes but our flame sensor can detect it and alert a microcontroller like Arduino that a fire has been detected.
In this article we interface Flame Sensor with Arduino and learn all the steps to build Fire Alarm System by using Arduino and flame sensor. Flame sensor module has a photodiode to detect the light and an op-amp to control the sensitivity. It is used to detect fire and provide a HIGH signal upon the detection. Arduino reads the signal and provides alert by turning on the buzzer and LED. The flame sensor used here is an IR based flame sensor. We have also used the same concept to detect fire in our Fire Fighting Robot, you can also check that our if you are interested.
Flame Sensor
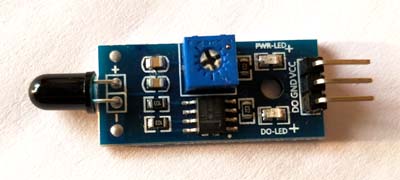
A flame detector is a sensor designed to detect and respond to the presence of a flame or fire. Responses to a detected flame depend on the installation but can include sounding an alarm, deactivating a fuel line (such as a propane or a natural gas line), and activating a fire suppression system. The IR Flame sensor used in this project is shown below, these sensors are also called Fire sensor module or flame detector sensor sometimes.

There are different types of flame detection methods. Some of them are: Ultraviolet detector, near IR array detector, infrared (IR) detector, Infrared thermal cameras, UV/IR detector etc.
When fire burns it emits a small amount of Infra-red light, this light will be received by the Photodiode (IR receiver) on the sensor module. Then we use an Op-Amp to check for a change in voltage across the IR Receiver, so that if a fire is detected the output pin (DO) will give 0V(LOW), and if the is no fire the output pin will be 5V(HIGH).
In this project, we are using an IR based flame sensor. It is based on the YG1006 sensor which is a high speed and high sensitive NPN silicon phototransistor. It can detect infrared light with a wavelength ranging from 700nm to 1000nm and its detection angle is about 60°. The flame sensor module consists of a photodiode (IR receiver), resistor, capacitor, potentiometer, and LM393 comparator in an integrated circuit. The sensitivity can be adjusted by varying the onboard potentiometer. Working voltage is between 3.3v and 5v DC, with a digital output. A logic high on the output indicates the presence of flame or fire. A logic low on output indicates the absence of flame or fire.
Below is the Pin Description of the Flame sensor Module:
|
Pin |
Description |
|
Vcc |
3.3 – 5V power supply |
|
GND |
Ground |
|
Dout |
Digital output |
Applications of flame sensors
- Hydrogen stations
- Combustion monitors for burners
- Oil and gas pipelines
- Automotive manufacturing facilities
- Nuclear facilities
- Aircraft hangars
- Turbine enclosures
Components Required
- Arduino Uno (any Arduino board can be used)
- Flame sensor module
- LED
- Buzzer
- Resistor
- Jumper wires
Circuit Diagram
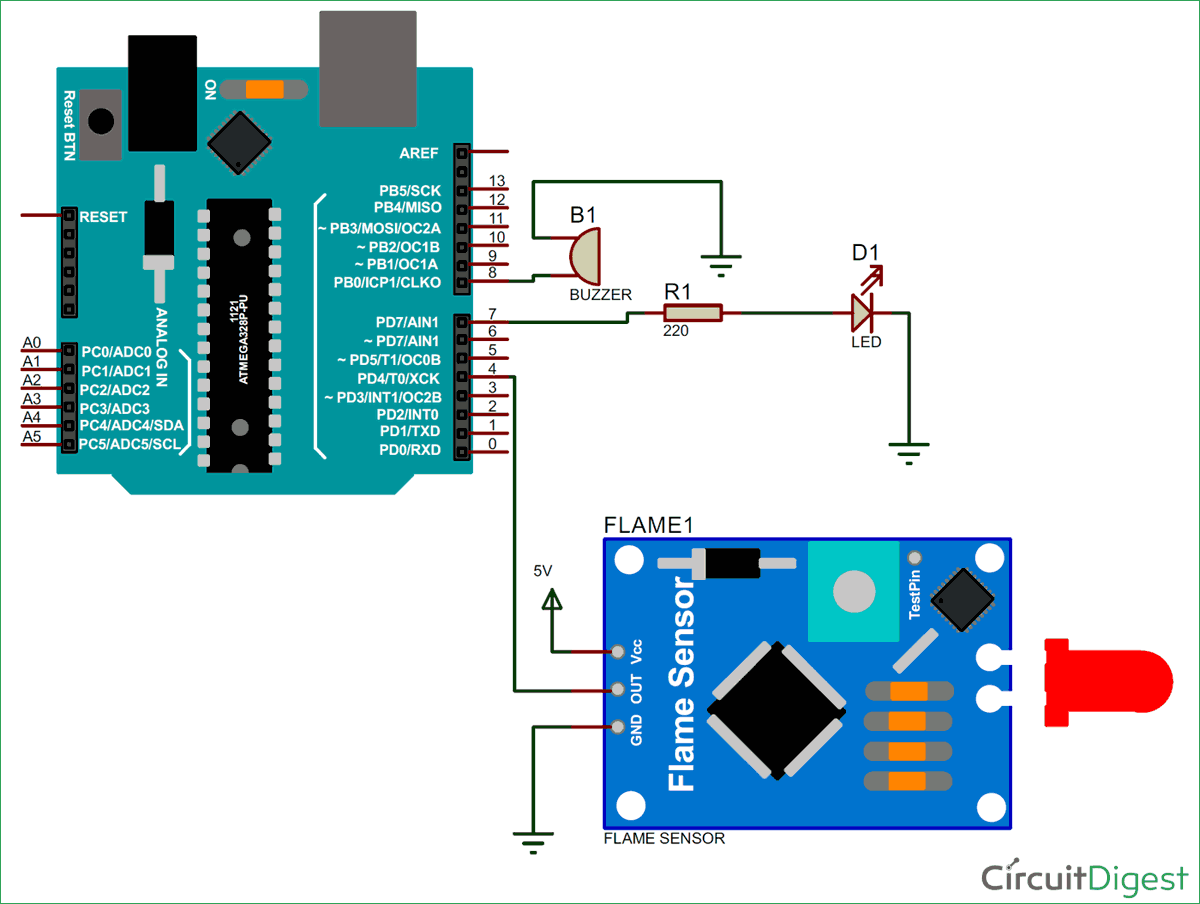
The below image is the Arduino fire sensor circuit diagram, it shows how to interface the fire sensor module with Arduino.
Working of Flame Sensor with Arduino
Arduino Uno is a open-source microcontroller board based on the ATmega328p microcontroller. It has 14 digital pins (out of which 6 pins can be used as PWM outputs), 6 analog inputs, on-board voltage regulators etc. Arduino Uno has 32KB of flash memory, 2KB of SRAM and 1KB of EEPROM. It operates at a clock frequency of 16MHz. Arduino Uno supports Serial, I2C, SPI communication for communicating with other devices. The table below shows the technical specification of Arduino Uno.
|
Microcontroller |
ATmega328p |
|
Operating voltage |
5V |
|
Input Voltage |
7-12V (recommended) |
|
Digital I/O pins |
14 |
|
Analog pins |
6 |
|
Flash memory |
32KB |
|
SRAM |
2KB |
|
EEPROM |
1KB |
|
Clock speed |
16MHz |
The flame sensor detects the presence of fire or flame based on the Infrared (IR) wavelength emitted by the flame. It gives logic 1 as output if a flame is detected, otherwise, it gives logic 0 as output. Arduino Uno checks the logic level on the output pin of the sensor and performs further tasks such as activating the buzzer and LED, sending an alert message.

Also, check our other fire alarm projects:
- Fire Alarm using Thermistor
- Fire Alarm System using AVR Microcontroller
- Arduino Based Fire Fighting Robot
Code explanation
The complete Arduino code for this project is given at the end of this article. The code is split into small meaningful chunks and explained below.
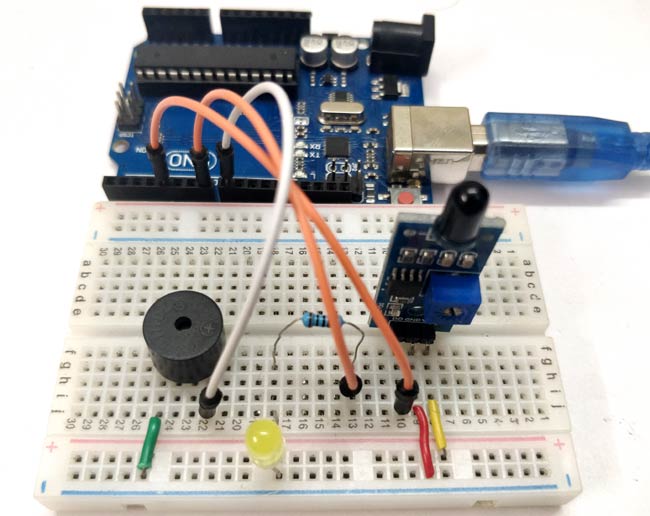
In this part of the code, we are going to define pins for Flame sensor, LED and buzzer which are connected to Arduino. The flame sensor is connected to digital pin 4 of Arduino. The buzzer is connected to digital pin 8 of Arduino. LED is connected to digital pin 7 of Arduino.
Variable “flame_detected” is used for storing the digital value read out from the flame sensor. Based on this value we will detect the presence of flame.
int buzzer = 8 ;
int LED = 7 ;
int flame_sensor = 4 ;
int flame_detected ;
In this part of the code, we are going to set the status of digital pins of Arduino and configure
Baud rate for Serial communication with PC for displaying the status of the flame detection circuit.
void setup()
{
  Serial.begin(9600) ;
  pinMode(buzzer, OUTPUT) ;
  pinMode(LED, OUTPUT) ;
  pinMode(flame_sensor, INPUT) ;
}
This line of code reads the digital output from flame sensor and stores it in the variable “flame_detected”.
flame_detected = digitalRead(flame_sensor) ;
Based on the value stored in “flame_detected”, we have to turn on the buzzer and LED. In this part of the code, we compare the value stored in “flame_detected” with 0 or 1.
If its equal to 1, it indicates that flame has been detected. We have to turn on buzzer and LED and then display an alert message in Serial monitor of Arduino IDE.
If its equal to 0, then it indicates that no flame has been detected so we have to turn off LED and buzzer. This process is repeated every second to identify the presence of fire or flame.
if (flame_detected == 1)
  {
    Serial.println("Flame detected...! take action immediately.");
    digitalWrite(buzzer, HIGH);
    digitalWrite(LED, HIGH);
    delay(200);
    digitalWrite(LED, LOW);
    delay(200);
  }
  else
  {
    Serial.println("No flame detected. stay cool");
    digitalWrite(buzzer, LOW);
    digitalWrite(LED, LOW);
  }
  delay(1000);
We have built a fire fighting robot based on this concept, which automatically detects the fire and pump out the water to put down the fire. Now you know how to do fire detection using Arduino and flame sensor, hope you enjoyed learning it, if you have any questions leave them in the comment section below.
Check the complete code and demo Video below.
Complete Project Code
int buzzer = 8;
int LED = 7;
int flame_sensor = 4;
int flame_detected;
void setup()
{
  Serial.begin(9600);
  pinMode(buzzer, OUTPUT);
  pinMode(LED, OUTPUT);
  pinMode(flame_sensor, INPUT);
}
void loop()
{
  flame_detected = digitalRead(flame_sensor);
  if (flame_detected == 1)
  {
    Serial.println("Flame detected...! take action immediately.");
    digitalWrite(buzzer, HIGH);
    digitalWrite(LED, HIGH);
    delay(200);
    digitalWrite(LED, LOW);
    delay(200);
  }
  else
  {
    Serial.println("No flame detected. stay cool");
    digitalWrite(buzzer, LOW);
    digitalWrite(LED, LOW);
  }
  delay(1000);
}
Comments
Can u please tell whether
Can u please tell whether this arduino flash sensor interface use iot technology ?
thank you so much for giving
thank you so much for giving good information about flame sensor


project for students