The Oscilloscope is one of the most important tools you will find on the workbench of any electronics engineer or maker. It is primarily used for viewing waveform and determining voltage levels, frequency, noise and other parameters of signals applied at its input that might change over time. It is also used by embedded software developers for code debugging and technicians for troubleshooting electronic devices during repair. These reasons make the oscilloscope a must have tool for any engineer. The only issue is they can be very expensive, Oscilloscopes that performs the most basic of functions with the least accuracy can be as expensive as $45 to $100 while the more advanced and efficient have cost over a $150. Today I will be demonstrating how to use the Arduino and a software, which will be developed with my favourite programming language Python, to build a low cost, 4-channel Arduino oscilloscope capable of performing the tasks for which some of the cheap oscilloscope are deployed like the display of waveforms and determination of voltage levels for signals.
[You can also check this similar project: DIY Mini Oscilloscope using Arduino nano and OLED]
How it works
There are two parts for this project;
- The Data Converter
- The Plotter
Oscilloscopes generally involve the visual representation of an analog signal applied to its input channel. To achieve this, we need to first convert the signal from analog to digital and then plot the data. For the conversion, we will be leveraging on the ADC (Analog to Digital converter) on the atmega328p microcontroller used by the Arduino to convert the Analog data at the signal input to a digital signal. After conversion, the value per time is sent via UART from the Arduino to the PC where the plotter software which will be developed using python will convert the incoming stream of data to a waveform by plotting each data against time.
Required Components
The following components are required to build this project;
- Arduino Uno (Any of the other boards can be used)
- Breadboard
- 10k Resistor (1)
- LDR (1)
- Jumper wires
Required Softwares
- Arduino IDE
- Python
- Python Libraries: Pyserial, Matplotlib, Drawnow
Schematics
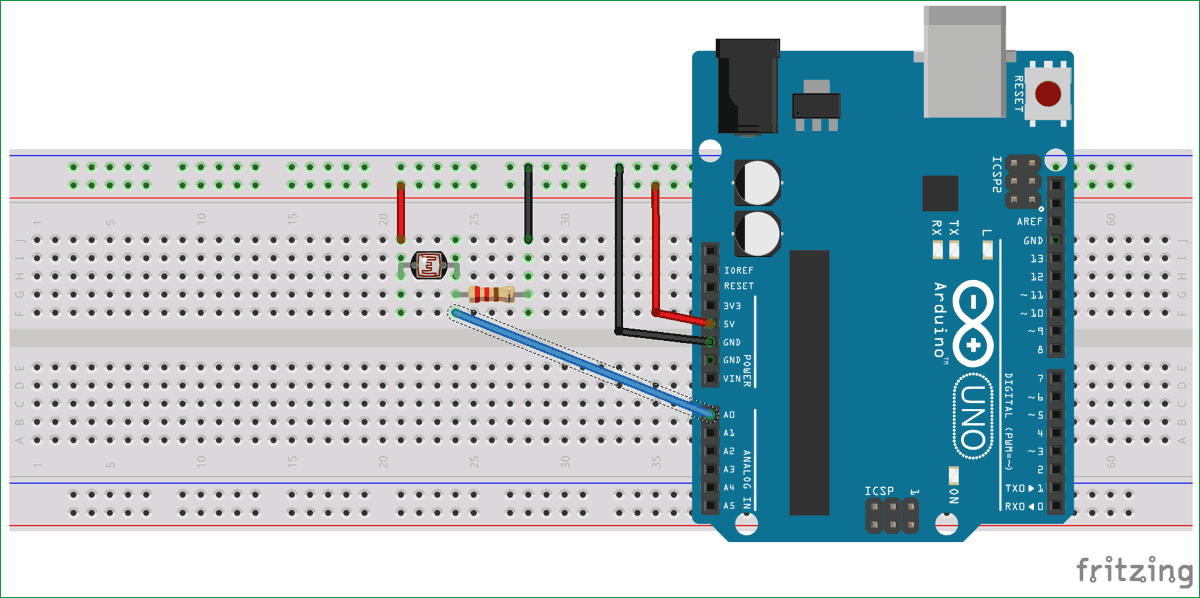
The schematic for the Arduino Oscilloscope is simple. All we need to do is connect the signal to be examined to the specified Analog pin of the Arduino. However, we will be using the LDR in a simple voltage divider setup to generate the signal to be examined, such that the generated waveform will describe the voltage level, based on the intensity of light around the LDR.
Connect the components as shown in the schematics below;
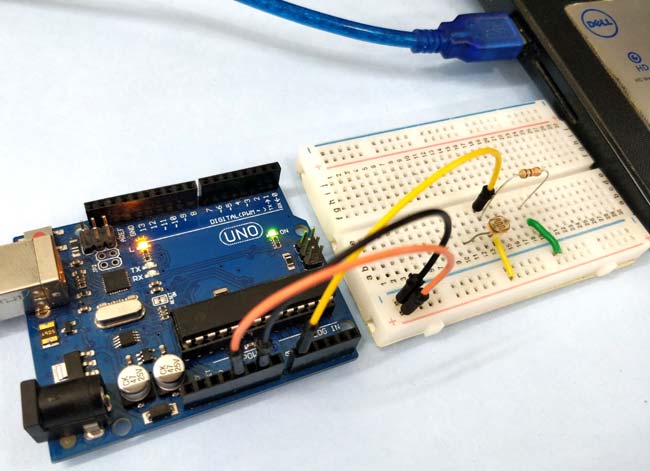
After connection, the setup should like the image below.

With the connections all done, we can proceed to write the code.
Arduino Osclloscope Code
We will be writing codes for each of the two sections. For the Plotter as mentioned earlier, we will be writing a python script that accepts the data from the Arduino via UART and Plots, while for the converter, we will be writing an Arduino sketch that takes in the data from the ADC and converts it to voltage levels which are sent to the plotter.
Python (Plotter) Script
Since the python code is more complex, we will start with it.
We will be using a couple of libraries including; drawnow, Matplotlib and Pyserial with the python script as mentioned earlier. Pyserial allows us to create a python script that can communicate over the serial port, Matplotlib gives us the ability to generate plots from the data received over the serial port and drawnow provides a means for us to update the plot in real time.
There are several ways to install these packages on your PC, the easiest being via pip. Pip can be installed via command line on a windows or linux machine. PIP is packaged with python3 so I will advise you install python3 and check the box about adding python to path. If you are having issues with installing pip, check out this the official python website for tips.
With pip installed, we can now install the other libraries we need.
Open the command prompt for windows users, terminal for linux users and enter the following;
pip install pyserial
With this done, install matplotlib using;
pip install matplotlib
Drawnow is sometimes installed alongside matplotlib but just to be sure, run;
pip install drawnow
With the installation complete, we are now ready to write the python script.
The python script for this project is similar to the one I wrote for the Raspberry Pi Based Oscilloscope.
We start by importing all the libraries needed for the code;
import time
import matplotlib.pyplot as plt
from drawnow import *

import pyserial
Next, we create and initialize the variables that will be used during the code. The array val will be used to store the data received from the serial port and cnt will be used to count. Data at location 0 will be deleted after every 50 data counts. This is done to keep the data being displayed on the oscilloscope.
val = [ ]
cnt = 0
Next, we create the serial port object through which the Arduino will communicate with our python script. Ensure the com port specified below is the same com port through which your Arduino board communicates with the IDE. The 115200 baud rate used above was used to ensure high speed communication with the Arduino. To prevent errors, the Arduino serial port must also be enabled to communicate with this baud rate.
port = serial.Serial('COM4', 115200, timeout=0.5)
Next, we make the plot interactive using;
plt.ion()
we need to create a function to generate the plot from the data received, creating the upper and minimum limit we are expecting, which in this case is 1023 based on the resolution of the Arduino’s ADC. We also set the title, label each axis and add a legend to make it easy to identify the plot.
#create the figure function
def makeFig():
    plt.ylim(-1023,1023)
    plt.title('Osciloscope')
    plt.grid(True)
    plt.ylabel('ADC outputs')
    plt.plot(val, 'ro-', label='Channel 0')
    plt.legend(loc='lower right')
With this done, we are now ready to write the main loop that takes the data from the serial port when available and plots it. To synchronize with the Arduino, a handshake data is sent to the Arduino by the python script to indicate its readiness to read data. When the Arduino receives the handshake data, it replies with data from the ADC. Without this handshake, we will not be able to plot the data in real time.
while (True):
    port.write(b's') #handshake with Arduino
    if (port.inWaiting()):# if the arduino replies
        value = port.readline()# read the reply
        print(value)#print so we can monitor it
        number = int(value) #convert received data to integer
        print('Channel 0: {0}'.format(number))
        # Sleep for half a second.
        time.sleep(0.01)
        val.append(int(number))
        drawnow(makeFig)#update plot to reflect new data input
        plt.pause(.000001)
        cnt = cnt+1
    if(cnt>50):
        val.pop(0)#keep the plot fresh by deleting the data at position 0
The complete python code for arduino oscilloscope is given at the end of this article shown below.
Arduino code
The second code is the Arduino sketch to obtain the data representing the signal from the ADC, then wait to receive the handshake signal from the plotter software. As soon as it receives the handshake signal, it sends the acquired data to the plotter software via UART.
We start by declaring the pin of the Analog pin of the Arduino to which the signal will be applied.
int sensorpin = A0;
Next, we initialize and start serial communication with a baud rate of 115200
void setup() {
  // initialize serial communication at 115200 bits per second to match that of the python script:
  Serial.begin(115200);
}
Lastly, the voidloop() function which handles the reading of the data, and sends the data over serial to the plotter.
void loop() {
  // read the input on analog pin 0:
  float sensorValue = analogRead(sensorpin);
  byte data = Serial.read();
  if (data == 's')
  {
    Serial.println(sensorValue);
    delay(10);        // delay in between reads for stability
  }
}
The complete Arduino Oscilloscope Code is given below as well as at the end of this article shown below.
int sensorpin = A0;
void setup() {
  // initialize serial communication at 115200 bits per second to match that of the python script:
  Serial.begin(115200);
}
void loop() {
  // read the input on analog pin 0:########################################################
  float sensorValue = analogRead(sensorpin);
  byte data = Serial.read();
  if (data == 's')
  {
    Serial.println(sensorValue);
    delay(10);        // delay in between reads for stability
  }
}
Arduino Oscilloscope in Action
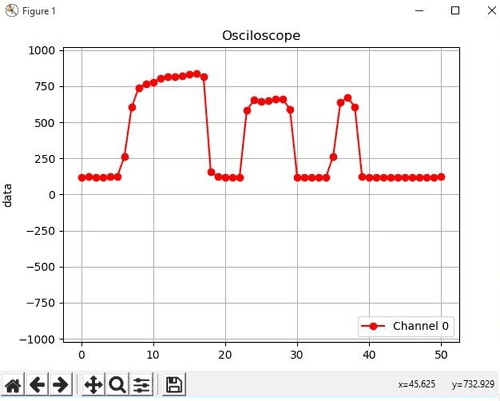
Upload the code to the Arduino setup and run the python script. You should see the data start streaming in via the python command line and the plot varying with the light intensity as shown in the image below.

So this is how Arduino can be used as Oscilloscope, it can also be made using Raspberry pi, check here the complete tutorial on Raspberry Pi based Oscilloscope.
Complete Project Code
Python Code:

import time

import matplotlib.pyplot as plt

from drawnow import *

import serial

val = [ ]

cnt = 0

#create the serial port object

port = serial.Serial('COM4', 115200, timeout=0.5)

plt.ion()
#create the figure function

def makeFig():

    plt.ylim(-1023,1023)

    plt.title('Osciloscope')

    plt.grid(True)

    plt.ylabel('data')

    plt.plot(val, 'ro-', label='Channel 0')

    plt.legend(loc='lower right')
while (True):

    port.write(b's') #handshake with Arduino

    if (port.inWaiting()):# if the arduino replies

        value = port.readline()# read the reply

        print(value)#print so we can monitor it

        number = int(value) #convert received data to integer

        print('Channel 0: {0}'.format(number))

        # Sleep for half a second.

        time.sleep(0.01)

        val.append(int(number))

        drawnow(makeFig)#update plot to reflect new data input

        plt.pause(.000001)

        cnt = cnt+1

    if(cnt>50):

        val.pop(0)#keep the plot fresh by deleting the data at position 0

Arduino Code:
int sensorpin = A0;

void setup() {

  // initialize serial communication at 115200 bits per second to match that of the python script:

  Serial.begin(115200);

}

void loop() {

  // read the input on analog pin 0:########################################################

  float sensorValue = analogRead(sensorpin);

  byte data = Serial.read();

  if (data == 's')

  {

    Serial.println(sensorValue);

    delay(10);        // delay in between reads for stability

  }

}
Comments
Works well
I did discover, however, that in the Python code I had to change:
number=int(value) to number=int(float(value)) to get rid of a conversion error (using Python 3.7)
I am a Python newbie and so would be interested if there is a better solution.
How it is done to achieve the input of the input signal?
I try to understand. For example, if I want to monitor the 110Vac signal from the current outlet. Then, I would have to put a light bulb to the socket, so that the LDR detects the signal of sinusoidal light intensity, present in the variations?
no you dont do that.LDR is
no you dont do that.LDR is meant to measure light intensity. It cannot be used to detect the intensity of light and predict the voltage value. Because it will also be affected by the light in the enviroment, like light from sun


Lovely setup