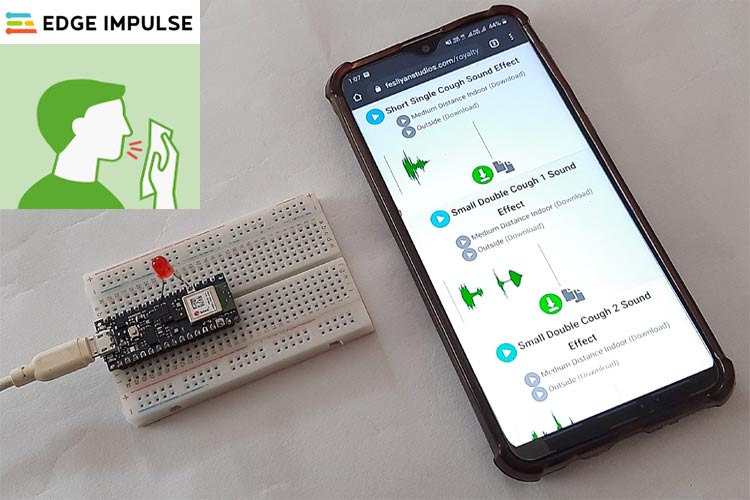
COVID19 is really a historic pandemic affecting the whole world very badly and people are building a lot of new devices to fight with it. We have also built an automatic sanitization machine and Thermal Gun for Contactless temperature screening. Today we will build one more device to help fighting with Coronavirus. It is a cough detection system, which can distinguish between noise and cough sound and can help finding Corona suspect. It will use machine learning techniques for that.
In this tutorial, we are going to build a Cough Detection system using Arduino 33 BLE Sense and Edge Impulse Studio. It can differentiate between normal background noise and coughing in real-time audio. We used Edge Impulse Studio to train a dataset of coughing and background noise samples and build a highly optimized TInyML model, that can detect a Cough sound in real-time.
Components Required
Hardware
- Arduino 33 BLE Sense
- LED
- Jumper Wires
Software
- Edge Impulse Studio
- Arduino IDE
We have covered a detailed tutorial on Arduino 33 BLE Sense.
Circuit Diagram
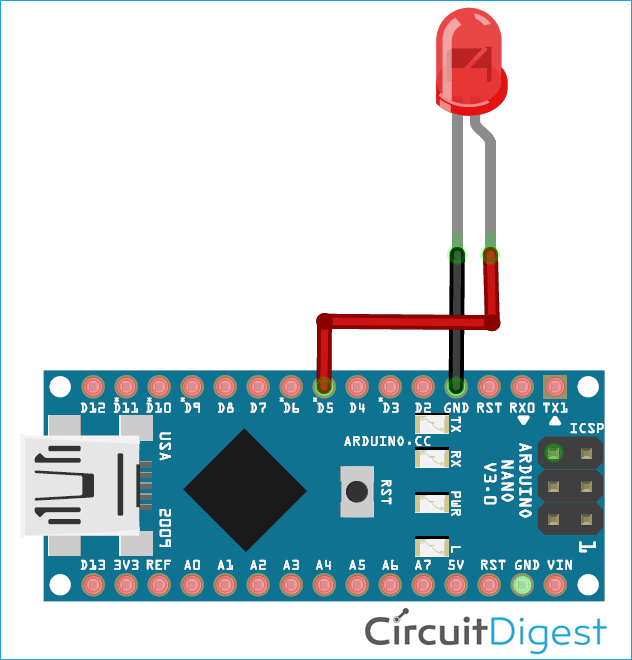
Circuit Diagram for Cough Detection Using Arduino 33 BLE Sense is given below. Fritzing part for Arduino 33 BLE was not available, so I used Arduino Nano as both have the same pin-out.
The Positive lead of LED is connected to digital pin 4 of Arduino 33 BLE sense and Negative lead is connected to the GND pin of Arduino.
Creating the Dataset for Cough Detection Machine
As mentioned earlier, we are using Edge Impulse Studio to train our cough detection model. For that, we have to collect a dataset that has the samples of data that we would like to be able to recognize on our Arduino. Since the goal is to detect the cough, you'll need to collect some samples of that and some other samples for noise, so it can distinguish between Cough and other Noises.
We will create a dataset with two classes “cough” and “noise”. To create a dataset, create an Edge Impulse account, verify your account and then start a new project. You can load the samples by using your mobile, your Arduino board or you can import a dataset into your edge impulse account. The easiest way to load the samples into your account is by using your mobile phone. For that, you have to connect your mobile with Edge Impulse.
To connect your Mobile phone, click on ‘Devices’ and then click on ‘Connect a New Device’.

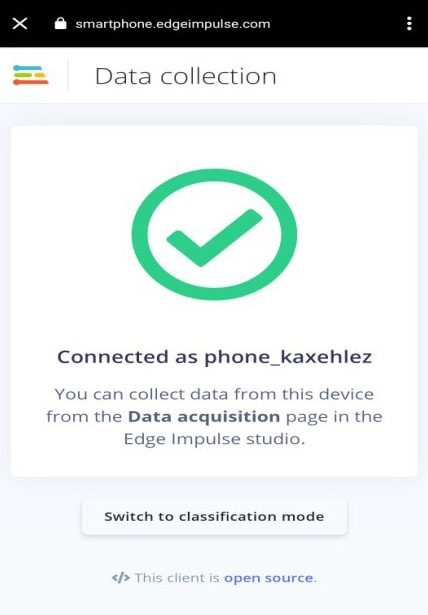
Now in the next window, click on ‘Use your Mobile Phone’, and a QR code will appear. Scan the QR code with your Mobile Phone using Google Lens or other QR code scanner app.
This will connect your phone with Edge Impulse studio.
With your phone connected with Edge Impulse Studio, you can now load your samples. To load the samples, click on ‘Data acquisition’. Now on the Data acquisition page, enter the label name, select the microphone as a sensor, and enter the sample length. Click on ‘Start sampling’, to start sampling a 40 Sec sample. Instead of forcing yourself to cough, you can use online cough samples of different lengths. Record a total of 10 to 12 cough samples of different lengths.
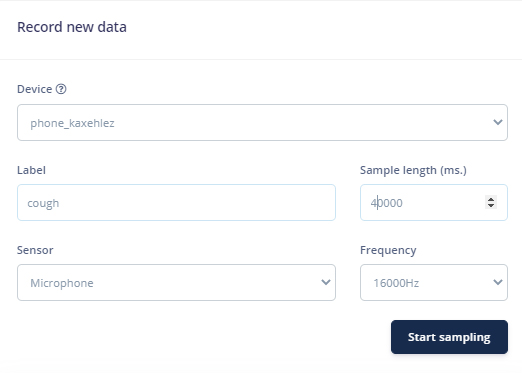
After uploading the cough samples, now set the label to ‘noise’ and collect another 10 to 12 noise samples.
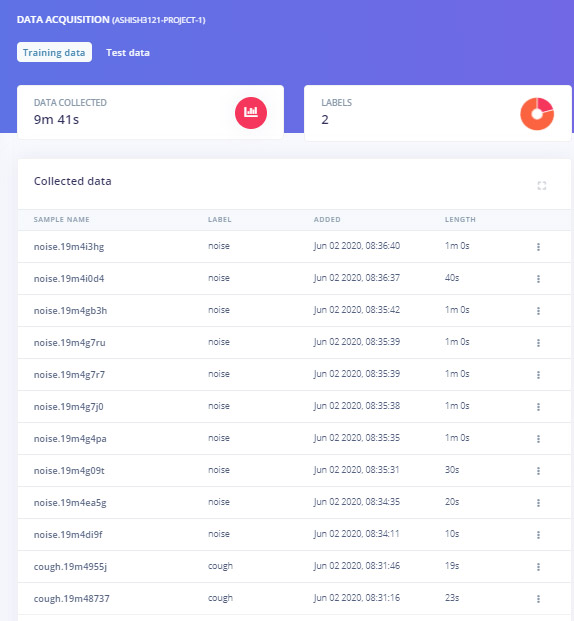
These samples are for Training the module, in the next steps, we will collect the Test Data. Test data should be at least 30% of training data, so collect the 3 samples of ‘noise’ and 4 to 5 samples of ‘cough’.
Instead of collecting your data, you can import our dataset into your Edge Impulse account using the Edge Impulse CLI Uploader.
To install the CLI Uploader, first, download and install Node.js on your laptop. After that open the command prompt and enter the below command:
npm install -g edge-impulse-cli
Now download the dataset (Dataset Link) and extract the file in your project folder. Open the command prompt and navigate to dataset location and run the below commands:
edge-impulse-uploader --clean
edge-impulse-uploader --category training training/*.json
edge-impulse-uploader --category training training/*.cbor
edge-impulse-uploader --category testing testing/*.json
edge-impulse-uploader --category testing testing/*.cbor
Training the Model and Tweaking the Code
As the dataset is ready, now we will create an impulse for data. For that go to the ‘Create impulse’ page.
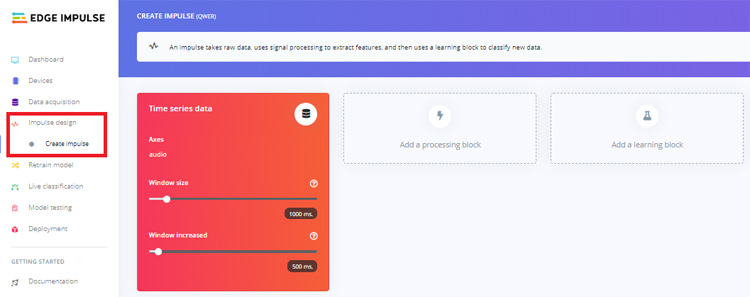
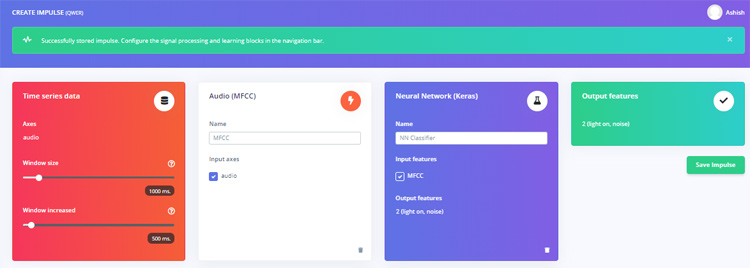
Now on the ‘Create impulse’ page, click on ‘Add a processing block’. In the next window, select the Audio (MFCC) block. After that click on ‘Add a learning block’ and select the Neural Network (Keras) block. Then click on ‘Save Impulse’.
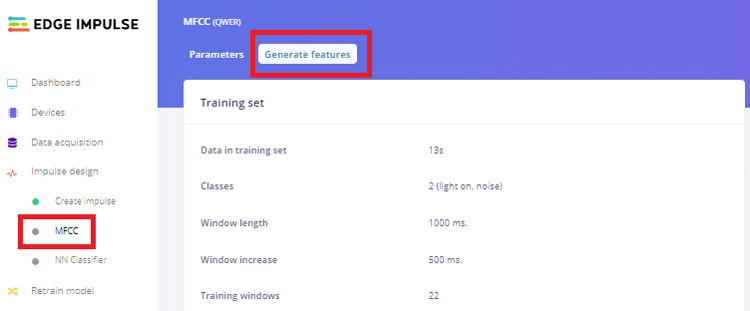
In the next step, go to the MFCC page and then click on ‘Generate Features’. It will generate MFCC blocks for all of our windows of audio.
After that go to the ‘NN Classifier’ page and click on the three dots on the upper right corner of the ‘Neural Network settings’ and select ‘Switch to Keras (expert) mode’.
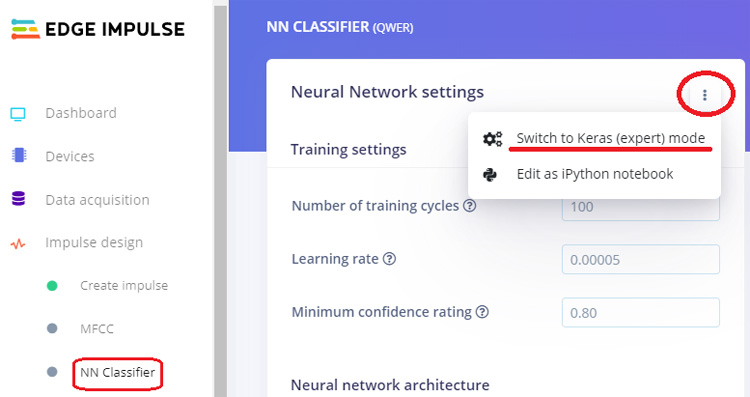
Replace the original with the following code and change the ‘Minimum confidence rating’ to ‘0.70’. Then click on the ‘Start training’ button. It will start training your model.
import tensorflow as tf
from tensorflow.keras.models import Sequential
from tensorflow.keras.layers import Dense, InputLayer, Dropout, Flatten, Reshape, BatchNormalization, Conv2D, MaxPooling2D, AveragePooling2D
from tensorflow.keras.optimizers import Adam
from tensorflow.keras.constraints import MaxNorm
# model architecture
model = Sequential()
model.add(InputLayer(input_shape=(X_train.shape[1], ), name='x_input'))
model.add(Reshape((int(X_train.shape[1] / 13), 13, 1), input_shape=(X_train.shape[1], )))
model.add(Conv2D(10, kernel_size=5, activation='relu', padding='same', kernel_constraint=MaxNorm(3)))
model.add(AveragePooling2D(pool_size=2, padding='same'))
model.add(Conv2D(5, kernel_size=5, activation='relu', padding='same', kernel_constraint=MaxNorm(3)))
model.add(AveragePooling2D(pool_size=2, padding='same'))
model.add(Flatten())
model.add(Dense(classes, activation='softmax', name='y_pred', kernel_constraint=MaxNorm(3)))
# this controls the learning rate
opt = Adam(lr=0.005, beta_1=0.9, beta_2=0.999)
# train the neural network
model.compile(loss='categorical_crossentropy', optimizer=opt, metrics=['accuracy'])
model.fit(X_train, Y_train, batch_size=32, epochs=9, validation_data=(X_test, Y_test), verbose=2)
After training the model, it will show the training performance. For me, the accuracy was 96.5% and loss was 0.10 that is good to proceed.

Now as our cough detection model is ready, we will deploy this model as Arduino library. Before downloading the model as a library, you can test the performance by going to the ‘Live Classification’ page.
Go to the ‘Deployment’ page and select ‘Arduino Library’. Now scroll down and click on ‘Build’ to start the process. This will build an Arduino library for your project.
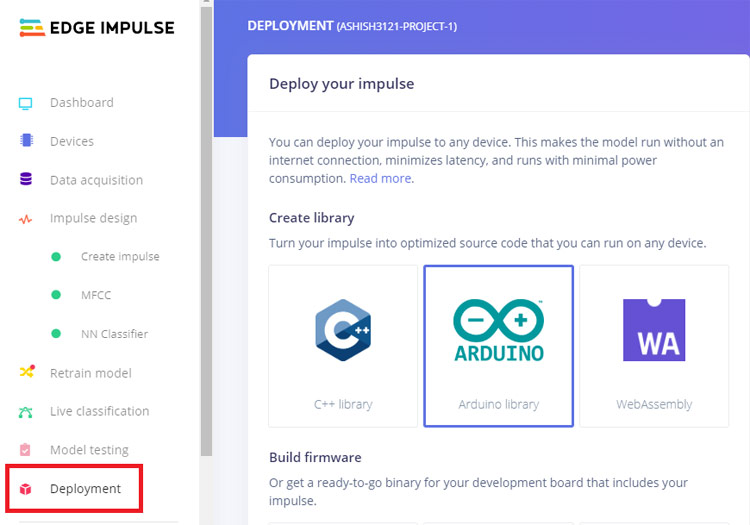
Now add the library in your Arduino IDE. For that open the Arduino IDE and then click on Sketch > Include Library > Add.ZIP library.
Then, load an example by going to File > Examples > Your project name - Edge Impulse > nano_ble33_sense_microphone.
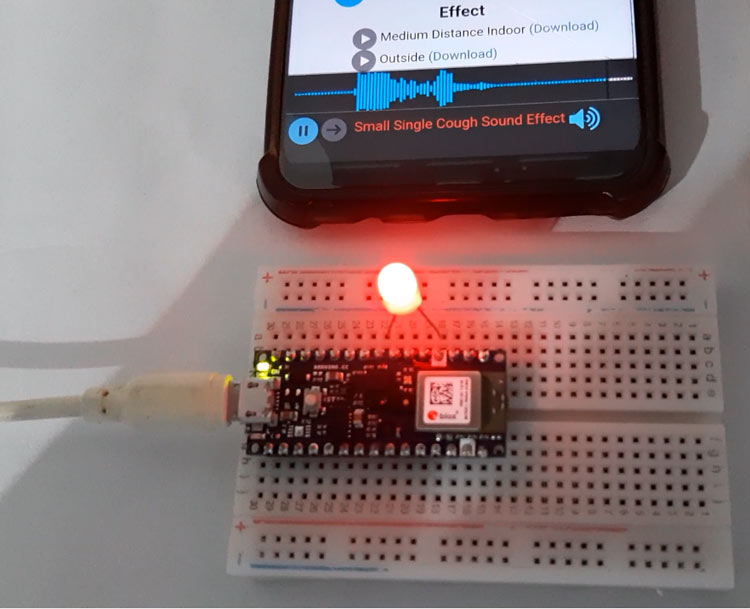
We will make some changes in the code so that we can make an alert sound when the Arduino detects cough. For that, a buzzer is interfaced with Arduino and whenever it detects cough, LED will blink three times.
The changes are made in void loop() functions where it is printing the noise and cough values. In the original code, it is printing both the labels and their values together.
for (size_t ix = 0; ix < EI_CLASSIFIER_LABEL_COUNT; ix++) {
ei_printf("    %s: %.5f\n", result.classification[ix].label, result.classification[ix].value);
   }
We are going to save both the noise and cough values in different variables and compare the noise values. If the noise value goes below 0.50 that means cough value is more than 0.50 and it will make the sound. Replace the original for loop() code with this:
for (size_t ix = 1; ix < EI_CLASSIFIER_LABEL_COUNT; ix++) {
    Serial.print( result.classification[ix].value);
    float Data = result.classification[ix].value;
    if (Data < 0.50){
    Serial.print("Cough Detected");
    alarm();
    }
    }
After making the changes, upload the code into your Arduino. Open the serial monitor at 115200 baud.
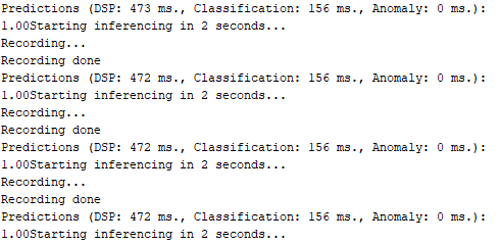
So this is how a cough detection machine can be built, it's not a very effective method to find any COVID19 suspect but it can work nicely in some crowded area.
A complete working video with library and code is given below:
Complete Project Code
#define EIDSP_QUANTIZE_FILTERBANK   0
#include <PDM.h>
#include <ashish3121-project-1_inference.h>
#define led 5
/** Audio buffers, pointers and selectors */
typedef struct {
    int16_t *buffer;
    uint8_t buf_ready;
    uint32_t buf_count;
    uint32_t n_samples;
} inference_t;
static inference_t inference;
static bool record_ready = false;
static signed short sampleBuffer[2048];
static bool debug_nn = false; // Set this to true to see e.g. features generated from the raw signal
void setup()
{
    // put your setup code here, to run once:
    Serial.begin(115200);
    pinMode(led, OUTPUT);
    Serial.println("Edge Impulse Inferencing Demo");
    // summary of inferencing settings (from model_metadata.h)
    ei_printf("Inferencing settings:\n");
    ei_printf("\tInterval: %.2f ms.\n", (float)EI_CLASSIFIER_INTERVAL_MS);
    ei_printf("\tFrame size: %d\n", EI_CLASSIFIER_DSP_INPUT_FRAME_SIZE);
    ei_printf("\tSample length: %d ms.\n", EI_CLASSIFIER_RAW_SAMPLE_COUNT / 16);
    ei_printf("\tNo. of classes: %d\n", sizeof(ei_classifier_inferencing_categories) / sizeof(ei_classifier_inferencing_categories[0]));
    if (microphone_inference_start(EI_CLASSIFIER_RAW_SAMPLE_COUNT) == false) {
        ei_printf("ERR: Failed to setup audio sampling\r\n");
        return;
    }
}
void loop()
{
    ei_printf("Starting inferencing in 2 seconds...\n");
    delay(2000);
    ei_printf("Recording...\n");
    bool m = microphone_inference_record();
    if (!m) {
        ei_printf("ERR: Failed to record audio...\n");
        return;
    }
    ei_printf("Recording done\n");
    signal_t signal;
    signal.total_length = EI_CLASSIFIER_RAW_SAMPLE_COUNT;
    signal.get_data = µphone_audio_signal_get_data;
    ei_impulse_result_t result = { 0 };
    EI_IMPULSE_ERROR r = run_classifier(&signal, &result, debug_nn);
    if (r != EI_IMPULSE_OK) {
        ei_printf("ERR: Failed to run classifier (%d)\n", r);
        return;
    }
    // print the predictions
    ei_printf("Predictions (DSP: %d ms., Classification: %d ms., Anomaly: %d ms.): \n",
        result.timing.dsp, result.timing.classification, result.timing.anomaly);
    for (size_t ix = 1; ix < EI_CLASSIFIER_LABEL_COUNT; ix++) {
    Serial.print( result.classification[ix].value);
    float Data = result.classification[ix].value;
    if (Data < 0.50){
    Serial.print("Cough Detected");
    alarm();
    }
    }
    //for (size_t ix = 0; ix < EI_CLASSIFIER_LABEL_COUNT; ix++) {
    // ei_printf("    %s: %.5f\n", result.classification[ix].label, result.classification[ix].value);
  // }
#if EI_CLASSIFIER_HAS_ANOMALY == 1
    ei_printf("    anomaly score: %.3f\n", result.anomaly);
#endif
}
void ei_printf(const char *format, ...) {
    static char print_buf[1024] = { 0 };
    va_list args;
    va_start(args, format);
    int r = vsnprintf(print_buf, sizeof(print_buf), format, args);
    va_end(args);
    if (r > 0) {
        Serial.write(print_buf);
    }
}
static void pdm_data_ready_inference_callback(void)
{
    int bytesAvailable = PDM.available();
    // read into the sample buffer
    int bytesRead = PDM.read((char *)&sampleBuffer[0], bytesAvailable);
    if (record_ready == true || inference.buf_ready == 1) {
        for(int i = 0; i < bytesRead>>1; i++) {
            inference.buffer[inference.buf_count++] = sampleBuffer[i];
            if(inference.buf_count >= inference.n_samples) {
                inference.buf_count = 0;
                inference.buf_ready = 1;
            }
        }
    }
}
static bool microphone_inference_start(uint32_t n_samples)
{
    inference.buffer = (int16_t *)malloc(n_samples * sizeof(int16_t));
    if(inference.buffer == NULL) {
        return false;
    }
    inference.buf_count  = 0;
    inference.n_samples  = n_samples;
    inference.buf_ready  = 0;
    // configure the data receive callback
    PDM.onReceive(&pdm_data_ready_inference_callback);
    // optionally set the gain, defaults to 20
    PDM.setGain(80);
    //ei_printf("Sector size: %d nblocks: %d\r\n", ei_nano_fs_get_block_size(), n_sample_blocks);
    PDM.setBufferSize(4096);
    // initialize PDM with:
    // - one channel (mono mode)
    // - a 16 kHz sample rate
    if (!PDM.begin(1, EI_CLASSIFIER_FREQUENCY)) {
        ei_printf("Failed to start PDM!");
    }
    record_ready = true;
    return true;
}
static bool microphone_inference_record(void)
{
    inference.buf_ready = 0;
    inference.buf_count = 0;
    while(inference.buf_ready == 0) {
        delay(10);
    }
    return true;
}
static int microphone_audio_signal_get_data(size_t offset, size_t length, float *out_ptr)
{
    arm_q15_to_float(&inference.buffer[offset], out_ptr, length);
    return 0;
}
static void microphone_inference_end(void)
{
    PDM.end();
    free(inference.buffer);
}
#if !defined(EI_CLASSIFIER_SENSOR) || EI_CLASSIFIER_SENSOR != EI_CLASSIFIER_SENSOR_MICROPHONE
#error "Invalid model for current sensor."
#endif
void alarm(){
  for (size_t t = 0; t < 4; t++) {
  digitalWrite(led, HIGH);
  delay(1000);
  digitalWrite(led, LOW);
  delay(1000);
//  digitalWrite(led, HIGH);
//  delay(1000);
//  digitalWrite(led, LOW);
  }
}Comments
Problem when compiling
Hi, first of all, thanks for your work on the project. I have a problem when compiling,
fork/exec C:\Users\Edzham\AppData\Local\Arduino15\packages\arduino\tools\arm-none-eabi-gcc\7-2017q4/bin/arm-none-eabi-g++.exe: The filename or extension is too long.
Error compiling for board Arduino Nano 33 BLE.
Any idea on how to solve this issue? I am so close to completing this project yet cannot compile on Arduino IDE. I already tried generating the Edge Impulse firmware specifically for Arduino Nano 33 BLE then running it via cmd and the Impulse works!
My only problem is now to run this using Arduino IDE as I want to add more sensors/LEDs to my project.
Hi Edzham Fitrey,
Hi Edzham Fitrey,
I need your help so urgently in this project coding by using Arduino nano 33 BLE. I am doing something new in this. Hope u be with me in this development of the project.
hi @LC 412 Nanda Kishore
hi @LC 412 Nanda Kishore
did you use spectogram for traind your model ?
Hi frinde,
Hi frinde,
did you solve the file name problem or not yet?
becuase I'm facing it & I want the solution
Thank you
Hi,
Hi,
I tried this project & but the serial monitor dosent work, I'm getting a warning that the microphone_inference_end () is defined but not used.
after uploding the code to the Arduino bord, the first recording start ( it printed recording ), then it doesn't do any thing, doesn't record, doesn't print and it just stay as it is.
I need your help please,
thank you
Thank you for sharing your
Thank you for sharing your project. But I have a problem like that
C:\Users\BEARLE~1\AppData\Local\Temp\arduino_modified_sketch_999303\nano_ble33_sense_microphone.ino: In function 'void loop()':
nano_ble33_sense_microphone:105:5: error: 'alarm' was not declared in this scope
alarm();
^~~~~
exit status 1
'alarm' was not declared in this scope
Could you tell me how to solve it and let me know what issues I have in this process.
Thank you
Tiis is bcz there is no
Tiis is bcz there is no function named 'alarm'. Copy the complete given code and try again.



I really loved this concept, but I don't have this board, can you tell me what are the modifications need to do for same code run in esp32. Which sound sensor need to integrate.