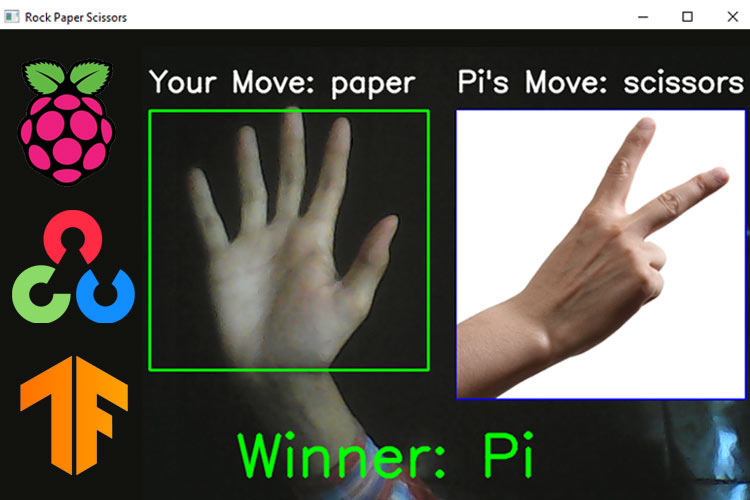
We all have played Rock, Paper, and Scissors game at least once. It’s a very simple game where each player picks one of the three objects (Rock, Paper, and Scissor) making the appropriate hand shape on a count of three, and these rules are applied to decide the winner:
- Paper beats Rock
- Scissors beat Paper
- Rock beats Scissors
So in today’s tutorial, we will learn how we can play Rock, Paper, and Scissors with Raspberry Pi using OpenCV and Tensorflow. This project consists of three phases:
- Data Gathering
- Training the model
- Gesture Detection
In the first phase, we will collect the images for Rock, Paper, Scissors, and nothing gesture. Nothing gesture is included so that Raspberry Pi doesn’t make unnecessary moves. This dataset consists of 800 images belonging to four classes. In the second phase, we will train the Recognizer for detecting the gestures made by the user, and in the last phase, we will use the trainer data to recognize the gesture made by the user. Upon recognizing the gesture from the user, Pi will make its move randomly and the winner will be declared after comparing both the gestures. We previously used Raspberry Pi for some complex image processing projects like facial landmark detection and Face recognition applications.
Components Required
- Raspberry Pi
- Pi Camera Module
Here, we only need RPi 4 and Pi camera module with OpenCV and Tensorflow installed on it. OpenCV is used here for digital image processing. The most common applications of Digital Image Processing are object detection, Face Recognition, and people counter.
Installing OpenCV
Before installing the OpenCV and other dependencies, the Raspberry Pi needs to be fully updated. Use the commands given below to update the Raspberry Pi to its latest version:
sudo apt-get update
Then use the following commands to install the required dependencies for installing OpenCV on your Raspberry Pi.
sudo apt-get install libhdf5-dev -y
sudo apt-get install libhdf5-serial-dev –y
sudo apt-get install libatlas-base-dev –y
sudo apt-get install libjasper-dev -y
sudo apt-get install libqtgui4 –y
sudo apt-get install libqt4-test –y
After that, use the below command to install the OpenCV on your Raspberry Pi.
pip3 install opencv-contrib-python==4.1.0.25
Installing imutils: imutils is used to make essential image processing functions such as translation, rotation, resizing, skeletonization, and displaying Matplotlib images easier with OpenCV. Use the below command to install the imutils:
pip3 install imutils
Installing Tensorflow: Use the below commands to install Tensorflow
sudo pip3 install https://github.com/lhelontra/tensorflow-on-arm/releases/download/v2.2.0/tensorflow-2.2.0-cp37-none-linux_armv7l.whl
sklearn (Scikit-learn): It is a python library that provides a range of supervised and unsupervised learning algorithms via a consistent interface in Python. Here we are going to use it for building a machine learning model that can recognize hand gestures. Use the below command to Install sklearn to Raspberry Pi.
pip3 install sklearn
SqueezeNet: It is a deep neural network model for computer vision. SqueezeNet is a smaller neural network model that is implemented on top of the Caffe deep learning framework. Here, we used SqueezeNet because of its small size and accuracy. This model is more feasible to deploy on hardware with limited memory. Install keras_squeezenet using the below command:
pip3 install keras_squeezenet
Programming Raspberry Pi for Face Mask Detection
As mentioned earlier, we are going to complete this project in three-phase. The first phase is data gathering; the second is training the Recognizer, and the third is recognizing the gesture made by the user. The project directory contains:
- Dataset: This folder contains the images for Rock, Paper, Scissors, and nothing gesture images.
- image.py: It is a simple python script to collect the images to build the dataset.
- training.py: It accepts the input dataset and fine-tunes Squeezenet upon it to create our gesture detection model (game-model.h5).
- game.py: This Rock Paper and scissors python script uses the trainer data to recognize gestures made by the user and allow Raspberry to make its move randomly.
The Complete project directory can be downloaded from here.
1. Data Gathering
In the first phase of the project, we are going to create a Dataset that has 200 images for each class (Rock, Paper, Scissors, and nothing). Image.py is a simple python script that uses OpenCV to collect images of the gestures. Open up the image.py file in the Game directory, and paste the given code. Then start collecting the images using the below command:
python3 image.py 200
Where 200 is the number of the images that will be captured. Once you launch the script press the ‘r’ key to capture the images for the Rock gesture and then press ‘a’ to start the process. You have to press ‘p’ for paper, ‘s’ for scissors, and ‘n’ for nothing.
The image Gathering program is explained below:
The image.py script starts with importing the required packages.
import cv2
import os
import sys
The next line of the code accepts the system argument. It is used to enter the number of samples that we want to collect.
num_samples = int(sys.argv[1])
Then enter the path of the data where all these images will be saved.
IMG_SAVE_PATH = 'images'
The below lines create the image directory folder.
try:
    os.mkdir(IMG_SAVE_PATH)
except FileExistsError:
    pass
Then create a rectangle using cv2.rectangle function. When the script launches you would need to place your hands inside this rectangle box.
cv2.rectangle(frame, (10, 30), (310, 330), (0, 255, 0), 2)
Then in the next lines detect the key presses. If the pressed key is ‘r’ then set the label name as ‘rock’ and create a folder named rock inside the image directory. If the pressed key is ‘p’ then set the label name as paper and so on.
k = cv2.waitKey (1)
    if k == ord('r'):
            name = 'rock'
            IMG_CLASS_PATH = os.path.join(IMG_SAVE_PATH, name)
            os.mkdir(IMG_CLASS_PATH)
    if k == ord('p'):
            name = 'paper'
            IMG_CLASS_PATH = os.path.join(IMG_SAVE_PATH, name)
            os.mkdir(IMG_CLASS_PATH)
    if k == ord('s'):
            name = 'scissors'
            IMG_CLASS_PATH = os.path.join(IMG_SAVE_PATH, name)
            os.mkdir(IMG_CLASS_PATH)
    if k == ord('n'):
            name = 'nothing'
            IMG_CLASS_PATH = os.path.join(IMG_SAVE_PATH, name)
            os.mkdir(IMG_CLASS_PATH)
If the start button is pressed, then create a Region of Interest (ROI) around the rectangle that we created earlier and save all the images inside the directory using the path that entered earlier.
roi = frame[25:335, 8:315]
        save_path = os.path.join(IMG_CLASS_PATH, '{}.jpg'.format(counter + 1))
        print(save_path)
        cv2.imwrite(save_path, roi)
        counter += 1
    font = cv2.FONT_HERSHEY_SIMPLEX
    cv2.putText(frame,"Collecting {}".format(counter),
            (10, 20), font, 0.7, (0, 255, 255), 2, cv2.LINE_AA)
    cv2.imshow("Collecting images", frame)
2. Training the Model
Now that we have collected images, we can pass them on to the neural network and start the training process to automatically detect the gesture made by the user. So open up the training.py file in the Game directory, and paste the given code. Then start the training process using the below command:
python3 training.py
Python script for training the Recognizer is explained below:
The training.py script starts with importing the required packages. The next lines after importing the packages are used to define the path to the image directory and the class map.
IMG_SAVE_PATH = 'images'
CLASS_MAP = {
    "rock": 0,
    "paper": 1,
    "scissors": 2,
    "nothing": 3
}
Now in the next lines construct the head of the model that will be placed on top of the base model. The AveragePooling2D layer calculates the average output of each feature map in the previous layer. To prevent over-feeding, we have a 50% dropout rate.
def get_model():
    model = Sequential([
        SqueezeNet(input_shape=(227, 227, 3), include_top=False),
        Dropout(0.5),
        Convolution2D(NUM_CLASSES, (1, 1), padding='valid'),
        Activation('relu'),
        GlobalAveragePooling2D(),
        Activation('softmax')
    ])
Now, Loop over the image directory and load all the images to python script so that we can begin the training. Pre-processing steps include converting the images to RGB from BGR, resizing the images to 227×227 pixels, converting them to array format.
for directory in os.listdir(IMG_SAVE_PATH):
    path = os.path.join(IMG_SAVE_PATH, directory)
    if not os.path.isdir(path):
        continue
    for item in os.listdir(path):
        if item.startswith("."):
            continue
        img = cv2.imread(os.path.join(path, item))
        img = cv2.cvtColor(img, cv2.COLOR_BGR2RGB)
        img = cv2.resize(img, (227, 227))
        dataset.append([img, directory])
Now, we will call the get model function and compile the model with the Adam optimizer.
model = get_model()
model.compile(
    optimizer=Adam(lr=0.0001),
    loss='categorical_crossentropy',
    metrics=['accuracy']
)
After this, start training the model and once training is finished save the model as “game-model.h5”.
model.fit(np.array(data), np.array(labels), epochs=15)
model.save("game-model.h5")
3. Hand Gesture Recognition
Now, in the final step of our project, we will use the trainer data to classify each gesture from the live video feed. So open up the game.py file in the Game directory, and paste the given code. The python script is explained below:
Same as the training.py script this script also starts with importing the required packages. The next lines after importing the packages are used to create a reverse class-map function.
REV_CLASS_MAP = {
    0: "rock",
    1: "paper",
    2: "scissors",
    3: "nothing"
}
The calculate_winner function takes user’s move and Pi’s move as input and then decides the winner out of it. It uses Rock, Paper, and Scissors game rules to decide the winner.
def calculate_winner(user_move, Pi_move):
    if user_move == Pi_move:
        return "Tie"
    elif user_move == "rock" and Pi_move == "scissors":
        return "You"
    elif user_move == "rock" and Pi_move == "paper":
        return "Pi"
    elif user_move == "scissors" and Pi_move == "rock":
        return "Pi"
    elif user_move == "scissors" and Pi_move == "paper":
        return "You"
    elif user_move == "paper" and Pi_move == "rock":
        return "You"
    elif user_move == "paper" and Pi_move == "scissors":
        return "Pi"
Then in the next line load the trained model and start the video stream
model = load_model("game-model.h5")
cap = cv2.VideoCapture(0)
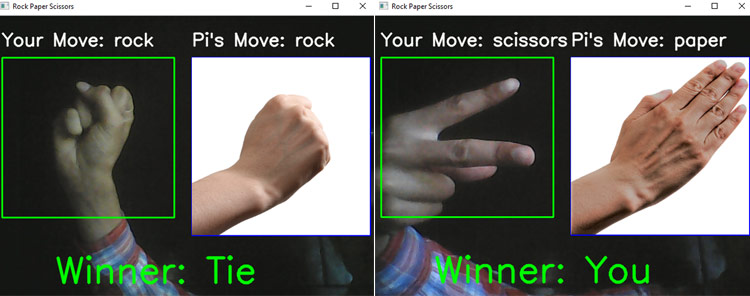
Inside the loop, create two rectangles on the left and right sides of the frame. The left side rectangle is for the user’s move and the right side rectangle is for Pi’s move. After that extract, the region of the image within the user rectangle converts it to RGB format and resizes it to 227×227.
    cv2.rectangle(frame, (10, 70), (300, 340), (0, 255, 0), 2)
    cv2.rectangle(frame, (330, 70), (630, 370), (255, 0, 0), 2)
    roi = frame[70:300, 10:340]
    img = cv2.cvtColor(roi, cv2.COLOR_BGR2RGB)
    img = cv2.resize(img, (227, 227))
Now, use the model that we trained earlier and predict the gesture. Compare the predicted code with the class map and get the user move name.
pred = model.predict(np.array([img]))
move_code = np.argmax(pred[0])
user_move_name = mapper(move_code)
In the next line check if users move is nothing or not. If not then allow Raspberry Pi to make its own random move and then use calculate_winner function to decide the winner. If the user move is ‘nothing’ then wait for the user to make a move.
if prev_move != user_move_name:
        if user_move_name != "nothing":
            computer_move_name = choice(['rock', 'paper', 'scissors'])
            winner = calculate_winner(user_move_name, computer_move_name)
        else:
            computer_move_name = "nothing"
            winner = "Waiting..."
    prev_move = user_move_name
In these lines, we have used cv2.putText function to display Users move, Pi’s move, and the winner on the frame.
font = cv2.FONT_HERSHEY_SIMPLEX
    cv2.putText(frame, "Your Move: " + user_move_name,
                (10, 50), font, 1, (255, 255, 255), 2, cv2.LINE_AA)
    cv2.putText(frame, "Pi's Move: " + computer_move_name,
                (330, 50), font, 1, (255, 255, 255), 2, cv2.LINE_AA)
    cv2.putText(frame, "Winner: " + winner,
                (100, 450), font, 2, (0, 255, 0), 4, cv2.LINE_AA)
Now, we will display the Pi’s move inside the rectangle that we created earlier. Pi will randomly choose an image stored in the ‘test_img’ directory.
if computer_move_name != "nothing":
        icon = cv2.imread(
            "test_img/{}.png".format(computer_move_name))
        icon = cv2.resize(icon, (300, 300))
        frame[70:370, 330:630] = icon
Testing the Rock Paper and Scissors Game
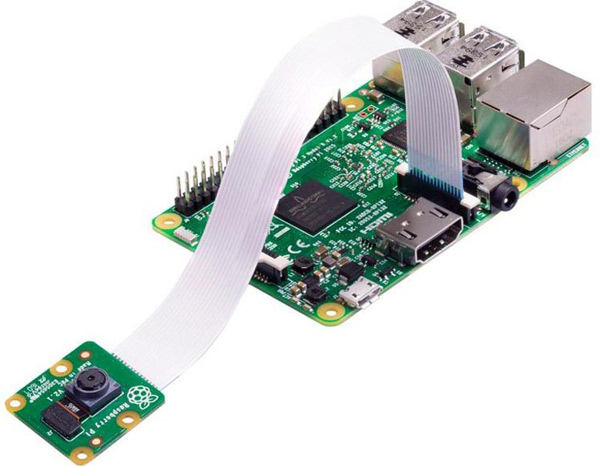
Now, that everything is ready, connect Raspberry Pi Camera module with Pi as shown below:
Then launch the game.py script. After a few seconds, you should see your camera view pop-up window with two rectangles. The left rectangle is for the user's move and the right is for Pi’s move. So, adjust your hand inside the rectangle and make a move. Upon detecting the gesture, Raspberry Pi will also make a move and the winner will be decided after comparing both the moves.

This is how you can play Rock Paper and Scissors using OpenCV and python. A working video can be found at the end of the page.
Complete Project Code
from keras.models import load_model
import cv2
import numpy as np
from random import choice
REV_CLASS_MAP = {
    0: "rock",
    1: "paper",
    2: "scissors",
    3: "nothing"
}
def mapper(val):
    return REV_CLASS_MAP[val]
def calculate_winner(user_move, Pi_move):
    if user_move == Pi_move:
        return "Tie"
    elif user_move == "rock" and Pi_move == "scissors":
        return "You"
    elif user_move == "rock" and Pi_move == "paper":
        return "Pi"
    elif user_move == "scissors" and Pi_move == "rock":
        return "Pi"
    elif user_move == "scissors" and Pi_move == "paper":
        return "You"
    elif user_move == "paper" and Pi_move == "rock":
        return "You"
    elif user_move == "paper" and Pi_move == "scissors":
        return "Pi"
model = load_model("game-model.h5")
cap = cv2.VideoCapture(0)
prev_move = None
while True:
    ret, frame = cap.read()
    if not ret:
        continue
    cv2.rectangle(frame, (10, 70), (300, 340), (0, 255, 0), 2)
    cv2.rectangle(frame, (330, 70), (630, 370), (255, 0, 0), 2)
    # extract the region of image within the user rectangle
    roi = frame[70:300, 10:340]
    img = cv2.cvtColor(roi, cv2.COLOR_BGR2RGB)
    img = cv2.resize(img, (227, 227))
    # predict the move made
    pred = model.predict(np.array([img]))
    move_code = np.argmax(pred[0])
    user_move_name = mapper(move_code)
    # predict the winner (human vs computer)
    if prev_move != user_move_name:
        if user_move_name != "nothing":
            computer_move_name = choice(['rock', 'paper', 'scissors'])
            winner = calculate_winner(user_move_name, computer_move_name)
        else:
            computer_move_name = "nothing"
            winner = "Waiting..."
    prev_move = user_move_name
    # display the information
    font = cv2.FONT_HERSHEY_SIMPLEX
    cv2.putText(frame, "Your Move: " + user_move_name,
                (10, 50), font, 1, (255, 255, 255), 2, cv2.LINE_AA)
    cv2.putText(frame, "Pi's Move: " + computer_move_name,
                (330, 50), font, 1, (255, 255, 255), 2, cv2.LINE_AA)
    cv2.putText(frame, "Winner: " + winner,
                (100, 450), font, 2, (0, 255, 0), 4, cv2.LINE_AA)
    if computer_move_name != "nothing":
        icon = cv2.imread(
            "test_img/{}.png".format(computer_move_name))
        icon = cv2.resize(icon, (300, 300))
        frame[70:370, 330:630] = icon
    cv2.imshow("Rock Paper Scissors", frame)
    k = cv2.waitKey(10)
    if k == ord('q'):
        break
cap.release()
cv2.destroyAllWindows()
import cv2
import os
import sys
cam = cv2.VideoCapture(0)
start = False
counter = 0
num_samples = int(sys.argv[1])
IMG_SAVE_PATH = 'images'
try:
    os.mkdir(IMG_SAVE_PATH)
except FileExistsError:
    pass
while True:
    ret, frame = cam.read()
    if not ret:
        print("failed to grab frame")
        break
    if counter == num_samples:
       break
    cv2.rectangle(frame, (10, 30), (310, 330), (0, 255, 0), 2)
    k = cv2.waitKey(1)
    if k == ord('r'):
            name = 'rock'
            IMG_CLASS_PATH = os.path.join(IMG_SAVE_PATH, name)
            os.mkdir(IMG_CLASS_PATH)
    if k == ord('p'):
            name = 'paper'
            IMG_CLASS_PATH = os.path.join(IMG_SAVE_PATH, name)
            os.mkdir(IMG_CLASS_PATH)
    if k == ord('s'):
            name = 'scissors'
            IMG_CLASS_PATH = os.path.join(IMG_SAVE_PATH, name)
            os.mkdir(IMG_CLASS_PATH)
    if k == ord('n'):
            name = 'nothing'
            IMG_CLASS_PATH = os.path.join(IMG_SAVE_PATH, name)
            os.mkdir(IMG_CLASS_PATH)
    if start:
        roi = frame[25:335, 8:315]
        save_path = os.path.join(IMG_CLASS_PATH, '{}.jpg'.format(counter + 1))
        print(save_path)
        cv2.imwrite(save_path, roi)
        counter += 1
    font = cv2.FONT_HERSHEY_SIMPLEX
    cv2.putText(frame,"Collecting {}".format(counter),
            (10, 20), font, 0.7, (0, 255, 255), 2, cv2.LINE_AA)
    cv2.imshow("Collecting images", frame)
    if k == ord('a'):
        start = not start
    if k == ord('q'):
            break
print("\n{} image(s) saved to {}".format(counter, IMG_CLASS_PATH))
cam.release()
cv2.destroyAllWindows()
import cv2
import numpy as np
from keras_squeezenet import SqueezeNet
from keras.optimizers import Adam
from keras.utils import np_utils
from keras.layers import Activation, Dropout, Convolution2D, GlobalAveragePooling2D
from keras.models import Sequential
import tensorflow as tf
import os
IMG_SAVE_PATH = 'images'
CLASS_MAP = {
    "rock": 0,
    "paper": 1,
    "scissors": 2,
    "nothing": 3
}
NUM_CLASSES = len(CLASS_MAP)
def mapper(val):
    return CLASS_MAP[val]
def get_model():
    model = Sequential([
        SqueezeNet(input_shape=(227, 227, 3), include_top=False),
        Dropout(0.5),
        Convolution2D(NUM_CLASSES, (1, 1), padding='valid'),
        Activation('relu'),
        GlobalAveragePooling2D(),
        Activation('softmax')
    ])
    return model
# load images from the directory
dataset = []
for directory in os.listdir(IMG_SAVE_PATH):
    path = os.path.join(IMG_SAVE_PATH, directory)
    if not os.path.isdir(path):
        continue
    for item in os.listdir(path):
        # to make sure no hidden files get in our way
        if item.startswith("."):
            continue
        img = cv2.imread(os.path.join(path, item))
        img = cv2.cvtColor(img, cv2.COLOR_BGR2RGB)
        img = cv2.resize(img, (227, 227))
        dataset.append([img, directory])
data, labels = zip(*dataset)
labels = list(map(mapper, labels))
# one hot encode the labels
labels = np_utils.to_categorical(labels)
# define the model
model = get_model()
model.compile(
    optimizer=Adam(lr=0.0001),
    loss='categorical_crossentropy',
    metrics=['accuracy']
)
# start training
model.fit(np.array(data), np.array(labels), epochs=15)
# save the model for later use
model.save("game-model.h5")


