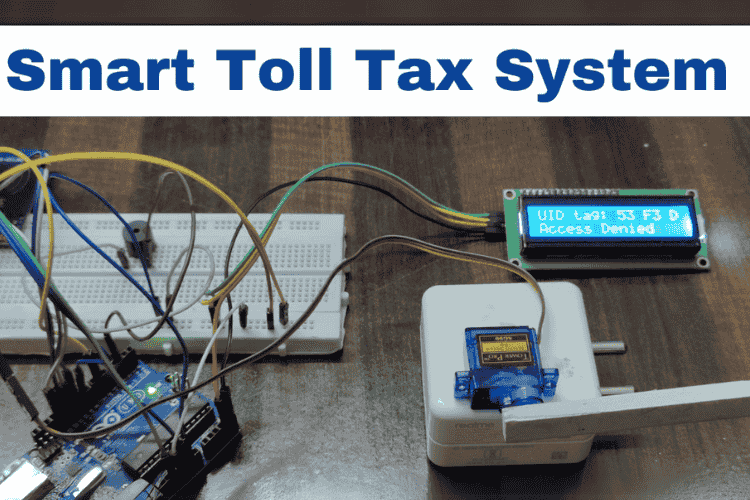
In this project, Smart Toll Tax System using RFID and Arduino, we aim to create a contactless, automated toll collection system using RFID technology. Toll booths often cause delays, especially during peak hours, and manual toll collection can result in human errors. This system automates the process of opening and closing the toll barrier based on whether a valid RFID card is presented. If the RFID card is authorized, the toll gate opens, and if the card is unauthorized or missing, the gate remains closed. A 16X2 LCD display is used to provide a clear indication of the access status, showing messages like "Access Granted" or "Access Denied." This not only speeds up toll collection but also ensures that only authorized vehicles can pass through.
This Arduino project can be used in highways, parking lots, and even private communities where access control is needed. It ensures that vehicles pass through efficiently, saving time for drivers and reducing the workload on toll operators. Additionally, this system could be integrated with a database to keep track of vehicles passing through the toll for future billing or monitoring purposes. If you wan to use a different microcontroller other than Arduino you can also check out our RFID-based Toll collection System using PIC microcontroller and the AI-based smart parking system project.
Components Required
Here is a list of all the components you will need to build this project:
Arduino Uno
RFID Reader (RC522)
RFID Cards/Tags
Servo Motor (for opening/closing the toll)
Jumper Wires
Breadboard
Power Supply
16x2 I2c LCD Display
Buzzer
To see the full demonstration video, click on the YouTube Video below
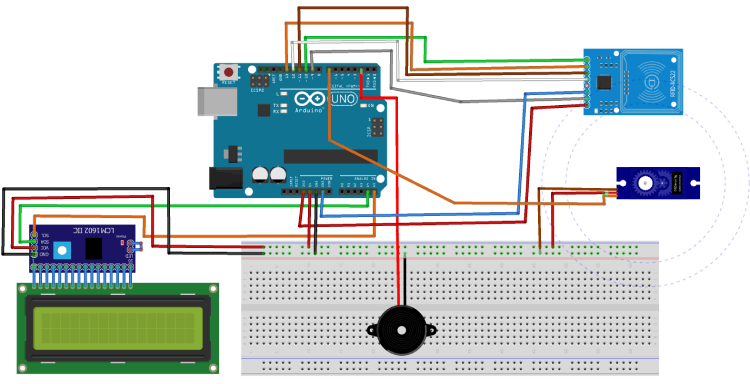
Circuit Diagram to Build a Smart Toll System Using Arduino:
Circuit Explanation
1. RFID Reader Connections:
The RFID reader communicates with the Arduino via SPI protocol. The following connections should be made:
SDA to pin 10
SCK to pin 13
MOSI to pin 11
MISO to pin 12
GND to ground
3.3V to 3.3V pin of Arduino
If you want to learn more about RFID readers, how they work and how to use one you can check out our tutorial on how to interface RFID reader with Arduino.
2.16x2 LCD Display Connections:
The LCD display communicates with the Arduino using I2C protocol. You will need to connect:
SCL to pin A5
SDA to pin A4
VCC to 5V pin
GND to ground
3.Servo Motor Connections:
The control pin of the servo motor connects to a digital pin (D7)on the Arduino and the servo also requires power (5V) and ground connections. If you are a complete beginner with servo motor please check out our Arduino servo motor tutorial to learn more about servo motors and how to use them with Arduino.
4.Buzzer
+ of buzzer is connected the Pin D2 of Arduino uno and the other side of buzzer is connected to the GND
Building
After completing the circuit, I assembled the components for the hardware setup.
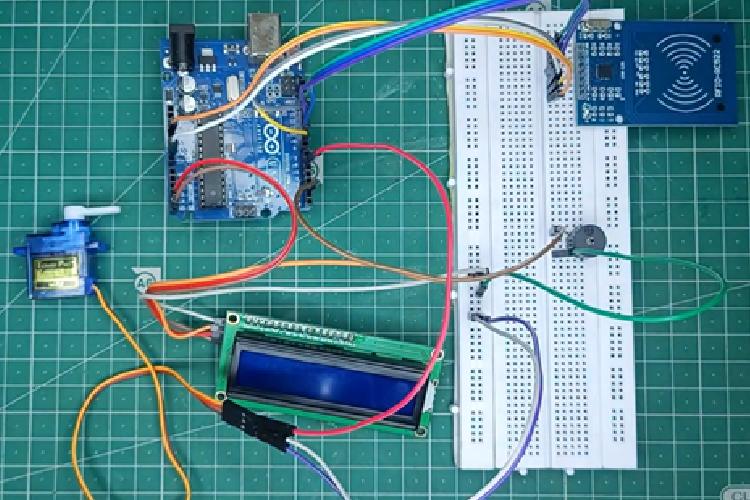
First, I fixed the RFID reader in a convenient position where the RFID card can be easily scanned. Next, I attached the display in a visible spot for clear status indications, like "Access Granted" or "Access Denied." The servo motor was mounted on the toll barrier so that it could open and close based on the card validation.
The setup also included a power source for the Arduino and connected components. During the building process, I ensured the servo motor was powerful enough to handle the gate’s movement smoothly.
Code explanation for reading UID of the RFID Card Using Arduino UNO:
Reading the RFID Card's UID
You can read the UID of the RFID card using the MFRC522 library. The UID is a unique identifier stored on each RFID card/tag. This code snippet will help you read and display the UID so that you can add it to your list of valid cards.
Code :
Libraries and Initialization:
#include <SPI.h>
#include <MFRC522.h>
The code uses the SPI library for SPI communication and the MFRC522 library specifically for the RFID module. SS_PIN and RST_PIN are defined for the RFID module's Slave Select and Reset pins, and the mfrc522 object is created to handle RFID functions.
Setup Function:
void setup() {
 Serial.begin(9600);
 SPI.begin();
 mfrc522.PCD_Init();
 Serial.println("Approximate your card to the reader...");
}
In setup(), the code initializes the serial communication and starts SPI. It then calls PCD_Init() to initialize the RFID module. The message prompts the user to bring the RFID tag close to the reader.
Main Loop – Card Detection:
if (!mfrc522.PICC_IsNewCardPresent()) {
 return;
}
In the loop() function, the code first checks for the presence of a new card with PICC_IsNewCardPresent(). If no card is present, it immediately returns to avoid further processing.
Card Selection and UID Retrieval:
if (!mfrc522.PICC_ReadCardSerial()) {
 return;
}
Once a card is detected, PICC_ReadCardSerial() attempts to select the card and read its unique identifier (UID). If the read operation fails, the function returns.
Display and Process UID:
String content = "";
for (byte i = 0; i < mfrc522.uid.size; i++) {
 Serial.print(mfrc522.uid.uidByte[i] < 0x10 ? " 0" : " ");
 Serial.print(mfrc522.uid.uidByte[i], HEX);
 content.concat(String(mfrc522.uid.uidByte[i] < 0x10 ? " 0" : " "));
 content.concat(String(mfrc522.uid.uidByte[i], HEX));
}
In this part, the code converts the UID to a string content and prints it to the Serial Monitor. It iterates through each byte of the UID, appending it to content in hexadecimal format. This UID uniquely identifies the card.
Access Control Logic:
if (content.substring(1) == "BD 31 15 2B") {
 Serial.println("Authorized access");
 delay(3000);
} else {
 Serial.println("Access denied");
 delay(3000);
}
The code checks if the card's UID matches a pre-specified value (BD 31 15 2B). If it matches, it prints "Authorized access"; otherwise, it prints "Access denied." This is where you can modify the UID for specific cards you want to grant access to. The delay(3000) pauses for 3 seconds before continuing.
Code Explanation for Arduino Smart Toll System
The programming logic involves reading the RFID card, verifying it against a list of authorized IDs, controlling the servo motor, and updating the LCD display with the access status.
Libraries and Pin Definitions:
#include <Wire.h>
#include <LiquidCrystal_I2C.h>
#include <SPI.h>
#include <MFRC522.h>
#include <Servo.h>
#define SS_PIN 10
#define RST_PIN 9
#define BUZZER 2 // Buzzer pin
Libraries: Wire and LiquidCrystal_I2C for the LCD, SPI and MFRC522 for the RFID module, and Servo for servo motor control.
Pins: Define RFID pins and a pin for the buzzer.
Object Initialization:
MFRC522 mfrc522(SS_PIN, RST_PIN); // RFID instance
Servo myServo; // Servo instance
LiquidCrystal_I2C lcd(0x27, 16, 2); // LCD instance with I2C address 0x27
The MFRC522 object (mfrc522) controls the RFID reader.
myServo is the servo instance.
The lcd object represents the I2C LCD display.
Setup Function:
void setup() {
 Serial.begin(9600);
 SPI.begin();
 mfrc522.PCD_Init();
 myServo.attach(6);
 myServo.write(0);
 pinMode(BUZZER, OUTPUT);
 noTone(BUZZER);
 lcd.init();
 lcd.clear();
 lcd.backlight();
 lcd.setCursor(0, 0);
 lcd.print("  Put card on   ");
 lcd.setCursor(0, 1);
 lcd.print("     reader     ");
}- Serial & RFID Initialization: Starts serial communication and initializes the RFID reader.
- Servo & Buzzer: Attaches the servo to pin 6, sets the start position to 0°, and sets up the buzzer.
- LCD Setup: Initializes and clears the LCD, enabling the backlight, and displays the initial message.
Main Loop:
if (!mfrc522.PICC_IsNewCardPresent()) {
 return;
}
if (!mfrc522.PICC_ReadCardSerial()) {
 return;
}
Card Detection: The code checks for a new card. If no card is detected, it returns to avoid further processing.
Read Card UID: If a card is detected, it attempts to read its UID.
lcd.clear();
lcd.setCursor(0, 0);
lcd.print("UID tag:");
String content = "";
for (byte i = 0; i < mfrc522.uid.size; i++) {
 lcd.print(mfrc522.uid.uidByte[i] < 0x10 ? " 0" : " ");
 lcd.print(mfrc522.uid.uidByte[i], HEX);
 content.concat(String(mfrc522.uid.uidByte[i] < 0x10 ? " 0" : " "));
 content.concat(String(mfrc522.uid.uidByte[i], HEX));
}
content.toUpperCase();
Display UID: Clears the LCD, displays "UID tag:", and then prints each byte of the UID in hexadecimal format.
Store UID: The UID bytes are stored in the content string for access comparison.
Access Control Logic:
cd.setCursor(0, 1);
if (content.substring(1) == "53 37 5A E4") { // Replace with your card's UID
 lcd.print("Access Granted");
 tone(BUZZER, 500);
 delay(300);
 noTone(BUZZER);
 myServo.write(90);  // Open the servo
 delay(5000);        // Keep it open for 5 seconds
 myServo.write(0);   // Close the servo
} else {
 lcd.print("Access Denied");
 tone(BUZZER, 300);
 delay(2000);
 noTone(BUZZER);
}
delay(2000);
UID Comparison: Checks if the UID matches a predefined authorized UID. If it does, access is granted; otherwise, access is denied.
Access Granted:
- Displays "Access Granted" on the LCD.
- Sounds a short buzzer tone.
- Moves the servo to 90° (open position) for 5 seconds, then returns it to 0° (closed position).
Access Denied:
- Displays "Access Denied" on the LCD.
- Sounds a longer buzzer tone.
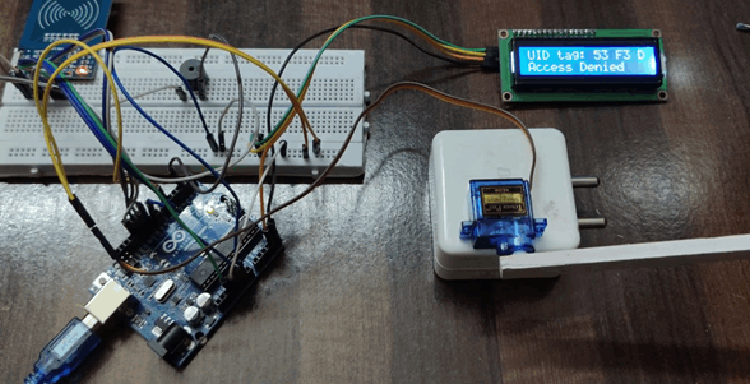
Working of Smart Toll Tax System Using Arduino Uno
Once the hardware and code are in place, it's time to test the Smart Toll Tax System. Here's how the system works:
1. Present an RFID Card: When you bring an RFID card near the reader, it scans the card and compares it to the list of authorized cards.
2. Valid Card: If the card is valid, the servo motor rotates to open the toll gate. The LCD display shows the message "Access Granted," and after 5 seconds, the gate closes automatically.
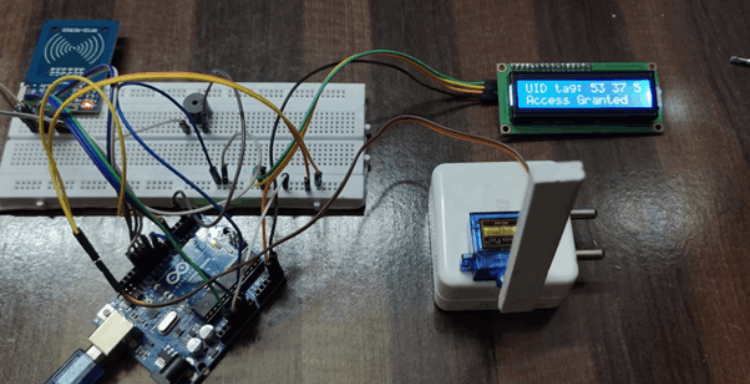
3. Invalid Card: If the card is invalid or not recognized, the gate remains closed, and the displays "Access Denied."
Future Improvements
To further improve this project, you could:
1.Add a Database: Integrate a database to log each vehicle's toll passage, allowing for tracking and billing.
2.Enhance Security: You could add an IP camera to monitor vehicles and capture their number plates in case of unauthorized access attempts.
3.Mobile App Integration: Add a mobile app to let users monitor their toll usage, check balances, and make payments.
For all the code, follow the GitHub link below:
Complete Project Code
#include <SPI.h>
#include <MFRC522.h>
#define SS_PIN 10
#define RST_PIN 9
MFRC522 mfrc522(SS_PIN, RST_PIN);
void setup()
{
 Serial.begin(9600);
 SPI.begin();
 mfrc522.PCD_Init();
 Serial.println("Approximate your card to the reader...");
 Serial.println();
}
void loop()
{
 // Look for new cards
 if ( ! mfrc522.PICC_IsNewCardPresent())
 {
   return;
 }
 // Select one of the cards
 if ( ! mfrc522.PICC_ReadCardSerial())
 {
   return;
 }
 //Show UID on serial monitor
 Serial.print("UID tag :");
 String content= "";
 byte letter;
 for (byte i = 0; i < mfrc522.uid.size; i++)
 {
    Serial.print(mfrc522.uid.uidByte[i] < 0x10 ? " 0" : " ");
    Serial.print(mfrc522.uid.uidByte[i], HEX);
    content.concat(String(mfrc522.uid.uidByte[i] < 0x10 ? " 0" : " "));
    content.concat(String(mfrc522.uid.uidByte[i], HEX));
 }
 Serial.println();
 Serial.print("Message : ");
 content.toUpperCase();
 if (content.substring(1) == "BD 31 15 2B") //change here the UID of the card/cards that you want to give access
 {
   Serial.println("Authorized access");
   Serial.println();
   delay(3000);
 }
else   {
   Serial.println(" Access denied");
   delay(3000);
 }
}


